 Foy's Division Joins the Assault
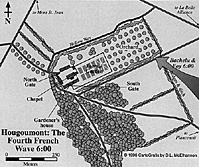
The buildings were attacked again, probably with much less elan than before. The well defended garden walls were apparently too tough to break through, but entrance into the orchard was easier. By now there was a large gap in the hedge, and Jerome's men surged in once more. Foy had seen that the defenders could also be outflanked by going down the chateau's east side. Saltoun's light companies and the Germans were pushed back tree by tree, until they were back in the hollow way.
Large Version of 3rd Assault Map (very slow download: 120K)
The French attempt to run down the east side of the orchard was visible from the ridge above, and it was pointed out to the Prince of Orange, who commanded one of Wellington's two infantry corps. He coolly remarked: "No, don't stir, the Duke is sure to see that movement, and will take steps to counteract it." Two companies of the Scots Guards were soon seen advancing down the eastern hedge of the orchard to stop the French.
Meanwhile the French in the orchard found that defenders of the garden were able to maintain a dangerous fire from that side. Their impetus spent, and both flanks threatened, the French were unable to stand up to Saltoun's counterattack and were thrown out of the orchard again. Still, Foy's attack was described as "most desperate."
Foy had been seriously wounded and carried from the field. Jerome had been hit in the arm, and also had to be carried off. They bore him to the Emperor; perhaps it rattled Napoleon to see his brother so disposed.
Howitzers Set Fire to the Chateau
Jerome's and Foy's attacks were finished, General d'Erlon's 1st Corps had likewise been repulsed on the east side of the battlefield, and Marshal Ney was about to begin his famous cavalry charges in the center. French maneuvers were much inconvenienced by the narrow front available between La Haye Sainte and Hougoumont.
Many wounded died in the flames
as the officers held the Guardsmen
to the defense of the
still threatened chateau rather than
let them go off on rescue missions.
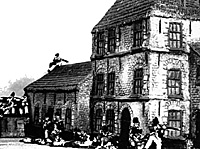
Bull's howitzers have already been praised for the effectiveness of their fire. Finally the French thought to return the favor. If Jerome and Reille were too busy, Napoleon himself could see that howitzers would be effective against the strong chateau buildings. He ordered howitzers to be gathered from various batteries, and soon howitzer shells set Hougoumont on fire. It was probably about 2:45 P.M., a short time before Ney's impetuous massed cavalry attack. The burning chateau formed, in the words of Colonel Frazier (commander of the RHA) "a striking feature in this murderous scene".
Inside the chateau the flames caused havoc. The defenders held on to their posts to the last moment, and then shifted to find other vantage points free of the flames. Many wounded died in the flames as the officers held the Guardsmen to the defense of the still threatened chateau rather than to let them go off on rescue missions.
Exceptions
However, there were exceptions. One of the men who helped Macdonell to close the gate was Sergeant Graham of the Coldstreams. Later in the day, while stationed along the garden wall facing the wood, and at one of the heated moments of the battle, he asked Macdonell's permission to fall out. Macdonell expressed surprise at such a request at such a time. Graham explained that his brother lay wounded in one of the burning buildings. Given permission, Graham retrieved his brother, took him to a safer place, and returned to his post. The Guards still pride themselves at being very formal in stressful times.
After a long day repelling numerous assaults, the defenders were getting tired. The French continued to keep up the pressure. Most of General Byng's brigade of Guards was committed to Hougoumont's defense. All but two companies of the Coldstream Guards were now defending the buildings and garden. The last two companies were on the slopes above, guarding the colors. Colonel Hepburn led the remainder of the Scots Guards to defend the orchard. Saltoun's weary light infantryman were able to rejoin the rest of the 1st Guards on the ridge above.
Despite the casualties, confusion and disorder caused by several failed attacks, the French once again forced their way into the orchard. But with converging fire from the garden wall and hollow way, it was still a killing ground and the attackers faltered. Colonel Hepburn led the Scots Guards forward in a sudden and vigorous rush. The retreating French suffered severely as they were forced to bunch at the gap in the fence as they retired. The Scots Guards then established themselves along the southern hedge of the orchard. The French attacks were becoming weaker and weaker as their morale disintegrated with each failed assault.
Hougoumont Consumes the French 2nd Corps
Reille had clearly lost control of the 2nd Corps, as his third division, Bachelu's, got pulled into the fruitless attacks on Hougoumont. Bachelu may have been trying to attack the British center in support of Ney's cavalry, but whether by British fire or by the attraction of the burning chateau, some of his troops were deflected west. As his columns turned they were raked by Cleeve's battery, KGL. His division fell back in confusion, a testament to what a single battery could do under optimal conditions.
 At about 3:30, Bachelu led a second attack through the orchard with some of his reformed division, but this had no better luck than the attacks by Jerome and Foy before as the British were stronger now. It was this sustained pressure that kept the Guards at their posts as the buildings burned around them.
Du Plat's KGL brigade was severely harassed by French skirmishers infiltrating up the ridge, using the smoke and confusion of Hougoumont as cover. To counter this du Plat sent down his light companies, and then the 2nd Line Battalion, KGL. After fighting since late morning, the Nassauers may have finally been relieved at this point, but this is not clear.
The Brunswick Avant-Garde Battalion was also committed, but exactly where and how successfully is hard to determine from current sources. While the rest of the Brunswick contingent fought bravely in the center, the Avant-Garde may have been weakened by its efforts at Quatre Bras and dispersed somewhat. To the east of Hougoumont, Captain Ross of the British 51st recorded: "There were some straggling Brunswickers, who joined our ranks at this place, and a few of their old soldiers remained during the day with my company, as they recollected me when serving with them in the 7th Division (in Spain)."
 This was not the end of the Anglo-Allied reinforcements coming down to Hougoumont. About 5 or perhaps 6 P.M., two or three battalions of Hanoverian landwehr joined the Scots Guards in the orchard. General Halkett, their brigade commander, wrote that he remembered one of his battalions being sent into the wood, and two others occupying the ditches in the rear of Hougoumont. At one point he tried to bring up the two battalions, but the officer sent to fetch them was killed, and he went into the final advance with only the Osnabruck Battalion. Three battalions of his brigade may have got into the Hougoumont action or its fringes: Landwehr Battalions Bremervarde, Quackenbruck, and Salgitter.
With all these reinforcements, the Scots Guards and some of the German reinforcements retook the wood. The battle for Hougoumont was all but over by 7 P.M. Only desultory fire continued. Reille tried to free his corps from the Hougoumont entanglement. He led Bachelu's and Foy's rallied divisions against the center of the British line about 6 P.M. They were cut to pieces as they reached the crest, and a quarter of the 5,000 men involved fell before they broke. This distraction was probably 2nd Corps's most valuable contribution to the French cause that day. But it was far too late to do any good.
Hougoumont
-
Introduction
First and Second French Assaults
More French Assaults
In Retrospect (analysis)
Hougoumont Today
French Line Grenadier (profile)
British Foot Guards (profile)
Excerpt from Lt. Ellison, 1st Foot Guards
Order of Battle
Diorama
Back to Table of Contents -- Napoleon #7
Back to Napoleon List of Issues
Back to Master Magazine List
© Copyright 1997 by Emperor's Press.
This article appears in MagWeb (Magazine Web) on the Internet World Wide Web.
The full text and graphics from other military history magazines and gaming magazines are available at http://www.magweb.com