 The First French Assault Gains the Woods
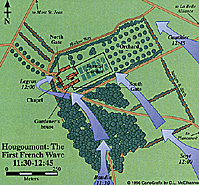
Jerome started the battle at 11:30 A.M., when he sent forward Baudin's brigade. (In some sources, especially French, command of this division is ascribed to Guilleminot, the second in command, presumably as he was a well-respected general, and Jerome Bonaparte was not). The five battalions advanced in echelon, the left leading, preceded by a strong line of skirmishers. They were met by fire from the Germans in the woods.
Large Version of 1st Assault Map (very slow download: 171K)
Jerome's batteries opened fire to support the advancing troops, and on the Emperor's orders General Kellerman's 3rd Cavalry Corps's two horse artillery batteries were added to the French gun line south of Hougoumont. Pire's horse artillery battery was also drawn in: it found a small mound near the Nivelles road where it could enfilade some of the British batteries acting in defense of Hougoumont. This was probably an error: it was a misuse of horse artillery, which was valuable in closer support due to its mobility, and the lack of it would be felt dearly later in the day when not enough horse guns were available to support the massed cavalry attacks on the center of the Anglo-Allied line.
Bull's battery, Royal Horse Artillery (RHA), fired the first gun from the British side. It was apparently on target with its opening shot: it was said to have caused three casualties to the 1st Leger Regiment. Sandham's battery joined in, followed by Cleeve's King's German Legion (KGL) Foot battery. A brisk artillery duel followed, the French guns trying to silence the British ones, the British guns maintaining a steady fire on Jerome's columns. The British artillery was evidently well-handled and accurate this day.
The French columns were checked for a while by the British guns and the obstinate resistance; already things had started to go wrong for the French. Baudin was killed at the beginning of the assault, but his men forced their way into the woods, driving back the Hanoverians and Nassauers.
Wellington in person directed Bull to fire his howitzers over Hougoumont and the garden. Bull's battery was unusually equipped, with only 5.5" howitzers, giving them an indirect fire capability. Given the inaccuracy of the guns of the time, coupled with the proximity of allied troops in the chateau and garden, Bull's battery did extremely well. Their fire is credited with hurting the French badly.
The French who came out of the wood opposite the garden and buildings soon fell back from the intense fire that came from windows, loopholes and over the garden wall. More to the right, the German skirmishers were driven back into the orchard, but Saltoun's two companies standing by the hollow way behind it were unleashed in a counterattack. The French were driven back into the wood. Some accounts say that Bull's howitzer fire forced the French back, but it may have taken a bayonet charge to swing the balance. Saltoun's Guardsmen and the Germans took up positions in the orchard ready for the next stage.
The Second French Assault Nearly Captures the Chateau
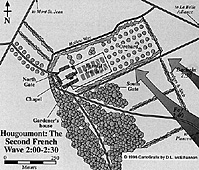 Despite the reminder from Guilleminot, his second in command, that it wasn't part of Napoleon's plan to press the attack too far, Jerome committed his only other brigade under Soye.
Certain actions might have led to French success, but none of these were executed. No effort took place to get any cannon through the woods to break down the walls, and no petards -- explosive charges to blow down gates or walls -- were provided. No ladders were issued or constructed, nor was any other method of getting over the walls provided to the troops.
Despite the reminder from Guilleminot, his second in command, that it wasn't part of Napoleon's plan to press the attack too far, Jerome committed his only other brigade under Soye.
Certain actions might have led to French success, but none of these were executed. No effort took place to get any cannon through the woods to break down the walls, and no petards -- explosive charges to blow down gates or walls -- were provided. No ladders were issued or constructed, nor was any other method of getting over the walls provided to the troops.
Large Version of 2nd Assault Map (very slow download: 136K)
Clearly none of the commanders on the spot had thought out the requirements necessary for this assault, and in the heat of battle, no attempt to address these needs was ever made. Thus, the French infantry were repeatedly sent in to do the job in the most difficult way possible, something they had succeeded in doing many times in the past, and very nearly did so again.
With the support of Baudin's rallied men, this second attack got further. Soye's brigade came up against the high garden wall. The only way over was to scramble up with the help of comrades below; none who made it over survived. (Ironically, the French memorial at Hougoumont is placed in the garden which they could never enter in force).
Baudin's former brigade was directed more to the left. Jerome, Guilleminot, even the corps commander Reille, were all seen leading from the front. Jerome's second attack was taken under fire from Bolton's battery and also Sympher's Hanoverian horse battery, but counter-battery fire from Pire's horse battery suppressed much of Bolton's fire. Smith's battery, Royal Foot Artillery (RFA), and Kuhlman's Horse Battery, KGL, also got into the action.
 Not only were the allies quickly pushed out of the wood again, but the more westerly approach took the defenders by surprise. The handful of Scots Guards and Coldstreamers by the haystack were quickly driven back, the haystack itself set alight. The defenders fell back into the buildings by the gate on the west side.
The French from the 1st Leger tried to follow them in, and were only held out by fierce hand to hand fighting. The 1st Leger's Colonel Cubieres fell wounded outside the gate. In later years Cubieres thanked one of the British Guards officers for his life. When he was hit and thrown from his horse, he could see that the defenders refrained from shooting at him. His horse was seized however, and borne off in triumph by a Guards sergeant.
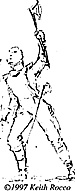 The danger of the still open gate soon became clear as the 1st Leger made another effort, led by a Lieutenant Legros, a large man nicknamed the l'Enforceur. Wielding a pioneer's ax, he forced his way into the courtyard, followed by about 40 men [as depicted in Rocco's painting].
Macdonell, helped by four others, ran to the gate and forced it shut against more French trying to push into the courtyard. The deed called for great physical strength and courage for which Wellington later gave Macdonell and his fellows due credit. Meanwhile more Guardsmen converged on the intruders and slew all the French except for a young drummer boy.
More French skirmishers pushed past the left of the buildings and beyond to threaten the ridge. They succeeded in silencing Smith's battery, already galled by flanking fire from Pire's horse battery. To drive them off, four more companies of the Coldstreams descended the ridge They were just in time, as French grenadiers were still trying to cut through the gate or climb over it. With the French driven back, these Guardsmen were added to the garrison of the buildings.
 Despite the repeated successes by the defenders, the crisis was not yet over for the British. In fact, Hougoumont came close to being lost for lack of ammunition, but officers were able to get Private Joseph Brewster (sometimes referred to as "Brewer") of the Wagon Train to drive a tumbril loaded with ammunition down to the buildings through a gauntlet of enemy fire.
Joseph Brewster (no relation to the author) may be the real hero of Hougoumont. La Haye Sainte fell primarily because the defenders ran out of ammunition. Some accounts place this key resupply later in the day, but Fletcher and Poulter point out in Gentlemen's Sons it may have happened before the gates were closed or else how could the wagon have been driven into the chateau?
By 1 P.M., Guilleminot's (Jerome's) two brigades, now weary and much fewer, had fallen back into the wood, wary of attacking the buildings and garden walls where they were shot down by well-concealed defenders.
Hougoumont
-
Introduction
First and Second French Assaults
More French Assaults
In Retrospect (analysis)
Hougoumont Today
French Line Grenadier (profile)
British Foot Guards (profile)
Excerpt from Lt. Ellison, 1st Foot Guards
Order of Battle
Diorama
Back to Table of Contents -- Napoleon #7
Back to Napoleon List of Issues
Back to Master Magazine List
© Copyright 1997 by Emperor's Press.
This article appears in MagWeb (Magazine Web) on the Internet World Wide Web.
The full text and graphics from other military history magazines and gaming magazines are available at http://www.magweb.com