This is a significant advantage, allowing lance-armed cavalry to fight as effectively as spear-armed foot, but with the added benefits of charging and often being frenzied as well. Axe-armed foot, normally relegated to fighting with a rank and a half, also benefit from the use of the wedge if allowed. By using wedge, they too get to fight with a full second rank.
How do you use a wedge and how is this best portrayed on the battlefield?
Split Stands
At one time, wedges were presented by having your stands split up into smaller pieces in order to show the wedge formation visually. Some players still do this and it is perfectly acceptable. When using this method of wedge replication, the stands are represented as follows:
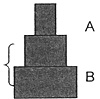 This cavalry unit is two stands in size. Each stand normally has three figures mounted on it. Take Stand A and divide it into two pieces, one small piece with one figure mounted on it and the second piece, twice as large as Stand A with two figures mounted on it. Stand B is left as is with three figures mounted on it as normal.
- 1 figure on the first stand section
2 figures on the second stand section (part of stand A)
3 figures on the third stand (stand B)
Wedge Markers
Alternatively, you can use your stands as they are and simply use 'Wedge' markers to designate the wedge. The markers must be placed either in front of the front stand or behind the back stand of the wedging unit to denote it is in wedge and is taking up that much more space.
The Downside….
Yes, there is a downside to using a wedge formation.
- The wedging unit counts the same as a Mass for missile fire; it is easier to hit.
- If the wedge fails to rout or break through the opponent's unit, the wedge will flatten out and become a disordered line.
The Wedge in Combat Example of Play
- When wedges enter a close combat as a result of a Charge or Countercharge, it will fight with two full ranks unless disordered or worse.
- If the wedge does not Charge or Countercharge, but only moves in contact with an enemy because of an Advance order, or is moved into by they enemy, it does not count as being in wedge for the close combat. Remove the wedge marker. The unit is now considered to be in a Line.
- When charging into an enemy archer/crossbow unit, the enemy unit counts the charging wedge as an easier missile target. It is harder to miss, being concentrated!
- If your wedge suffers the loss of a stand from missile fire, and takes the required morale test (using the If Charging table) and fails, it may find itself stuck an inch away from the enemy target, unable to move further that turn. Worse, it may fail so badly, it is forced to retreat disordered!
Note:
The wedging unit will NOT suffer two disorders from this failing of missile fire morale. It may only suffer the disorder from falling out of wedge if it is fighting a close combat and fails to break through or rout the enemy unit.
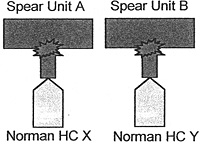 Okay, here we have two wedges of Norman knights, HC Veterans with Lance & Shield. There are two stands in each unit. They have both successfully rolled for their charge movement range as well as for going frenzied. The enemy units are both spear-armed HI Saxon Warriors with Defend orders in Shieldwall. They are each six stands in size, three wide by two deep.
- The HI units both have to take a morale test for being charged by mounted non-SC in the open.
- Unit A rolls a '4' and passes. Unit B rolls a '10' and goes Frenzied! It loses it's Defend order and it's Shieldwall marker. Frenzied units may not have Defend orders or be in Shieldwall! It does not charge as the Normans start the turn over 1/2 of the Saxon movement distance away and foot are allowed to charge only if they start their charge within 1/2 of their normal movement distance away.
- The Norman player won the Initiative die roll and elects to start the close combats from the left to the right…he does not want to fight the frenzied foot first!
- The Norman HC unit X and Spear unit A both roll a d6 for their Random Factor. The Normans roll a '6' and the spearmen roll a '1'. God roll time! The disgruntled Saxon player rolls his eyes skyward and tosses the die. Another '1'! The gods favor the Normans.
- The Norman player gleefully tallies up his points:
- +5 for the Random (deducting the spearmen die roll from his own).
- +1 for being Veterans.
- 0 for enemy armor (HI is the default number).
- +3 for Lance in the 1st round of close combat.
- Roll for the Charge Bonus modifier, mounted non-SC getting a full d6. Rolls a '6', so +6.
- +3 for frenzied mounted in the 1st round.
- -1 for enemy in Shieldwall.
- -1 for enemy with Defend orders.
The total points for the Norman HC unit X is +5, +1, +3, +4, +3, -1, -1 for a final tally of +16.
- The Norman wedge counts both stands as fighting. Two stands times 16 equals 32. This translates to three figures lost and a 20% to remove a fourth…and a complete stand!
- The Saxon spearmen unit loses three figures automatically and the Norman rolls a d10 to try for a fourth. He needs to roll a 1 or a 2 (20% chance for the hit). He rolls a '2'! The Saxon player has lost a complete stand of four figures.
- The Saxon spear unit has:
- 0 for enemy armor (HC is the default number as above).
- +2 modifier for Spear in 1st round.
- +1 for More Strength Points per Stand (4 figures/stand vrs. 3 for the cavalry).
- +1 for being Wider (three stand wide vrs. just one for the Norman).
Their total fighting factor is therefore +4.
- The Saxons count the stand in contact in the initial round of close combat and, being spear-armed, count the second rank stand as well. Two stands times 4 equals 8. The Saxons have an 80% chance of inflicting a casualty on the Norman HC. He rolls a 3 and gets one hit.
- The Saxon spear unit has lost the close combat falling back 1", disordered and the Norman player follows up, keeping in contact.
- The Saxon player must now take a morale test for losing a stand. He rolls a '6' on a d10. He is disordered for a -1, lost a stand for another -1 and is now unsupported for a third -1. Six minus three equals three. He is Warriors, so normally needs a 4 to pass morale. He fails by one. The result is Halt, Disordered. The Saxon spear unit picks up another disorder so is now fragmented.
- The Norman player has a decision to make. If there was another Saxon unit within 6" or less to the rear of the Saxon unit, the Norman may decide to use a Breakthrough Move as he killed a stand and caused twice as many figure casualties as received. But there is no unit within that range. He could still break through, but would then be considered disordered for failing to contact any fresh enemy. His opponent is already fragmented. If he can push it back one more time it will rout.
- The Norman player elects to simply follow up. His wedge flattens out into a line. The back stand can be left where it is or brought up to fight alongside the front rank. The Norman unit is now disordered as it falls out of the wedge while in close combat.
Now for the second close combat.
- Both units roll for their Random. This time the Saxons roll a '5' and the Norman player rolls a '2'. Looking around the table, the Norman player decides to sit on that die roll as he may need his God Roll someplace else later.
- We will count up the Saxon units combat points first this time.
- He starts out with a +3 for the Random.
- +2 for Spear versus Mounted in the first round.
- +2 for Frenzied Foot in the first round.
- +1 for Wider formation.
- +1 for more Strength Points.
The Saxon player has a total of 9 points times two stands that count as fighting, equals 18. This is one automatic hit on the Norman HC and an 80% chance for a second. The Saxon player rolls a 6. Two hits inflicted.
- 0 for the Random (the spearmen won this time).
- +1 for being Veterans.
- 0 for enemy armor (HI is the default number).
- +3 for Lance in the 1st round of close combat.
- Roll for the Charge Bonus modifier, mounted non-SC getting a full d6. Rolls a '2', so +2.
- +3 for frenzied mounted in the 1st round.
The total points for the Norman HC unit X is +1, +3, +2, +3 for a final tally of +9. Two stand times 9 is 18.
Wedges can be a very powerful formation, but they are also fragile. Using them may prove hugely successful, but they can be beaten.
Medieval Warfare Rules Clarifications
- Part 1. Turning Units, Dropping Back Stands and Expanding Out
Part 2: Cavalry and Infantry Wedges in Medieval Warfare
Part 3: Pursuits -- Rules Change
Part 4: Mantlets -- Rules Change
Part 5: Skirmish Targets and Frenzied Skirmish Infantry
Part 6: Turn Initiative
Part 7: Weapons Use -- Rules Change
Part 8: Roman Order Version 5.0 -- Rules Change for AW
Back to Saga # 95 Table of Contents
Back to Saga List of Issues
Back to MagWeb Master Magazine List
© Copyright 2004 by Terry Gore
This article appears in MagWeb.com (Magazine Web) on the Internet World Wide Web.
Other articles from military history and related magazines are available at http://www.magweb.com