This is a battle report which hopefully illustrates some of the tabletop tactics to the Huns. The game was played in 15mm scale, using WRG 7th edition rules on 7' x 4' table. During the initial stages, I will invite you, the armchair general, to participate. The battle in fictional.
A Hunnic army has crossed the Danube and is preparing to attack the city of Naissus, Moesia Superior. A Roman field army, hastily raised, has intercepted the Huns at a site -- prepare for battle, knowing that the fate of the city and the province rests the outcome of the battle. It is late afternoon before both sides complete deployment (See Map 2).
The Hun army consists of three commands, as follows:
- Eldric (Unreliable)
- 12 hun LC
14 Hun LC
10 Hun LC
6 Hun LC
24 Hun LI
Uldin (CinC)
- 12 Hun LC
10 Hun LC
6 Hun LC
12 Hun Nobles
Balaaber
- 12 Hun LC
18 Hun LC
6 Hun LC
6 Alan LC
The battlefield looks like this:
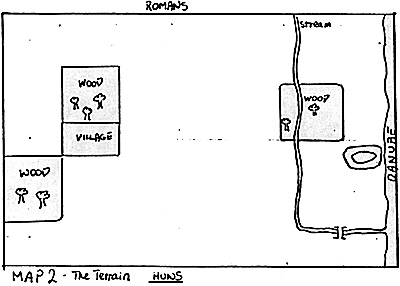
The terrain is not ideal for the Huns, but they are committed to battle, the warriors eager to fight. As the Hun commander, how would you deploy your command? Fortunately, your cavalry severely pressed the Roman scouting screen, but were unable to break it and accurately report on the Roman deployment. The woods will surely be filled with accursed Roaan foot soldiers; and the river and stream clutter flank; the woods the other. Make your deployment - write it down.
Your troops are now deployed. All you can see of the enemy is a screening line of light cavalry force marched to the centre-line, stretching from the stream to the village. Now write your orders: an order for the command, rather than the individual, is sufficient.
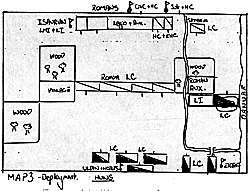 As Battle commences, the full visible deployment is revealed.
Eldric, on the right, is to advance with orders to probe - this means in this context attack if the opposition is light, otherwise skirwish. Fortunately, Eldric accepted these orders and acted upon thee. Uldin, in the centre, is also ordered to probe - to skirmish with enemy to the front and to try and contain the Roman center.
Now let us turn to your deployment and orders. If you deployed all troops on-table or with all commands on-table with possibly a unit on a flank march, then I'm afraid you lose. The Roman plan is to hold the stream line on the left, and to advance rapidly in the centre and on the right, using the Isaurians to dominate the woods and village.
Thus with all your commands on table, the best the battle outcome will be is a marginal win because your Hunnic troops will have trouble dealing frontally with the combined Roman infantry and caralry. If you flank marched an entire command, then the battle, the city, the prorince, and untold wealth and prestige is yours. The Roman centre and right vere ordered to advance and attack, believing all Huns to be on table (assisted by a little dis-information from me during deployment along the lines of "The Huns are so expensive, you don't really get many of thee you knov... To be fair, did you notice that Balamber's command was missing?
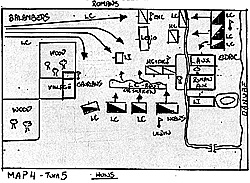 The situation at move five is shown on map 4. The Roman light cavalry in the centre is
falling back under the Hun missile attack, some units in rout after being caught while evading
Hun charges. The Roman left is holding the stream line, but is being hard pressed by Eldric's
command. The Isaurians on the Roman right have taken shelter in the village. Balamber's command
sweeps across from the Roman left flank, opposed only by some light infantry. The Roman army is
being surrounded, with most of its light troops in rout or shaken.
The situation at move five is shown on map 4. The Roman light cavalry in the centre is
falling back under the Hun missile attack, some units in rout after being caught while evading
Hun charges. The Roman left is holding the stream line, but is being hard pressed by Eldric's
command. The Isaurians on the Roman right have taken shelter in the village. Balamber's command
sweeps across from the Roman left flank, opposed only by some light infantry. The Roman army is
being surrounded, with most of its light troops in rout or shaken.
In the next bound, the stream line defences are started to collapse, with a Hun unit breaking through. Despite many good Roman units still intact, the Roman army is in an untenable position - surrounded and unable to retreat. The Roman field army is forced to capitulate.
Large Maps 3 and 4 (slow: 177K)
More Huns
-
The Huns Part 1: Introduction, Sources, At War
The Huns Part 1: On Campaign
The Huns Part 2: Fortifications and Sieges
The Huns Part 2: In Battle
The Huns Part 3: Equipment and Wargaming
The Huns Part 3: Battle of Naissus
The Huns Part 3: Wargaming Campaign
Back to Saga #51 Table of Contents
Back to Saga List of Issues
Back to MagWeb Master Magazine List
© Copyright 1995 by Terry Gore
This article appears in MagWeb (Magazine Web) on the Internet World Wide Web. Other military history articles and gaming articles are available at http://www.magweb.com