Landings: Part 1
Landings: Part 2
Franco-Batavian Plan of Attack
The Franco-Batavian attack would be made in three separate columns. The first column would be the right wing of the Franco-Batavian army, consisting of the 1st Batavian Division (Daendels). Their objective was the village Eenigenburg and the Westfriesche Dike behind it, and then to advance in the direction of St. Maarten. The left wing of their advance would be protected by the demolition of the bridges across the Groote Sloot.
The second column would be the centre of the Franco-Batavian army, consisting of the 2nd Batavian Division (Dumonceau). Their objective would be the Westfriesche Dike between the villages Eenigenburg and Krabbendam (the most southern point of the British defences). After this they had to advance to Krabbendam, and to capture this strongly fortified village. The 1st Brigade (Bruce) would attack this village along the Westfriesche Dike, and the 2nd Brigade (Bonhomme) from the direction of Warmenhuizen.
The third column would be the left wing of the Franco-Batavian army, consisting of the French Division Vandamme. This Division would be commanded directly by Brune, and had to attack the British defences between Krabbendam and Petten.
All three columns had to attack the British simultaneously at 03.45am. The darkness and the terrain forced the attackers to use the roads for their advance.
The battle of Zijpe: First Column (I)
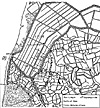 Large Map 6 (slow: 162K)
Jumbo Map 6 (extremely slow: 452K)
At 02.00am. Daendels left his starting positions, and at 04.00pm. he had already expelled the British from their forward positions at Haringkarpsel and Dirkshorn. Moving from there to his objective at Eenigenburg, he found his way blocked by the Brigade Bonhomme from the second column. He reinforced this brigade with a battalion of jagers and directed the remainder of his troops to St. Maarten.
He then attacked this village and succeeded in capturing part of it, but then received the news of the disorder of the Brigade Bonhomme, whose attack was repulsed at Eenigenburg. Daendels left his Division at their position and went in person to the Brigade Bonhomme. After restoring order there he returned to his Division, and was just renewing his attack when he received the message that Bonhomme's second attack had been repulsed. He then held his position till a strong British column advanced from Schagen to Dirkshorn and threatened his flank. At 02.00pm. he retreated to his starting positions. Daendels' losses were 10 men killed, 71 wounded and 82 missing.
Second column (II)
The 1st Brigade (IIa)(Bonhomme) would attack first. Their orders were to advance from Schoorldam to Warmenhuizen and Tuitgenhorn and to attack the Westfriesche Dike from there. However, at Tuitgenhorn the problems began. The road that was designated by Brune to the Brigade Bonhomme was a wide ditch! So because of this big mistake from Brune, Bonhomme couldn't follow his orders. So on his own initiative, he followed the only other narrow road in the direction of the enemy, the road to Eenigenburg. There he blocked the way of the Division Daendels, as we already saw. The brigade advanced in the direction of Eenigenburg, under heavy fire.
Only at 05.00am. could Bonhomme attack the British positions at Eenigenburg. Arriving before Eenigenburg two guns of the horse artillery, positioned on the road, opened fire. Giving support to Bonhomme's jagers and the jagers detached by Daendels to assist him. The jagers advanced to within range in skirmish order and opened a brisk fire on the British. After a while Bonhomme ordered his first battalions to attack. These charged and reached the ditch in front of the Westfriesche Dike, but couldn't cross it because the bridge was destroyed by gunfire. They received heavy fire, which they couldn't answer effectively, because there was no room to deploy the troops. The attacking battalions retreated in disorder. After restoring the order (with the help of Daendels), and after reinforcing these troops with 1st and 2nd Battalion 7th Halb Brigade, the Batavians attacked again.
They were again repulsed in disorder. Even the example of the Lieutenant Colonel of the Hussars Antoine Marie Collaert, who, unable to do anything with his hussars because of the terrain, went forward in person to lead the attacking troops, had little effect. Realising that further attacks were fruitless, he ordered his troops somewhat back out of range of the British guns, and took up position there. He left his artillery and jagers to engage the British. The brigade held this position till the retreat of Daendels, when he also retreated with his troops at 03.00pm.
The 2nd Brigade (IIb)(Bruce) also saw their attack fail because of the orders given by Brune. They had to attack Krabbendam before 03.00am. Part of this brigade found their way blocked by numerous vehicles, and could only reach the battlefield at 07.00am. Dumonceau, knowing that the result of the whole battle depended on the taking of Krabbendam attacked already at 06.00am. with all the troops he had at his disposal. That were 100 men infantry from the Brigade Bonhomme, a company of hussars and a howitzer. With this force he began the attack on the entrenchments in front of Krabbendam. At 07.00am. the first troops of the Brigade Bruce arrived; 200 men of the 3rd Battalion Jagers and 2nd Battalion 6th Halb Brigade, commanded by Lieutenant Colonel Anthing. When the jagers received the order to attack, they did so with such vigour that they captured the battery of 2 guns covering the road along which the Batavian troops were advancing.
In this act they lost their commander, the Major Daniel Tulleken, who's head was knocked of by a canon ball. After the taking of the guns the jagers attacked the entrenchments in front of Krabbendam, and the village itself, and they succeeded in capturing these and most of the village, taking many prisoners. On the British side Lieutenant General Abercromby, who was present at this position, knew the situation was critical. He ordered the reserve, positioned behind the British left wing, to move to Krabbendam. Then he dismounted, and in person took command of 5 companies of 2nd Regiment Foot, the only troops available, and encouraged them to hold their position as long as possible. They did so and received the Batavians with heavy fire. On the Batavian side the jagers now were reinforced with the 2nd Battalion 6th Halb Brigade
At the moment of dislodging the last of theBritish from their entrenchments, disorder caused part of this battalion to take flight. This flight caused panic among other troops and nearly all Batavian troops in Krabbendam took to flight. After collecting the fugitives and restoring order, the Batavians again took Krabbendam and deployed a battery of two guns, but couldn't advance any further. The British having received reinforcements were firing from behind the cover of the Westfriesche Dike at the Batavians, who were stopped by the ditch in front of the Westfriesche Dike and had no room to deploy. At 03.00pm. Dumonceau ordered a retreat. The Batavians weren't pursued.
Dumonceau's losses were 86 men killed, 427 wounded, and 294 missing.
Third column
The French troops left Schoorl at 02.00am. 2 battalions with 2 guns (IIIa) had to advance along the Kanaal van Alkmaar in the direction of Krabbendam; 2 battalions (IIIb) along the Slaperdike and 1 battalion (IIIc) through Kamp to Petten. The troops took with them some 'portable bridges', to cross the numerous ditches. This part of the British positions was defended by 2 brigades under the command of Major General Burrard. His troops were placed behind the Schoorlsche Zeedike, and at the entrenchments in front of Petten and on the head of the Slaperdike.
Vandamme ordered his skirmishers to outflank the entrenchments on the head of the Slaperdike, and to engage the defenders, and after some time he attacked frontally with his grenadiers. They were stopped by the circular canal in front of the Schoorlsche Zeedike. Part of the grenadiers jumped into the canal, to swim over it, covered by the other part. Most of them were drowned, killed or wounded. Brigadier General David was among the casualties, he was mortally wounded and died some days later. The battle continued for some hours, after which the French troops retreated out of range, and at 03.00pm. retreated to their starting positions. French losses were 789 men.
Aftermath
The Franco-Batavian attack was beaten off with heavy losses. The Franco-Batavians lost 1759 men, and the British only 184! The British now knew the strength of their position. They could use the cover of the Schoorlsche Zeedike and Westfriesche Dike, while the attackers had to advance across open ground and were canalised by the many canals and ditches. All movements had to be made along the roads. Cavalry wasn't of any use, and the artillery from the attackers had to take position on the roads, only to be masked by the attacking infantry.
The main reasons for the failure of the Franco-Batavian attack were:
-
1. Insufficient preparations (bridging materials, etc).
2. No reconnaissance of the terrain, and inadequate orders, or orders that couldn't be obeyed.
3. Not to reserve the roads that had to be used for the designated troops.
4. No strong artillery support for the infantry that had to attack strong positions frontally.
5. Separation of forces by not attacking the designated objectives.
The morale of the Batavian troops was low after this defeat. Already during the battle panics occurred, as we already saw. In the evening of the 10th September, a sergeant of the 1st Battalion Jagers positioned at the village Broek yelled that the British cavalry was coming. This caused a great panic with men yelling that they were surrounded. 5,000 men took flight. It was only at St. Pancras, the headquarters of Daendels, could the routbe stopped by the 3rd Battalion 5th Halb Brigade. Order restored, they were brought back to their positions. Some fugitives made it to Alkmaar, and there spread the panic to the train, who took flight as far as Haarlem. The sergeant who started the panic was shot!
The next day both armies stayed at their positions without much action. Some fighting occurred at Warmenhuizen. Lieutenant General Dumonceau judged he was hampered by the British outpost at Warmenhuizen (100 men), who's position was very strong because of the demolition of the bridge in front of their position. In the night from 14-15th September some jagers and grenadiers, commanded by the Captain of the jagers Hendrik van Goudoever, attacked the British. Under cover of the fire of the jagers, the grenadiers repaired the bridge, and stormed over it. The British didn't await them but took flight. Batavian losses were 1 men killed and 3 wounded. British losses were 2 men killed and 3 wounded. A small feat of arms, but it did help to restore Batavian morale.
Brune now realised that he was in no position to attack. So the Franco-Batavians strengthened their defences to await the inevitable Anglo-Russian attack. The main defences were along the line, Oud-Karspel - Schoorldam - Groet - Kamp. Daendels' proposition to extend the defences to the east was rejected.
Anglo - Russian Reinforcements
On 13th September York arrived in Holland, and took over command. From then on strong reinforcements arrived:
13th September; 1st Russian Division (Lieutenant General Jerepsoff), with the commander of the Russian troops Lieutenant General D. Hermann. 14-17th September; 3rd British Division (Lieutenant General Dundas), 2nd Russian Division. (Major General d'Essen)
Total Anglo-Russian strength was now about 40,000 men with the following composition:
Duke of York, Commander in Chief of the combined Anglo-Russian army in Holland.
British army:
Major General Tarringdon, commander of the artillery
Colonel Anstruther, Quartermaster-General
Advance Guard (Major General Knox)
- Grenadiers 1 bttn
Jagers 1 bttn
1st Division (Lieutenant General Ralph Abercromby)
- 1st Guards Brigade (Major General Doyle)
- Guard Grenadiers Battalion 1 bttn
1st Regiment Guards 1 bttn
2nd Guards Brigade (Major General Burrard)
- 2nd Regiment Guards 1 bttn
3rd Regiment Guards 1
1st Brigade (Major General Coote)
- 2nd Regiment Foot 1 bttn
27th Regiment Foot 1 bttn
29th Regiment Foot 1 bttn
69th Regiment Foot 1 bttn
85th Regiment Foot 1
2nd Brigade (Major General Moore)
- 14th Regiment Foot 1 bttn
21st Regiment Foot 1 bttn
49th Regiment Foot 1 bttn
79th Regiment Foot 1 bttn
92nd Regiment Foot 1
2nd Division (Lieutenant General James Pulteney)
-
3rd Brigade (Major General Don)
- 17th Regiment Foot 2 bttn
40th Regiment Foot 2
4th Brigade (Major General Lord Cavan)
- 20th Regiment Foot 1 bttn
63rd Regiment Foot 1
5th Brigade (Colonel MacDonald)
- 23rd Regiment Foot 1 bttn
55th Regiment Foot 1
3rd Division (Lieutenant General Dundas)
-
6th Brigade (Major General Lord Chatam)
- 4th Regiment Foot 3 bttn
31st Regiment Foot 1
7th Brigade (Major General Prince William)
- 5th Regiment Foot 2 bttn
35th Regiment Foot 2
8th Brigade (Major General Manners)
- 9th Regiment Foot 2 bttn
56th Regiment Foot 1 bttn
Artillery 3rd Battalion 1 bttn
Artillery 4th Battalion 1 bttn
Horse artillery 1 company
Cavalry
- 7th Regiment Light Dragoons 4 sqdn
11th Regiment Light Dragoons 4 sqdn
15th Regiment Light Dragoons 4 sqdn
18th Regiment Light Dragoons 2
Notes: Strength: Guard battalions 1000 men. Foot battalions 680 men. Cavalry squadrons 150 men
Russian Army
Lieutenant General D. Hermann, Commander in Chief of the Russian troops
Major General Capzewitz, commander of the artillery
Advance Guard (Major General Southoff)
-
Regiment Jagers van Pondhoff 2 bttn
Grenadiers van Petersburg 1
1st Division (Lieutenant General Jerepsoff)
-
1st Brigade (Colonel Gr. van Fersen)
- Regiment van Jerepsoff 2 bttn
Regiment van Fersen 2
2nd Brigade (Colonel Doubiansky)
- Combined Grenadiers 3
2nd Division (Major General d'Essen)
-
1st Brigade (Major General Zedmoradzky)
- Regiment van Zedmoradzky 2 bttn
Composed Grenadiers 2
2nd Brigade (Major General Darbinioff)
- Regiment van Darbinioff 2 bttn
Combined Grenadiers 1
3rd Brigade (Major General Emme)
- Regiment van Emme 2 bttn
Combined Grenadiers 2 bttn
Artillery Regiment van Capzewitz 1
Cavalry Regiment Hussars 4 sqdn
Cossacks 7th Division 6 sqdn
Notes: Strength: battalions 640 men. Squadrons 150 men
Franco-Batavian Army
The Franco-Batavian army didn't receive many reinforcements. Its disposition and strength were as follows:
General en Chef: Brune
Chef de l'etat-major: General de Brigade Dardenne
French Army
Commander in Chief French troops: General de Division VandammeCommandant de l'artillerie: General de Brigade Seroux
Infanterie de Ligne:
- 48e Demi-Brigade (D.B) 1 (and 3 companies grenadiers) bttn
49e Demi Brigade 3 bttn
54e Demi Brigade 3 bttn
60e Demi Brigade 1 bttn
90e Demi Brigade 3 bttn
Cavalerie:
- 10e Regiment Dragons 4 sqdn
5e Regiment Chasseurs a Cheval 1 sqdn
16e Regiment Chasseurs a Cheval 4
Artillerie:
- 4e company du 4e Regiment a Cheval
1e company du 8e Regiment a Cheval
2 companies des 6e et 7e Regiments a Pied
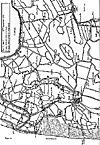 Large Map 7 (slow: 122K)
Jumbo Map 7 (extremely slow: 583K)
These troops were situated as follows (See Map 7):
-
A. 4 battalions, the squadron of the 5th Regiment Chasseurs a Cheval
and a battery of 6 guns in the line Kamp - Groet - Schoorldam, commanded
by General de Brigade Rostollant.
B. 3 battalions at Bergen, commanded by General de Brigade Gouvion.
C. 2 battalions at Alkmaar, reserve under command of Brune himself.
D. 2 battalions at Egmond, commanded by Vandamme.
The disposition of the other cavalry and artillery is not known.
Batavian Army
1st Division (Lieutenant General Daendels) (HQ at St. Pancras) 6,698
-
Advance Guard (Colonel Crass)
- E. Oud-Karspel - 1st Battalion Jagers 483
Noordscherwoude- 2nd Battalion Jagers 489
F. 1st Brigade (Colonel Rietveld)(HQ at Zuidscherwoude)
- Zuidscherwoude - 3 companies grenadiers/4th H.B 299
1st Battalion/1st Halb Brigade 571
Broek - 2nd Battalion/1st Halb Brigade 669
3rd Battalion/1st Halb Brigade 700
St. Pancras - 2nd company Horse Artillery 154
Regiment Dragoons (4 squadrons) 492
G. 2nd Brigade Major General van Zuylen van Nyevelt) (HQ at Ouddorp)
-
Ouddorp - 1st Battalion/4th Halb Brigade 678
2nd Battalion/4th Halb Brigade 498
5 companies 2nd Regiment Heavy Cavalry 198
St. Pancras - 1st Battalion/5th Halb Brigade 529
2nd Battalion/5th Halb Brigade 457
3rd Battalion/5th Halb Brigade 481
2nd Division (Lieutenant General Dumonceau) (HQ at Koedijk) 6,448
-
Advance Guard (Colonel Gilquin)
- H. Schoorldam - 4th Battalion Jagers 511
6 companies grenadiers 489
1 squadron Regiment Hussars 114
1 division (1/3 company) 1st company Horse Artillery 60
1st Brigade (Major General Bonhomme) (HQ at Koedijk)
- J. Koedijk - 1st Battalion/6th Halb Brigade 509
3rd Battalion/6th Halb Brigade 550
1st Battalion/7th Halb Brigade 502
2nd Battalion/7th Halb Brigade 375
K. Hijloo - 3 squadrons Regiment Hussars 372
1 division 1st company Horse Artillery 88
2nd Brigade (Colonel Bruce) (HQ at Koedijk)
- L. Koedijk - 1st Battalion/2nd Halb Brigade 474
2nd Battalion/2nd Halb Brigade 421
3rd Battalion/2nd Halb Brigade 449
2nd Battalion/6th Halb Brigade 582
3rd Battalion Jagers 298
3 companies grenadiers 208
1 division 1st company Horse Artillery 12
Alkmaar/Schermeer - 1st Regiment Heavy Cavalry (4 squadrons) 434
Total Franco-Batavian strength now was about 23,000 men.
Anglo-Russian Plan of Attack
(See Map 7)
York decided to attack the Franco-Batavian positions on 19th September. Even though the Russians still weren't recovered fully from their sea journey, and that the commanders hadn't had time to get acquainted with the terrain. The troops were also suffering from the shortage of supplies. The number of vehicles was too small to get the supplies from Den Helder to the troops. Bringing the supplies with ships through the Zuiderzee to Oude Sluis was not always possible. The attack would start at daybreak (05.00am.), and would be made in four columns:
The right column (I) was commanded by the Russian Commander in Chief Lieutenant General Hermann. It was to consist of 9000 Russians and 2500 British (8th Brigade (Major General Manners)(3 bats), 1 regiment light dragoons (500 men) and 4 guns of the horse artillery battery). Their right wing (with the cavalry and artillery) was to advance along the coast, and then to attack the villages Kamp and Groet from the back (a). Whe n these villages were captured, the remainder of the column would advance along the Slaperdike and make contact with the right wing (b). The whole column then would advance through Groet and Schoorl to Bergen (c). The Brigade Manners would be the reserve. This column would have to fight the French troops, commanded by Vandamme. (Vandamme had appointed Rostollant as commander of the Advance Guard. Brune didn't leave Alkmaar during the whole battle, although later he was called 'the hero of Bergen').
The second column (II) under the command of Lieutenant General Dundas, would consist of 2000 Russians (3 bats commanded by Major General Zedmoradsky) and 4500 British (The 1st Guards Brigade (Doyle), 2nd Guards Brigade (Burrard) and 7th Brigade (Prince William), 2 squadrons light dragoons and 12 guns). The Guards would attack the village Warmenhuizen through the villages Eenigenburg and Haringkarspel (d), while the Russians would attack this village from Krabbendam (e). The 1st Guards Brigade with the light dragoons would then cross the canal with a pontoon-bridge, and then advance to Schoorldam from the west (f). There they would have to take up positions, while the 2nd Guards Brigade and the Russians would try to cross the Kanaal van Alkmaar with boats and attack Schoorldam (g). Alternatively, in the event of the crossing failing, to advance in the direction of St. Pancras (h). The 7th Brigade would leave 1 battalion at St. Maarten, and 1 battalion near Schoorldam. York would accompany this column.
The third column (III) was commanded by Lieutenant General Pulteney, and would consist of 5000 British (1st Brigade (Coote) and 3rd Brigade (Don), 2 squadrons light dragoons and 8 guns). The 3rd Brigade would advance through Dirkshorn to Oud-Karspel and attack this village frontally (j). The 1st Brigade would advance through Schagen and the Heer Hugowaard (k) and attack Oud-Karspel in the flank and back (l). If Oud-Karspel was captured, the 3rd Brigade would have to advance in the direction of Schoorldam to support the 2nd column (m), while the 1st Brigade would advance south (n), and keep in contact with the left column by way of patrols. The 3rd Brigade would have to leave a battalion as a reserve near Kalverdijk.
The left column (IV) commanded by Lieutenant General Abercromby would consist of 9000 British (2nd Brigade (Moore), 4th Brigade (Cavan), 5th Brigade (MacDonald), 6th Brigade (Chatam) and the Advance Guard (Knox), 2 squadrons light dragoons (160 men) and 12 guns. This column had to advance already on the 18th from Winkel and Aartswoude between the Schermeer and the Zuiderzee to Hoorn (p). On the 19th they had to outflank the Batavian positions and to advance to Purmerend as quick as possible (q). If the attack on the right wing did succeed, the left column could advance south as far as possible, without any danger. In this way this column would outflank the Batavian positions and force them to retreat.
More Anglo-Russian Landings in Holland
-
Landings: Part 1
Landings: Part 2
Landings: Part 3
Landings: Part 4
Landings: Part 5
Landings: Part 6
Landings: Part 7
Next Issue Part 4: 19th September 1799, the battle of Bergen
Back to Table of Contents -- First Empire #10
Back to First Empire List of Issues
Back to MagWeb Master Magazine List
© Copyright 1993 by First Empire.
This article appears in MagWeb (Magazine Web) on the Internet World Wide Web. Other military history articles and gaming articles are available at http://www.magweb.com