Rearguard Action at Slins on October 7th
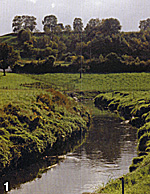 1. The river Jaar valley between Sluse and Glons. Nothing more than a stream, but difficult enough to hamper artillery and other movement. Watch the steep slopes on the other side.
At 10 a.m. Druchtleben notices the first French cavalry advancing north of the Jaar. About one hour later d'Estrees comes within sight of Slins. De Saxe guesses that only 5-6,000 Allied troops are deployed around Slins, covering the retreat of the main army. He decides to clear the valley west of Slins and occupy the surrounding heights. Therefore he orders d'Estrees' artillery forward to prepare the infantry attack with a bombardment.
Meanwhile on the north bank of the Jaar, Clermont-Gallerande has witnessed the Austrian hussars' retreat along the north bank while he advanced. Crossing the river being too risky, but seeing no immediate threat, he deploys his artillery on a height south of Sluse. So Druchtleben risks to come within an artillery crossfire and is forced to withdraw his troops from the villages in the Jaar valley and also from the edge of the Slins valley.
The time now is about 11.30a.m. Despite the battalions having to retreat while being under a French crossfire, the withdrawal is executed in good order. Meanwhile FM Batthyanyi has arrived to seize command and he sends a request to Prinz Carl for 12 battalions to reinforce Druchtleben's position. Before these will have arrived however, De Saxe has ordered d'Estrbes already to send his troops forward to cross the Slins valley.
This crossing occurs on both flanks of Druchtleben's position. On his right flank the cavalry regiments St.Jal and Vintimille advance along the Ferme de Couvenaille against the heights on which Slins and Fexhe are situated. However as they come too near they are repulsed by a hussar attack from Baranay's corps. Judging a renewed attack on the Austrian right flank too risky, Vintimille decides to join in with the attack against the Austrian left flank.
Here the French have just crossed the valley. De Saxe leading in front, has just narrowly escaped when his horse was killed. The infantry brigade Alsace, the Volontaires Royaux and the Rosen cavalry ascend the heights. Alsace takes possession of the vacated Dutch entrenchments. The Rosen cavalry advances on their right. The Volontaires Royaux infantry had advanced already even further and are engaged in a heavy fighting with the Allied infantry which has deployed in several lines outside Slins. De Saxe orders a battery forward upon the height to fire upon the strong Allied positions around Slins. The latter are suffering heavily from the fire. Both the effective short range French artillery fire and the growing numbers fed in cause heavy disorder amongst the Allied forces, which Batthyanyi is hardly able to restore.
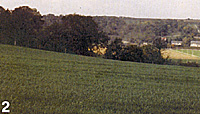 2. The Slins valley seen from the Allied Position facing West. Here the French cavalry attack occurred.
To distract the French, FZM Palffy orders forward 4 squadrons of the Austrian right wing cavalry, which are deployed some distance to the rear. These successfully force the Volontaires Royaux infantry to retreat and are only stopped and forced back by the mounted Volontaires Royaux and the Rosen cavalry. Palffy gets wounded during the charge.
By this time, between 2-2.30 p.m. Prinz Carl arrives in person. The first thing to do is to rearrange the battalions which stand too tightly packed, taking too many casualties from the artillery.
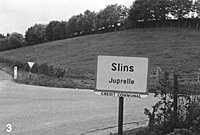 3. The road leading up to Slins from Juprelle, from which direction the French infantry attacked.
Then he orders 1 battalion accompanied by 10 guns forward to advance along a sunken road which runs from Slins in a northerly direction. From there the French attack force is completely surprised and repulsed. A renewed attack by the cavalry regiments, St. Jail and Vintimille in two lines, is cancelled by De Saxe when he notices that an English battalion (Johnson's) with 300 cavalry has cleared the heights from enemy troops up to its edge.
Seeing the advance of the Allied reinforcing column, De Saxe judges it wise to withdraw his troops from the action and decides to retreat with his whole force back across the Slins valley, before the action will escalate into a full-scale battle. The time is now 5 p.m. and the French withdraw under heavy Austrian artillery fire.
Wargaming 'Slins'
Those amongst you who read the Fontenoy article, know my preference for the Warfare in the Age of Reason rules (AOR), having a balance between playability and era flavour. Up to now no other rule set has convinced us of being better. Since few 18th Century rules are subject to some broader discussion, I have no idea of peoples' preference for (mid-) 18th Century wargame rules. Without leaning too much on the AOR rules, I feel free to refer to them occasionally. [We use these for virtually all our mid-18th C. games at Southend and have general approval from the members - Ed.]
Terrain
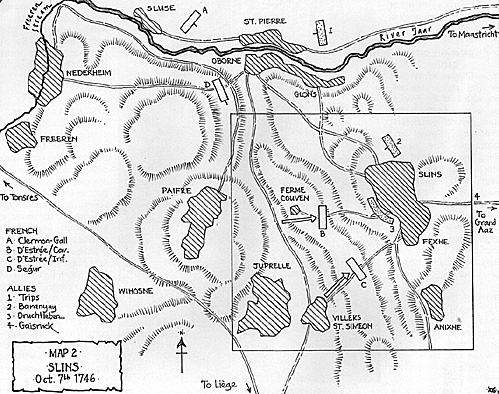
The terrain on which the fighting actually occurred comprises the village of Slins and its immediate environments, including the valley to the west, in which the Ferme de Couvenaille is situated. The valley is most important since the French had to cross it to engage the Allied troops around Slins. The troops under Clermont-Gallerande and Trips played no effective part in the action, except for Clermont's artillery.
So the table boundaries might be chosen as following: the river Jaar on the north edge; the heights west of the Slins valley on the west edge; the Slins village on the east edge. In case you have the action started at about 11.30 a.m., when Druchtleben has retreated upon Slins, the Jaar might even be excluded. So the terrain would then be as indicated on MAP II; about 4 km square. With a ground scale of 1" = 50 meters (AOR), this makes for a table of about 2 meters square.
Be aware that ground scales in rules mostly are approximations. I'm always very suspicious towards ground and time scales in rules. Besides there's always a great chance that some discrepancy between ground scale, time scale and movement allowances will actually influence the Outcome of a wargame. (Undoubtedly a theme for broader discussion).
The terrain is a real key factor in this action, hampering troop movement, especially for the French artillery and cavalry, which have to cross the Slins valley and scale the sloops. Some sources speak of a ravine, however the terrain on the west bank of the Meuse in that region is formed by hills up to 300 metres with gentle slopes.
Troops/figures
Troops involved on the French side are estimated at an average of 500 all ranks for the infantry battalions and 100 for the cavalry squadrons. The strength for the Austrian troops is based on records for the month October. The other Allied battalions are averaged at 600.
On a 1:50 figure/men scale (AOR), this action would involve at the initial stage about 11-0 figures (plus artillery and generals) for the French and 150- plus for the Allies. In case the reinforcements under Segur and Gaisruck should be fed in, this would increase the numbers involved with 220-plus for the French and 140-plus for the Allies.
As for the influence of the generals, the presence of De Saxe who accompanied his troops in the front line, can't be neglected. So his charisma (AOR) should be +2 against and +1 for all the other commanders. It's up to you if you also wish to give Prinz Carl a +2.
The Game
I prefer to have the action started at 11.30 a.m.. The situation then is as following. Batthyanyi has taken over command from Druchtleben, who has just retreated upon Slins. The Allied infantry is deployed in 2 lines about south-west of Slins while Baranya's light troops are deployed to their rear to cover the flanks. Clermont- Gallerande delivers (off-table) artillery fire from across the Jaar. De Saxe does the same from across the Slins valley, while d'Estrees troops have just started to descend the heights west of Slins.
Although both sides had more troops at close hand, both didn't have the intention to involve even more troops. The Allies since they hadn't fully prepared yet their new positions to their full advantage and the French because they thought to just have to deal with a retreating enemy. From Austrian journals it's apparent that the Austrian right wing cavalry had seated up already to reinforce their comrades, alarmed as they were by the artillery fire.
However as Prinz Charles rode up from his camp at Grand Aaz to Slins he ordered them to stay in their positions. This fits in rather well with the doctrines of the age of linear warfare, when battles were executed along formal and well prepared lines. Generals often disliked to direct their men in such large numbers in ad hoc formations into battle.
The prime importance of this rearguard action for the ensuing main battle lays in the effect on morale. For both sides a crushing defeat at Slins would have discouraged them to prolong the campaign any longer, since their men were longing for Winter-quarters.
Especially, De Saxe wasn't looking for a battle in which to risk his precious troops, with such an advantageous political negotiation position at hand. Prinz Carl would probably be more eager to draw the French into a battle. The losses inflicted to the French, even if to troops later involved in the main battle, would be of slight importance only. De Saxe could easily draw from other parts of his army, since he outnumbered the Allies with about 40.000 men.
However the effect on French morale might play a role at Rocour. Part of d'Estrees corps was involved at Slins. As we'll see in part II, d'Estrees' troops were forced twice to renew their attack against the Dutch. So you can imagine that troops which were heavily beaten some days before and were longing for winter quarters, will have lost much of their spirit. So in case the French shall have been heavily beaten at Slins you should keep this in mind when fighting the main battle.
For those interested there is only some vague information on the losses at Slins. Unofficial reports speak of 140-190 men killed, wounded and missing on the Allied side, as well as 65 horses and about 100 men on the French side. Actually no shocking (doubtful to me) numbers compared to the heavy artillery fire and hot fighting around Slins and the apparently dense Allied formations. Or can this be a proof for the slight effect of mid-18th century musketry?
Preparations Before Battle
When Charles learns next morning about the definite retreat of the French, he leaves some battalions behind to defend Slins and Fexhe and rearranges the others along the new front line which stretches out to Liege. The Allies occupy most villages between Liege and the Jaar They also try to establish a foot-hold in the suburbs of Liege, although the town keeps its gates shut. Hussars are detached as far as Huy.
Believing that the Allies are really retreating across the Meuse, De Saxe decides to prepare for winter quarters. However Oct 8th information comes in .about the new Allied positions. During the night De Saxe works out his strategy and issues his orders next morning. Since it takes a day to prepare the march routes for the columns and the camp-places, the army starts to march on the morning of Oct 10th.
At 10 a.m., the entire French army crosses the Jaar near Tongres. Their approach is executed in a 10-column wide movement, covered by the corps D'Estrees. Gradually the French shift in place opposite the Allied positions. D'Estrees 'corps i's to march as far south as Bierset, where it arrives at 5 p.m. to occupy the right when he finds the surrounding heights occupied by an Allied advanced post under Baranyay. So he first has to rout them, before being able to arrange camp for his troops.
OOB at Slins
French
Overall command: Marechal De Saxe
Attack force commanded by General d' Estrees
- left flank ; G.d.B. Vintimille; cav. regts. St. Jal and Vintimille, 2 x 4 sqns. 800
right flank; G.d.B. Marsillac; cav. regt. Rosen, 6 sqns. 600
G.d.B. La Touche; cav. regt. Volontaires Royaux, 6 sqns. 600
inf. regt. Volontaires Royaux, 3 battalions 1,500
G.d.B. Etlingen; infantry brigade Alsace, 4 battalions 2,000
'Reserve' commanded by General Segur:
- dragoon regt. Beauffremont, 5 sqns and dragoon regt Cararnan, 5 sqns Total: 1,000
inf.regt. Picardie, 4 battalions
inf. regt. Monaco, 3 battalions
inf. regt. Seggur, 2 battalions
inf. regt. Bourbon, 2 battalions
inf. regt. Rochefort, 1 battalion
inf. regt. Beaujolais, 1 battalion
inf. regt. Bassigny, 1 battalion
inf. regt. Royal Comtois, I battalion
inf. regt. Bearn, 1 battalion
inf. regt. Bresse, 1 battalion
inf. regt. Vexin, 1 battalion
inf. regt. La Tour, 1 battalion
inf. regt. d'Auvergne, 1 battalion
inf. regt. Berg, 1 battalion
Total: 10,000
11,000
Notes:
- Artillery: 1 battery each with
Clermont-Gallerande and and d' Estrees
and probably also 1 With Segur
Flanking force on the north bank of the Jaar, commanded by Clermont-Gallerande: Cavalry regts. Royal-Pologne Tallyrand, Orleans, Maugiron, Rohan and Royal (4 sqdn each)
GdB means General de Brigade
Allied
Overall command; at first FML Druchtleben, then FM Batthyanyi and, during the final stage, Herzog Carl of Lotharingen.
Main infantry force commanded by Druchtleben
GFWM Baden-Duriach
- Austrian regt. Alt-Konigsegg, 1 battalion 870
Austrian regt. Los Rios, 1 battalion 470
Austrian regt. Botta, 1 battalion 640
Austrian regt. Salm, 1 battalion 460
2,440
GFWM Borch
- Hessian regt. Haug , 1 battalion
Hessian regt. Boselager, 1 battalion
Hessian regt. Prinz Max, 1 battalion
English batt Johnson
Total: 2,400
4,840
Corps of light troops under FML Baranyay
GFWM Morocz
- Hessian hussars, 1 sqn.
Austrian hussar regt. Karolyi, 7 sqns. 420
Austrian hussar regt. Esterhazy, 7 sqns. 510
Austrian hussar regt. Ghilanyi, 7 sqns. 450
Total: 1,380
Trenck Panclours, 2 battalions 800
Obrist Esterhazy: 4 Dutch free comp 300
and Dutch Frangipani hussars, 4 sqns
300
Infantry reinforcements under of FZM Gaisruck
GFWM Puebla
- Austrian regt. Botta, 1 battalion
Austrian regt. Haller, 1 battalion
Austrian regt. Gaisruck, 2 battalions
Austrian regt. Platz, 2 battalions
Total: 3,500
GFWM Burghausen
- Hannoverian regt. Garde, 1 battalion
Hannoverian regt. Klinkowstrom, 1 battalion
Hannoverian regt. Zastrow, 1 battalion
Hannoverian regt. Sommerfeld, 1 battalion
Hessian regt Donop, 1 battalion
English battalion Graham
Total: 3,600
Grand Total: 7,100
Notes
Artillery; unknown.
Corps of light troops under FML Trips:
- Austrian hussar regt. Nadasdy, 7 sqns.
Austrian hussar regt. Beleznay, 7 sqns.
Austrian hussar regt. Kalnoky, 7 sqns.
Trenck Pandours, 1 battalion and 2 gren. co's
FZM Palffy's cavalry may have been cuirassiers or dragoons probably 4 sq, each, 100 strong.
M = Feldmarschall
FZM = Feldzeumeister
FML= Feldmarschall-Lieutnant
GFWM = GeneralFeldwachtmeister
Obrist = Colonel
More War of Austrian Succession
-
War of Austrian Succession: Introduction
War of Austrian Succession: Slins Oct 7, 1746
War of Austrian Succession: Bierset Oct 10, 1746
Back to Battlefields Vol. 1 Issue 8 Table of Contents
Back to Battlefields List of Issues
Back to Master Magazine List
© Copyright 1999 by Partizan Press.
This article appears in MagWeb (Magazine Web) on the Internet World Wide Web.
Other military history articles and gaming articles are available at http://www.magweb.com