[Regular readers will certainly recall Peter Lenders' articles on Fontenoy in Vol 1, Issues 3 & 4. This new offering is also in two parts and we anticipate part two coming in either the next issue or the one after, depending on what periods we have to offer in those issues - we don't want to overdo one period in any single release of "BATTLEFIELDS" but, equally, we don't want to keep you waiting for the final installment for too long. Ah, the headaches of an editor! Perhaps I'd make someone a good wife - Ed]
Introduction
Although less well known than Fontenoy (1745), Rocour surely is one of the most important battles of the War of Austrian Succession. Just like Fontenoy, this article will show that large historical battles may be divided into separately playable tabletop actions, without taking too much liberty with history. Both the role of the Dutch contingent in the battle and it's 250th anniversary (that is by the time of writing!) compelled me to research this battle.
This time I'll go one step further as with Fontenoy and include the preliminary actions prior to the main battle. First because their outcomes might have influenced the outcome of the oncoming main battle. Second it offers the option of playing a small campaign with several actions. Of course the whole must be suited to such, like Rocour. Particularly the effect of the outcomes of these preliminary actions on morale for the ensuing main battle may be interesting, since both armies were longing for winter-quarters after a tiring campaigning season.
In case you don't want to refight it all up to the main battle, the preliminary actions will appear to be interesting enough for a one-off refight. The other way about, you may wish to dice for the outcomes of the preliminary actions and take them into account for the main engagement
In all the actions dealt with, both terrain and deployment were key factors. The variety in troop types and nations included may be a challenge for wargaming on its own. Part 1 deals with the preliminary actions leading to the main battle at Rocour: a hard-fought rearguard action over difficult terrain at Slins on 7th Oct and a large-scale skirmish at Bierset on 10th Oct, to secure flank- positions the evening before the great clash.
Part 2 will deal with the main battle. Another interesting aspect is to compare De Saxe's applied strategy and tactics with his own theories as represented by his 'Reveries'. This I'll save, also, for part 2.
Background
After their victory over the Allies (Austria, Great Britain and the Dutch Republic) at Fontenoy, the French managed to occupy the greater part of Flanders. In 1746 Louis XV ordered his military genius Mar6chal De Saxe, to conquer the remainder of the Austrian Netherlands. This resulted in the occupation of Brussels and Antwerp and the successful sieges of the strongholds along the river Meuse: Mons, Charleroi and finally on September 30th Namur.
Throughout the campaign De Saxe had constantly outmanoeuvred the Allies, denying Prince Charles of Lorraine, who had succeeded to overall Allied command during Summer, even the smallest success. For several weeks now both main forces were watching each other in the Meuse region south of Maastricht, both longing for winter quarters.
Charles of Lorraine's Strategy
Due to endless discussions between the Allied commanders, but also to De Saxe's military capacities, the Allied army has seen nothing yet but fruitless manoeuvring. The fall of Namur seems to be the final blow. Charles however feels obliged to the Austrian Empress and the Allies to prove himself worthy of the overall Allied command. He offers several suggestions to the Allied generals which aim at achieving a (small) success against the French army, before going into winter-quarters.
Finally the choice falls on the following option:
- "We will take positions on the heights between Maastricht and Liege on the West bank of the river Meuse. From there we will try to disrupt the communication lines of the French army to tempt De Saxe to a pitched battle under favourable circumstances on our side. Moreover this plan has 2 other advantages. It offers a new foraging area for the army and the possession of the supply route over Luxembourg to Liege".
De Saxe's Strategy
For several weeks now De Saxe, with the bulk of his army, keeps an eye on the Allied army. The French having taken positions between Tongres and Bilsen and the Allies between Maastricht and the (small) river Jaar. De Saxe is aware of his numerical superiority over the Allies, amounting to 40.000, if disposing of all his troops.
However since his troops are longing for winter-quarters after a long and intensive campaigning season, he actually prefers to await the outcomes of the diplomatic negotiations during Winter. With almost the whole of the Austrian Netherlands under French control and a victorious army with a large numerical superiority at hand, Louis XV is in a strong position.
On the other hand, De Saxe is also aware of Charles' desire to close this fruitless campaigning season with a (small) success. Thus he intends to discourage the Allies to prolong their campaign and decides to force them back across the Meuse by demonstrating his power, but without risking a full-scale battle.
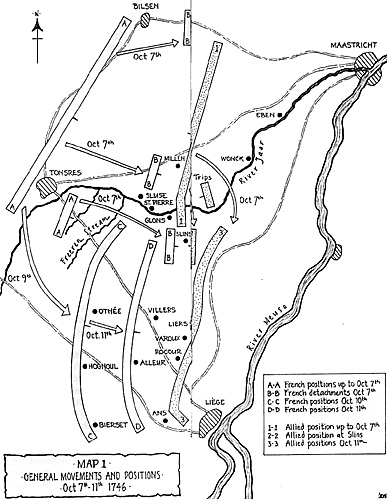
See MAP 1 for the overall geographical situation and the main positions of the armies up to the main battle.
Preliminary Movements
On October 7th at 5 a.m. the Allies, who have positions north of the river Jaar, cross this river southward. The left (Dutch) wing was already on the south bank of the river and now shifts to the south (Li6ge). The centre crosses it in 8 columns over 3 pontoon bridges between St. Pierre and Glons and 5 permanent bridges between Glons and Eben. This movement is guarded north of the river by a corps of light troop under Trips and an infantry detachment under Druchtleben and south of the river by a corps of light troops under Baranyay.
At 9 a.m. this movement is completed and Druchtleben is ordered to cross the river too. Detachments from several Austrian battalions, totalling 1,500 men under command of the Prinz Baden Durlach are left to guard the river crossings and the villages Glons, St. Pierre and Oborne in the Jaar valley. North of the Jaar only the corps of Trips is left on the heights opposite Glons. Druchtleben has local overall command.
De Saxe thinks the Allies are on their way to winter quarters on the east bank of the river Meuse, being covered by their rearguard. To convince himself he decides for a reconnaissance. At 9 a.m. he orders a detachment under Salieres to advance from Bilsen along the road to Maastricht with about 2.000 infantry and 2.000 cavalry. They will play no role in the forthcoming action.
The corps of Clermont Gallerande gets orders to advance upon the north bank of the Jaar south of Millen, up to the former Allied camp. The corps of d'Estrees is to advance along the south bank of the Jaar and cross the Freeren stream up to the vacated Dutch positions near Slins. He is to be backed up by a detachment under Segur, with troops which are just recalled from the German frontier.
What follows is an Allied rearguard action concentrating on the possession of the village Slins and its surrounding heights, which have to protect the right wing in their new positions.
More War of Austrian Succession
-
War of Austrian Succession: Introduction
War of Austrian Succession: Slins Oct 7, 1746
War of Austrian Succession: Bierset Oct 10, 1746
Back to Battlefields Vol. 1 Issue 8 Table of Contents
Back to Battlefields List of Issues
Back to Master Magazine List
© Copyright 1999 by Partizan Press.
This article appears in MagWeb (Magazine Web) on the Internet World Wide Web.
Other military history articles and gaming articles are available at http://www.magweb.com