Skirmish at Bierset
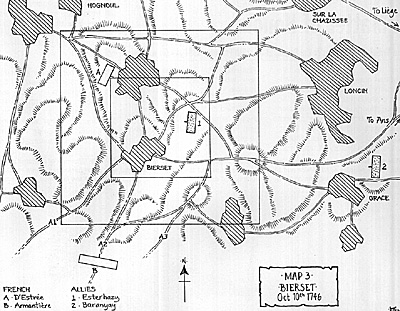
Baranyay's corps is part of the Allied left wing, added to the Dutch contingent under command of Waldeck. Baranyay has advanced as a forward post as far as the villages Loncin and Grace, with Esterhazy's command in front on the heights east of Bierset (see MAP III). D'Estrees orders Armentieres to round the Allied south flank with his 5 hussar regts.
Meanwhile he will attack them in front with the mounted parts of the free corps under his command and threaten their line of retreat with his regular infantry which are still marching into their new positions. The allied light troops start to waver under the French attack. However when Baranyay commits his reserve, the French retreat and Esterhazy can retake his position. At about 8 a.m. d'Estrees' line infantry arrives at their appointed positions and start to deploy, which makes Baranyay decide to pull back his advanced post from Bierset.
At about 9 a.m. they reach their camp at Ans.
The above is taken from several journals of commanding officers. One of the main French sources, Pajol, however states that Armentieres had orders to attack Esterhazy's position in front, while d'Estrees would threaten his south flank with some regular infantry. Personally I think the first option more logical, since the regular infantry were still marching into their new positions and needed more time to round the Allied flank than the light cavalry would.
Wargaming Bierset
Actually this action was merely a skirmish. On the outset all troops involved were light, with regulars being committed later. As far as I can trace no artillery was involved. The identification of the French regulars is a mere guess, since these were amongst the first in the approaching march column. For this purpose any other infantry brigade of d'Estrees' corps will do.
Terrain and Troops/figures
The terrain where the action concentrated, was about 2 km square. On the 1"= 50 metres scale this leads us to a table of about 1 metre square (MAP III). To enclose some more advance routes you might decide of course to enlarge the terrain to 4km square, or a 2 meter square table. The number of figures needed are modest; on a 1:50 scale initially 65+ French and 75+ Allied figures. With French regulars eventually getting involved their number might increased by 40. For the Austrians there is no need to feed in any more troops, since for them it is only a temporary advanced post, which would almost certainly be driven in at the start of the main battle next morning.
The commanders on both sides I would rate equal in capabilities, perhaps Baranyay being more cautious then d'Estrees. The troops had equal fighting qualities, the Dutch free comp probably being less experienced than the battle-hardened than Grassins and Molieres free corps. In case you choose to make a one off fight of this action, then it would appeal more perhaps to the 25mm gamer, perhaps on a 1:20 figure/men scale.
Uniform information for most troops is rather well available, except for the Dutch free companies. As for standards/guidons info is less clear.
The Game
The action starts with Esterhazy deployed north-east of Bierset, backed up by Baranyay's reserve between Loncin and Grace, so just off the east table edge. D'Estrees is entering the table in the north-west corner. Armentiere's flanking force enters the table somewhere along the south edge. With a time-scale of 1 move = 1/2 hour (AOR) I would suggest to have Armentieres arrive with the third turn. Throw 1 D6 for his table entry point: 1-3=A1, 46=A2.)
From the accounts it isn't clear if Armentieres actually participated in the melee, but feel free to suppose so (it will certainly cause more action). I suggest to let Baranyay advance when after 2 rounds of fire/melee Esterhazy hasn't pushed back the French. It will take one turn to warn him. The arrival of the French line infantry I would decide by dicing. Roll 1D6 at the start of turn 3; at a 6 they arrive in column anywhere along the north edge of the table. At the start of any next turn 1 pip less is needed for their arrival. Historically they started to appear and deploy 2 hours after the start of the action.
As with Slins the effect on morale for the oncoming main action is the most important factor. Main difference is that at Bierset only the Allies can lose. In case the French regulars succeed in catching up with the Allied light troops, the latter may suffer severe losses. In case the Allies are heavenly beaten, their morale will decline. Their steadiness next day will be less, when they have to bear the brunt of the initial French attack.
Whether you prefer to play this action as a one off or as part of the mini-campaign leading to Rocour, it is an ideal test case for commanding light troops. A test case both for your rules and your personal commanding capabilities. I often wargame 7 Years War and Napoleonic Peninsular. My experience with light or skirmishing troops is, that it's difficult to achieve historical results when deploying them in a fashionable way.
Of course the first question which comes to mind then, is: "Who's to blame, me or those damned rules?". Another question which comes automatically to mind is, whether it's advisable to play such skirmish action with rules, which are primarily biased towards real battles. With the AOR rules I think that they deal in a sufficient way with light troops to play a larger skirmish action like Bierset. Though it feels like balancing on the edge of a need for rules on company/squadron level.
OOB for Bierset
French
Overall command General d'Estrees
Command of MdC.Armentieres;
G.d.B. Lynden:
- Bercheny hussars 6 sqns.
Lynden hussars, 4 sqns.
1,000
GAB. Raugrave:
- David hussars, 4 sqns.
Raugrave hussars, 4 sqns.
Polleretzky hussars, 4 sqns.
1,200
Command of d'Estrees;
- mounted parts of the free corps Grassins and Morlieres 1,000
Total: 3,200
Reinforcements
G.d.B, Tanus: Inf. Regt. Picardie 4 battalions 2,000
Grand Total: 5,200
Allied
Overall local Command: FM Baranyay
Oberst Esterhazy Command
- Austrian hussar regt Ghilnyi, 7 sqdns, 450
Dutch hussar regt Frangipani, 4 sqdns, 300
4 Dutch Free Co, 300
Total: 1,050
Reserve under Barayay
-
Austrian Krolyi, 7 sqdns, 420
Esterhazy hussars, 7 sqdns, 510
Trench Pandours, 2 bttns, 800
Cavalry under GM Hammerstein, 1000
Total: 2730
Grand Total: 3780
On to the Great Clash
By the time that the action at Bierset had come to an end, the French had taken their positions as indicated with C-C on MAP 1. The Austrians were already in the positions as indicated with B-B. A nice detail is that De Saxe, in order to bolster the morale of his troops, had them amused during the evening by a comic-opera company. He used the opportunity to let one of the singers inform the troops with a song, that the unexpected was to come: an all-out battle with the Allies.
More War of Austrian Succession
-
War of Austrian Succession: Introduction
War of Austrian Succession: Slins Oct 7, 1746
War of Austrian Succession: Bierset Oct 10, 1746
Back to Battlefields Vol. 1 Issue 8 Table of Contents
Back to Battlefields List of Issues
Back to Master Magazine List
© Copyright 1999 by Partizan Press.
This article appears in MagWeb (Magazine Web) on the Internet World Wide Web.
Other military history articles and gaming articles are available at http://www.magweb.com