One look at the terrain will show that this is not an easy game to set up.
When my club last played this game we used terrain tiles. The battlefield/glen was three tiles wide and the outer two tiles were propped underneath so that they formed the glen "sides" sloping towards the glen floor. This gave a good representation of a glen particularly when broken up with rocky outcrops and the usual scattering of lichen. Okay, it was fairly regular and not nearly steep enough but at CBS least it gave a good visual impression and the figures stood up. The North side of the glen is dominated by the "Five Sisters of Kintail" which tend to appear in most books on hill-walking or sightseeing in Scotland. Thus, it is easy to get visual aids to setting up a battlefield.
No rules can adequately cover the action on the glen sides and the umpire is going to need to make regular decisions as to what is and is not possible. The players' briefings give a few ideas about their limitations but you can bet your life players will still try over convoluted manoeuvrings. Try to ensure that movement is difficult, retention of formation is well nigh impossible and firing is ineffective.
Contemporary accounts mention that the Government's Coehorn mortars set the glenside foliage alight.
I have given the numbers of troops involved rather than figures and leave the men:figure ratio to the umpire. A lower than usual ratio is called for because of the low numbers involved and I'd personally go for the straightforward 10:1.
Morale should play a large part in the game as although the Jacobites were well and truly routed they suffered very few casualties. Their traditional escape route, into the mountains was always open to them and seems to have been taken. On the other hand the Government would seem to have lost just over 100 men which is a high proportion of their absolute numbers.
Figures
Don't be too fussy. Who has figures specifically for this period? Even the highlanders changed. They introduced the "small kilt" between the '15 and '45 and so strictly only figures in full plaids are applicable to both rebellions and the time between. Be practical. Use any highland figures (count as, say, 50% with muskets), anyone in a tricorn (formal or informal) in red as the Government troops and likewise in grey for the Dutch and white for the Spaniards.
I know of one wargamer who refought Glenshiel with his Marlburians as the formal troops and his ECW highlanders as their countrymen 80 years on.
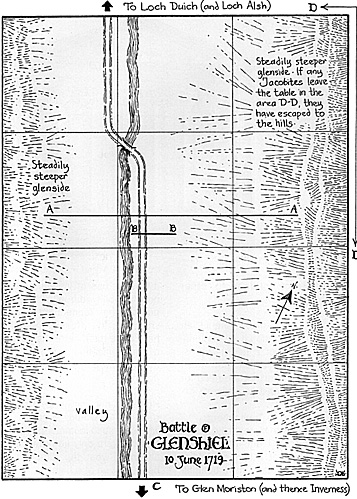
The Map
This represents the significant area along Glen Shiel. The river should be fordable and the bridge, though small, becomes more significant than usual within the men:figure scale. The Jacobites can form up anywhere behind the line A-A. Their defensive works are at the point BB. The Government forces enter at point C.
Who Wins?
This should be fairly obvious. Either the Government troops will have swept the Jacobites from the field or will have fallen back themselves after a few futile attacks. Glenshiel is notable for being the only battle involving a "traditional" Jacobite force (highlanders) who weren't able to launch an all-or-nothing charge. Strategically the Government wins no matter what happens on the battlefield - such is life. But the Jacobites can be give a moral victory if they do better than they did historically which is to be swept from the field.
Perhaps the Jacobites best hope lies with an umpire with fantasy wargame tendencies who can arrange an incident with Government troops marching to the action down the Great Glen, alongside Loch Ness!
More Glenshiel
- Glenshiel: Introduction
Glenshiel: Government Briefing
Glenshiel: Jacobite Briefing
Glenshiel: Notes for Umpire and Map
Back to Battlefields Vol. 1 Issue 8 Table of Contents
Back to Battlefields List of Issues
Back to Master Magazine List
© Copyright 1999 by Partizan Press.
This article appears in MagWeb (Magazine Web) on the Internet World Wide Web.
Other military history articles and gaming articles are available at http://www.magweb.com