The Battle Of
The Gohrde 1813
Main Action
by John Walsh
| |
Main Action At around 4.30pm, the main action began as Lutzow's infantry and cavalry belonging to Tettenborn's division, began to attack the French forward battalion. Lutzow's men were stopped in their tracks by the combined fire of the skirmishers and from the French artillery and troops on Steinker Hill. Prussian hussars then attacked the Chasseurs who, considering their small number, wisely retreated behind the French infantry on the rise. The skirmishers formed square and, aided by the French artillery, drove off the hussars which had turned their attack on them. When the hussars fell back two Prussian battalions attacked the French battalion but these were also driven back with heavy loss. Not bad for Marie-Louises! Around five o'clock troops from Arentschildt's column emerged from the woods on the French right and Dorenberg's troops emerged to the French left. The superiority of the allied artillery now came into play and the French battalion of skirmishers retreated behind the main French position, possibly to join the other battalion at Mur Hill. Allied artillery began to pound the French positions and the allied cavalry tried to outflank the French on both flanks. Their attempts to do so were driven off with high casualties. Arentschildt's infantry, in the form of two battalions of the Russo-German Legion, advanced on the French right flank. Unfortunately, they were too far apart to support each other and were driven back by the French fire. Lyon's Division arrived and took up position to the right of Tettenborn's troops. As his men formed in two lines, his artillery joined in the bombardment of the French. (The 73rd Highlanders were in Lyon's second line.) One of Lyon's Hanoverian battalions, the Lauenburg Battalion, advanced from out the trees, only to be quickly driven back by the French artillery. As more allied guns came into position to further increase the bombardment, Pecheux was forced to move his troops behind the rise for protection. Von Dorenberg's Division arrived and moved to threaten the French left flank. Dorenberg's artillery, including the rocket battery, alsojoined in the bombardment of the French positions. Dorenberg's cavalry advanced and attacked the French who quickly formed square. The French managed to hold the cavalry off but Russo-German skirmishers from Arentschildt's Division advanced and began to fire into the French formations. Some accounts say the French were in close columns as well as squares. The French, hard-pressed now both cavalry and allied skirmishers, as well as allied artillery, bravely stood their ground. The Marie-Louises were becoming veterans and the allies were unable to advance or force the French to give ground.
Lyon's Division went into the assault on the French left but the Bremem-Verden Battalion was beaten back when it reached the rise. When they retreated the other battalions followed suit. (Nafziger, in his account, suggests that many of the allied troops were also fairly new to combat. Perhaps this is the reason why the Russo-German Hussars only managed to destroy half the French column?) The attack on the French left seemed a total failure until more troops advanced, while allied artillery continued to batter the French formations with canister. It seemed at this point that the French had taken enough and when the Bennigsen Battalion advanced against them, they broke. The retreating troops were then attacked on both flanks by Cossacks and Hussars. Allied Advance The allies advanced on all sides now. First Oldendorf was taken, after a brisk fight, then Eichdorf. (One account reports that the 73rd Highlanders charged the French positions on the rise, after some Hussars had been driven back, captured some French guns and forced the French to fall back.) It was clear to Pecheux that all was lost and the best he could achieve now, was to break out with as many men as possible. He formed the surviving troops into squares and began to head them towards Harburg. In this formation, Pecheux managed to cut his way through the surrounding sea of allied infantry, cavalry and Cossacks, and escaped with a sizeable part of his command, considering the situation he'd been in. Some accounts put the French losses as high as 2,000 killed and wounded and a further 1,500 taken prisoner. This would mean that Pecheux lost virtually his whole command. Some say he managed to escape with only 500 men. A much more realistic figure, would be that he managed to save just under half of his command, the rest being killed or taken prisoner. However, he did lose all his guns, not that he had many to start off with. Even so, even if he only escaped with five hundred men, when we consider the odds stacked against him and the fact that many of his troops were Marie-Louises, this was still a fairly major achievement. The allied casualties were reported to be in the region of only 600 killed and wounded. This seems rather unlikely, considering the French stubbornness in defence, their firepower and the fact that so many allied units were forced to give up the attack. The real figure may well have been around twice this amount. More Gohrde
Battle of Gohrde: Main Action Battle of Gohrde: Wargaming Battle of Gohrde: Order of Battle Back to Table of Contents -- First Empire #51 Back to First Empire List of Issues Back to MagWeb Master Magazine List © Copyright 2000 by First Empire. This article appears in MagWeb (Magazine Web) on the Internet World Wide Web. Other military history articles and gaming articles are available at http://www.magweb.com |
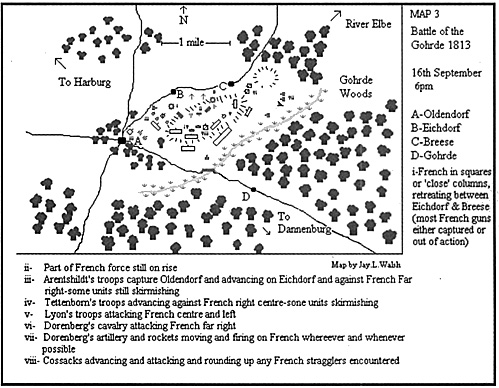 Unfortunately for the French, their brave stubbornness wasn't enough against such overwhelming odds. Around 6pm, the troops of Arentschildt's Division advanced against the French far right and, after a hard and bloody firefight, began to force the French line back. (Map 3) A horse battery from the Russo-German Legion and more infantry moved forward and began to fire on the rear of the French formations. A regiment of Russo-German Hussars attacked a battalion of the French 105th Regiment in column formation, as it fell back. They destroyed half the battalion but were unable to prevent the rest escaping, still in column formation. The Cossacks, sensing the end was near, now began to prowl the battlefield, capturing or killing any French stragglers they came upon.