Duke Eldridge, longtime WRG gamer (back to the 5th edition), donned Norman harness for a go at MW. His Normans, basically of "Conquest" vintage, featured large numbers of fanatical heavy cavalry (a.k.a. cheap knights) and a sprinkling of crossbow and close order infantry. The Duke wanted nothing but clear terrain on the battlefield, which in times past would have pleased the Sultan, but the latter's idea for the current campaign was to help out the Ayyubid foot as much as possible with some well placed terrain features, primarily a low wall or two and some patches of brush on the Ayyubid side of the board.
Dating back to my days as a WRG 7th warrior, a classic set-up for an army configured like Saladin's Ayyubids is to provide them with a broken line of terrain bastions -- brush is excellent for this -- across their side of the board in which the loose ordered Sudanese archers may be ensconced in forward positions to wreck havoc on attacking units. The cavalry is collected in reserve behind the archers, covering the gaps between the patches of brush. As the dice fell, the Ayyubids got a brush and a wall on their left, a clear center and a patch of brush on their right; overall, not much to succor the foot, and definitely not the desired set.
The Sultan made his first serious mistake during his deployment. The large number of fanatic Norman milites meant that the Normans best play would be a clean sweep through the clear area in the center of the table. What the Ayyubids did was anchor their left at the wall with a unit of Sudanese archers, and then extend a line of Sudanese archers across the center, allowing enough space between units of archers for passage by units of Toassin HC:
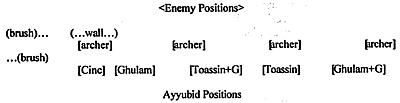 The Ayyubid defensive plan may be best characterized as a tactical counter-punch; first draw the Norman milites into the archer-line, then counter-attack with the HC. Neither the Ghazis nor the Turkomans were a factor in the battle, so they are left out of the schematic; these units were deployed in the brush to either flank. Had the Ayyubid center held longer, such flanking elements may have weighed in decisively. As things developed, they simply didn't signify in the end result.
The Ayyubid HC was deployed in four, four-stand units, two of which contained generals. The Cinc was paired with a single Mamluk stand. The Sudanese archers were comprised of four units of four stands each.
As it turned out, the concept may have been sound in the planning, but it was too risky in the execution. The Duke's Normans as expected flew across the board and into the Sudanese archers. In retrospective, the archer line was deployed too far forward, as room had to be created for the reserve cavalry units to operate freely behind it. The farther forward missile units are deployed, the less likely they are to inflict significant damage on enemy units before they are engaged at disadvantage by attacking forces.
Thus it was here. The opening volleys of the Sudanese units were largely ineffective, and the Norman wave hit them with bone-jarring force, either breaking through or routing the two archer units on the right. Still, this was neither unexpected nor fatal. The long pursuit/breakthrough moves of the successful Norman units carried them well past the Saracen HC units, and this was unexpected. Having finished off the archers and having bypassed the Saracen HC, the Norman units simply turned around 180 and faced the new threat, still frenzied and largely unbloodied. The Ayyubid counter-punch was further undermined by morale failures by at least one Saracen HC unit (the exact sequence of events here is difficult to remember - the results of shock no doubt). The Ayyubid right-center had gone wobbly from the get go! The indifferent morale of many if not most of the Ayyubid units makes the army relatively brittle, and here that became a significant factor.
The battle was decided by two cavalry melees fought in the Ayyubid rear. In the turn following the Norman breakthrough, several units each of Saracen and Norman HC crashed together behind the Ayyubid lines. Each side won a melee - and a Norman and a Saracen general fell - but the net effect of the action was the breaking of the Ayyubid army, and a 3-5 loss. Although winning is important in tournament play, scoring points may be more so, thus a 3-5 loss in the first round is not bad, whereas a 1-0 victory would really hurt one's chances of taking home tournament honors.
More Saladin's Fall (-In)
-
Introduction
The Duke of Eldridge and the Perfect (Norman) Storm
A Thousand Points of Pikes: Swiss Cheese too Tough to Cut
Fire and Flee: Sometimes It doesn't Always Work
Post-Mortem
Back to Saga # 84 Table of Contents
Back to Saga List of Issues
Back to MagWeb Master Magazine List
© Copyright 2002 by Terry Gore
This article appears in MagWeb (Magazine Web) on the Internet World Wide Web. Other military history articles and gaming articles are available at http://www.magweb.com