 The game began much as expected with a general advance by the Takeda. The cavalry on both flanks pushed on ahead of the infantry, eager for glory. The Omari in particular made good ground and were soon threatening to charge the Irobe. This they did on turn 3 and the Irobe arquebusiers pulled back through their supporting spearmen without firing a shot. This was just a precursor of what was to follow. Obviously the reputation of Omari Torayasu preceded him! A further charge next turn by Torayasu caused widespread panic amongst all six Uesugi ashigaru units as they turned and fled in rout. This was mainly the result of three horrendous morale scores of 2, 3 and 2 (on 2d6) causing the first 3 units to rout. After this, the others seeing so many units routing, decided to follow suit. The samurai, of course, unperturbed by the actions of these lesser mortals, stood their ground.
The situation at the end of turn 4 looked extremely precarious for the Uesugi. Only three samurai units (including Kenshin’s bodyguard) stood facing 13 units of the Takeda. Not quite the stubborn resistance I would have expected from Kenshin’s boys. On another day, I may have ended the game there. But since I was playtesting a few things, I decided to proceed. And anyway, there was still the surprise cavalry to consider.
Rain began to fall on turn 5 but that wasn’t going to dampen the Omari spirits. They proceeded to attack the Irobe samurai who managed to hold their ground heroically. Elsewhere, the Takeda advanced slowly and methodically. It was as if everyone was transfixed by events on the Takeda left flank. Kenshin was praying for the timely arrival of his cavalry.
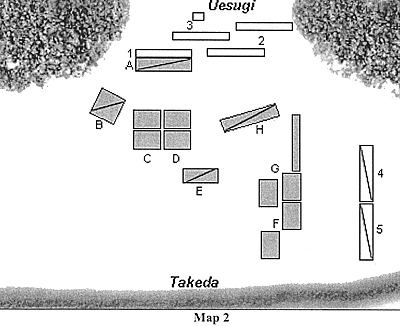
Turn 6 began and Kenshin’s prayers were answered! Both Uesugi cavalry units swept onto the battlefield, driven forward by bloodlust at the sight of the exposed flanks of the Takeda infantry. This though, was not going to be Uesugi’s day. The Naito and Nobushige infantry manoeuvred with perfect precision to meet this new threat. Meanwhile, the Irobe still battled on despite the death of clan commander Irobe Akinaga. To complete Kenshin’s misery, only the Suda arquebusiers managed to rally from rout. The remaining five routing units were all dispersed along the mountain pass. Map 2 shows the situation at this point.
There seemed to be a slight lull in events over the next few turns. The rain may have stopped but the Omari and Irobe continued their melee, both sides refusing to yield. Nobutatsu’s cavalry finally charged the Suda samurai and such was the carnage that although the Suda recoiled, the cavalry were unable to follow up. The Uesugi cavalry, now facing a determined looking Takeda line, seemed almost reluctant to close. This hesitation allowed the Naito arquebusiers a few volleys causing considerable damage to the Samboji.
 It was turn 11 before Norimasa charged the Nobushige and Naito ashigaru spearmen. The Nobushige were pushed back but support from their own samurai and the gallant efforts of the Naito rescued the situation for the Takeda. Perhaps it was the shame of losing men to ashigaru or seeing their fellow cavalrymen charging in that made the Samboji become frenzied. Whatever the reason, (it was actually a random event!) in they went. Unfortunately, the Naito again held on.
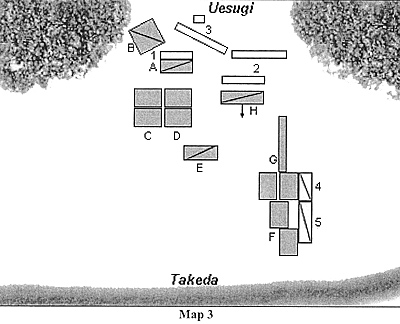
In the centre, the Suda managed to contact Nobutatsu and rout him – the only success for the Uesugi all day. It was too little, too late however. The Irobe were gradually giving ground allowing the cavalry of Kosaka Danjo to flood through the resulting gap to threaten Kenshin himself. At this point the game was over (the table being required for its more traditional domestic role). Map 3 shows the position at the end.
Battle of Sekida Pass Feudal Japan Wargame Battle Report
Back to Table of Contents -- Lone Warrior # 143
Back to Lone Warrior List of Issues
Back to MagWeb Magazine List
© Copyright 2003 by Solo Wargamers Association.
This article appears in MagWeb.com (Magazine Web) on the Internet World Wide Web.
Other military history articles and gaming articles are available at http://www.magweb.com