 When I began wargaming there was no good source
of buildings for gamers except Deltorama, and the Kirbri
kits. The former now tend to be objects of religious
veneration in many wargamers' collections. Though the
latter are still around they are very unsuited to wargames,
they are expensive, come in odd-shapes and sizes and
take up too much room on the table top, neither can you
put figures inside of them.
To answer all this I began making my buildings out of cardboard and balsa wood. This had several decisive advantages. They were cheap, could be tailor-made to my set-up in scale, could be mass-produced; would take rough handling and finally, they had just enough detail to look good tbut not too much so as to make the figures next to them look bad)!
This article kicks off the series on construction of musket period structures which will finally encompass twelve different types of house or building, fortifications, wagons, stockades, etc., and will cover complete details on construction, use, and detailing.
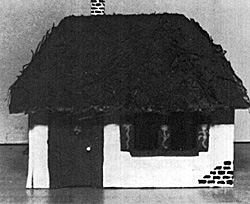
We begin the series with the simplest and easiest building to make, Farmer Generic's Hovel. Entailed in this is the entire method for all the many others, including modularization of buildings for larger structures.
All the buildings shown are geared to "fit" into the 4X4" squares I use on my table. Players disliking this may alter the dimensions as they see fit.
PLANS: The plans shown give all of the major construction details for Farmer Generic's house. It represents the general type of thatched peasent cottage or small urban hovel that dominated in Europe from 1500 to 1900. Indeed, it can even do for slightly earlier or later periods. The plan shown is a TEMPLATE. That is, it is full size, so dimensions can be taken right off the plan.
SCALE: The plans shown are FULL SIZE for 30mm or 25mm troops. (I have armies in both so I wanted interchangable terrain. Luckily the scales are not too far apart, and I made it just a bit small for the 30mm and just a bit large for the 25mm. However you do not notice this at all except upon the most minute inspection. They look perfect in either scale. If you use 15mm, cut dimensions in half. (use a 2:1 Xerox reduction -- ED.)
MATERIALS: The walls and roof are of ordinary (not corrugated) cardboard. Shirt cardboard is too flexible so I use stuff about the consistency of candy-box or typewriter paper box materials. A much better material is artboard which can be purchased from art supply stores. It costs about $3 to $5 for a 22" X 27" piece that will provide material for a veritable village. The rest is balsa wood for bracing and/or trim. Absolutely necessary is 1/4" by 1/4" stock for bracing. You can save money by looking in places like "Toys are Us" or the like for big bags of "Modeler's wood". All this is balsa wood cut to 6" or 5" lengths, and it comes in a wide variety of shapes and sizes, most of it 1/4" by 1/4".
To make this building you will require the following pieces:
- 4 pieces 1/4" by 1/4" X 4"
4 pieces 1/4" by 1/4" X 2 1/2"
4 pieces1/4" by 1/4" x 1"
8 pieces 1/4" by 1/2" x 1/2"
1 piece 1/4 " by 1/4" x 5" (for chimney)
This is to be used for the roof chocks and does not have to be in this dimension, see text.
CONSTRUCTION: First cut out two front/back and two sides. Note that the template shows dashed lines on the front if you want a side with all windows, on the back or front, and on the side panel. The dashed line shows where to make the door cuts if you want a door on the "short side". Note that if you want the windows closed you do not have to cut out anything at all. Likewise with the door, though I cut it out for modeling reasons. By the way, if you Xerox the page then paste it to heavy acetate or basswood stock, and then cut it out, the result is a template one can use to trace the pieces onto the card stock.
Next cut out the front and back of the roof, but do not separate them along the central line, simply "fold" the cardboard over, trying to get as sharp and edge as possible. Placing a ruler under the fold and crimpling it over should do this. The roof as shown will give you a "mansard" style you will notice two lines along two edges. Cut along the OUTER line. The roof is the hardest piece to make on the house and the most prone to error! Having a little leeway will save you many a tear, and you always trim off the excess when dry.
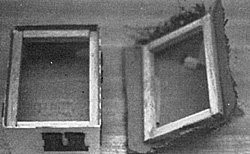
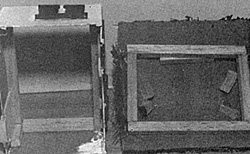
When you cut out the chimney hole SAVE THE PIECE! You may find that the hole is not exactly in the right spot and you may have to move it one way or the other, or cut an entirely new one. You can put the piece back in and patch it over with glue. Now we come to the hardest part . . . the bracing. Make two square frames each out of two 4" and two 2 1/2" lengths of 1/4" stock. Be sure that the 2 1/2" stock goes INSIDE the 4" lengths.
 Be careful that both are as near the same size you
can make them. They will support the walls and make the
roof "key" (at right). I fasten the building to a "base" when finished
to form the bottom part of a "box". The roof is then lifted off
to place troops within the building. Thus a "key" is
necessary to hold the roof on and assure alignment. If
however you do not want a seperable roof and are content
to lift the entire building up to place the troops, you will not
have to make a removable "key" and can economize on
lumber.
Line up the two frames and inspect them. It is handy to make a simple "tool" of a right angle corner in which you can place the pieces in while gluing them, that way you are assured of correct alignment. The roof key can be of the same size or slightly smaller than the wall braces, but if larger in any dimension the roof will not "lock" into the building. Use the larger frame for the wall frame and glue the wall sections onto it.
Note the detail on the plan marked "corner bracing", the wall box or frame should be glued '/4" down from the top of the wall. This is to allow the roof key to "nest" inside when completed. To add structural stability to the sides place the 1" studs in each corner at the top of the wall, below the wall frame. DO NOT PLACE THEM ON THE BOTTOM OF THE CORNERS. This will interfere with the building lying flush on the table top if a stand or figure base gets under it. If the building is fastened to a base this is not so important and the studs can be carried right down to the base or glued to the bottom corners.
Now glue the cardboard walls together with Elmer's glue. Pins may be used to fasten the walls together while drying. When dry, take the roof key and drop it into the top of the building so it rests upon the wall frame (or box). Take the roof piece (front and back) and place it over the building. Adjust the setting here and there until it is in a good position and looks straight.
Now take straight pins and run them through the roof into the roof "key". (You might want to poke holes in the roof with an awl beforehand or another pin to make this easier.) Once secure, take the roof off with the key pinned to it. Be careful not to disturb your tacking. Cut the 1/4 " by 1/4 " by 1/2" stock (or whatever scrap stock you can) to form the "roof chocks" (surface) which serve to hold the roof down to the key.
 Glue them into place (one front and one back) and
replace the roof on the house to check alignment and
make any last-minute corrections on the roof etc. Once
you are satisfied remove the roof key to let it dry. If you
leave it in place glue dripping inside may bond the key to
the wall and you will have a tough time getting it out. Glue
the roofsides in place, trimming as necessary, then put in
the chimney to complete the major construction.
FINISHING: The building won't look like much as yet and in fact will probably look like a pretty sloppy job.
Don't worry, as they say in carpentry . . . "a little moulding covers a multitude of sins." Disassemble the two pieces and inspect them. Any gaps or holes in the glueing can be filled in with Elmer's glue, although a far more preferable medium is Duralite speckling putty. This ready- to-use substance is available at any hardware store and is water soluble. It's advantage is that it can be sanded which the Elmer's cannot. It can be smeared on thick to cover any hole or gap then sanded with fine sandpaper for a truly finished job.
A little work with an X-acto knife may be needed to trim the roof etc. The roof, especially along the seams will need work with the putty, and this is where it will pay off. Check also the alignment of the key. If it is too loose a few strips of card may tighten up the edge if glued onto the wall. If it is too tight, shave a little (very little) off the roof key.
DETAILING: Much of the remainder of the job on Farmer Generic's house is up to individual preference. A lot can be done simply with paint. I will deal with fine detailing at length in later articles, I will give a few examples now. I do not usually devote too much time to this type of building as they represent poor dwellings and there are a lot of them.
The easiest to make is simply the stucco type house. Cut simple window-sills of 1/8" by 1/16" balsa for them. If you want to give the walls "depth" as seen through open windows, line the inside with 1/16" by 1/16" balsa. Doors can be closed or open. I prefer to cut out the doorway and glue on a piece of balsa behind it because it gives a realistic recessed look to the door. You can super-detail doors if you like. Doors for the farmer's house should be simple, or rough wood or boards. This can best be painted on.
Poster paints are ideal for this type of job as they dry absoutely flat, are cheap, and can be shaded and cross shaded as wished. A set of all primary and secondary colors is available from art stores for $3.00 or so, though if you have jobs you will want to get larger jars of white, brown, gray and yellow.
Stone walls to the house can be painted on (like field stone) or put on with "brick paper" available from model railroad stores. Model railroaders are way ahead of wargamers as far as detailing structures and terrain, and they do a fabulous job of it. I am also a model railroader and can speak with certainty, though my scenicing of my line is nowhere near as good as the "pro's" of that hobby. They do tend to go into far too much detail for wargamers, and their creations are very fragile.
Nevertheless a wealth of finishing and detailing can be had from their suppliers, though the big drawback is that it is all in HO or 20mm scale. (Does N scale fit with 15mm? -- ED.) Stone walls can also be made by smearing duralite over the wall in a 1/16" thick layer and carving out the morter joints with an X-acto knife.
Finally the "Tudor" style can be attained by gluing 1/16" square brown stained balsa over a white-washed gray surface. Normal wood can be painted on or overlayed with balsa. Stripwood or basswood siding, already scribed to represent clap-board is also available at model stores, and if you want to make a house of this type, simply substitute that for the cardstock.
Next . . . Detailing and customizing for Farmer Generic's House, and building the new model Burgher Standard's Town building.
Back to Table of Contents -- Courier Vol. 2 #4
To Courier List of Issues
To MagWeb Master Magazine List
© Copyright 1981 by The Courier Publishing Company.
This article appears in MagWeb (Magazine Web) on the Internet World Wide Web.
Other military history articles and gaming articles are available at http://www.magweb.com