 MATERIALS & TOOLS REQUIRED
- Kitchen matches (wood)
Fireplace matches (wood)
Thin cardboard
Wood stain
Tape
Knife
Scissors White glue
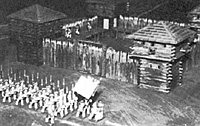
The wooden fort is a type of fortification that has been used since ancient times. Although made obsolete by catapult and cannon in the Old World, it remained successful in the frontier areas of the New World. Its success can be attributed to the relative ease of construction and an abundance of inexpensive building supplies.
There was also not a strong likelihood of having to defend against besieging artillery. This fact made wood sufficient protection. The first phase of the fort's construction was the building of blockhouses would serve as temporary shelter for the builders until these structures were connected by log palisades.
As with most miniature buildings used in wargaming, the main idea is for the model to represent but not necessarily duplicate the real thing. Keeping this in mind, this model will not be built with interlocking notched logs as was the case. But, as you will see, it will give that impression and that, after all, is the intention.
 The dimensions of the base are determined by the
length of ordinary kitchen matches which are usually 2
1/4" long. Light and quickly extinguish the match (the less
burnt the better). It is not advisable to light too many at
one time as it becomes very difficult to work in such detail
with bandaged hands. Scrape the blackened area with a
knife and sharpen this end to a blunt point as if the log had
been cut with an axe. Leave the other end square.
The dimensions of the base are determined by the
length of ordinary kitchen matches which are usually 2
1/4" long. Light and quickly extinguish the match (the less
burnt the better). It is not advisable to light too many at
one time as it becomes very difficult to work in such detail
with bandaged hands. Scrape the blackened area with a
knife and sharpen this end to a blunt point as if the log had
been cut with an axe. Leave the other end square.
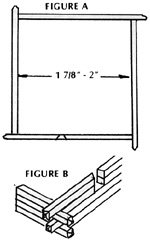
Align and glue the matches together in a square with the pointed ends extended beyond the square ends creating an interior measurement of 1-7/8" to 2" on a side. See Figure A. Use the glue sparingly as excess glue on the exposed parts of the model will not take the wood stain later. Repeat this procedure in the opposite direction for the next layer of logs so that the corners overlap every other layer. See Figure B. Continue this process for 21 layers of logs.
During the construction of the base, openings may be left for doors and loopholes. These are made by cutting shorter lengths of logs and leaving gaps of the desired width and any number of logs in height. The sides of loopholes should be cut at an angle with the opening being wider on the outside than on the inside. Door openings are 1/2" wide by 8 logs high. They can start at ground level or, if access is desired from the future rampart, the opening should begin 9 logs above the ground and placed dear the inside corner.
A much easier method is to omit the door opening altogether and just cut a door from cardboard and glue it onto the wall. The type of cardboard best suited for this project is that found on the backs of pads of paper or used in packing new shirts.
The second floor overhangs the first and is started by cutting a square of cardboard 3" on a side. At this point, planking may be drawn on this floor piece with a pencil. Center the floor and glue it to the top of the base. For the walls of the second floor, fireplace matches are used because they are much longer and eliminate having to butt shorter pieces end to end. Cut these matches in lengths of at least 3" and again with one end pointed and the other square. Build it to a height of 12 logs in the same manner as the base. The top and last layer should be squared off, i.e., there should be no overlap at the corners. Since the roof will be removable, you will have access to this floor. Therefore, the sizes and placement of loopholes and gun embrasures can be custom-made to accomodate gun and musket barrels.
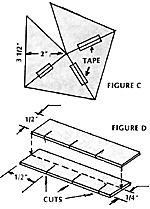
The final piece of the blockhouse, the roof, is started
by cutting 4 cardboard triangles with a base measuring
3 1/2" and an altitude of 2". These pieces are then taped
together to form a shallow pyramid. See Figure C. Roof
shingles are made by cutting strips of cardboard 1/2" wide.
Every 1/2" along the length of these strips cut half way
through at right angles to form the "shingles". See Figure
D. Glue the strips along the eaves trimming the ends to
conform with the angles of the pyramid. The strip edge
with the cuts should be at the bottom of each row. Glue
the next row of shingles overlapping the upper half of the
first row so that the cuts fall between those of the first.
See Figure D. Continue the rows until you come to the
peak. Each row being an ever decreasing trapezoid. After
the roof is totally shingled, cut 4 strips of paper 1/4" wide
and glue them along the angles to cover the shingle joints.
Trim the ends with scissors at the eaves. See Figure E.
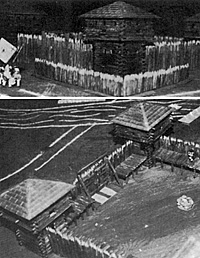
 As stated above, this particular blockhouse is
intended as a corner or wall tower in a stockade fort.
Obviously with size variations of the same basic design it
can be made to represent an interior structure or an
independent strong point.
As stated above, this particular blockhouse is
intended as a corner or wall tower in a stockade fort.
Obviously with size variations of the same basic design it
can be made to represent an interior structure or an
independent strong point.
The walls of the stockade are relatively simple. They are built in sections to facilitate construction and to allow variety in the fort's shape and size. A wall's length can easily be changed by adding or removing sections. Also a breach can be simulated by removing a section in the middle of the wall.
The palisade is made by sharpening the burnt ends of kitchen matches and gluing them side by side until you have 27 matches or a length of about 3". Some of the matches can be cut shorter and spaced at intervals to create a kind of crenellation if desired. Glue a length of longer match about 3/4" above and parallel to the bottom of the palisade. This will help keep the vertical members aligned and also support the rampart.
Rampart matches should be cut to lengths of 1 3/4", yet wide enough to accommodate the typical 25mm infantry stand, narrower than the blockhouse base so that the base will protrude beyond the walls. This will allow men stationed in the blockhouse to cover the face of the walls as in a bastioned work. The rampart matches are glued side by side until they reach the same length as the palisade.
Another longer match should be glued along the rampart and set back about 1/8" from one edge. After this has set glue the unsupported edge to the palisade on its support piece. See Figure F. Keep the two perpendicular until the glue sets. Now cut 4 or 5 short pieces to provide support on the interior side. Glue these at intervals along the interior side of the rampart. These posts should be of a proper length to insure that the palisade is vertical and the rampart level when standing.
The gate is made the same length as the wall sections. A base of cardboard 3" by 1 3/4 " just cut out first. Next cut 6 pieces of fireplace matches 2 1/2" long. Glue these side by side to form two sections of 3 matches each. These are the side supports for the gate frame. Cut another match 3" long and glue this across the tops of the two side supports forming an inverted "U" shape. Glue the frame to a long edge of the cardboard base.
Cut two pieces of match to form a brace for the gate frame. The length is that of the hypotenuse of the right triangle created by the base and the frame. The ends of this diagonal brace are then cut at angles to fit flush against frame and base. The doors are made exactly like the palisades only make each 10 matches wide. These can be braced with horizontal cross pieces. The completed doors are then affixed to the frame by means of paper hinges. Cut 4 hinges 5/8" by 1/8" and glue two to each door and frame like any normal door.
 If you want to be able to lock the gate, it can be
accomplished with a simple cross bar. Cut a "log" long
enough to extend beyond each door when they are closed
and make 4 "L" shaped pieces. These pieces are made
by cutting 4 very short pieces and glue them one on each
side of the frame and one on each door near the opening
and about 1/3 of the way up from the ground. Cut four
more pieces twice as long as the short pieces. Glue
these on top of the short pieces to made the "L". The long
bar is dropped into these slots across the doors to secure
the gate.
If you want to be able to lock the gate, it can be
accomplished with a simple cross bar. Cut a "log" long
enough to extend beyond each door when they are closed
and make 4 "L" shaped pieces. These pieces are made
by cutting 4 very short pieces and glue them one on each
side of the frame and one on each door near the opening
and about 1/3 of the way up from the ground. Cut four
more pieces twice as long as the short pieces. Glue
these on top of the short pieces to made the "L". The long
bar is dropped into these slots across the doors to secure
the gate.
The final step is applying stain with a brush. It does not have to be mixed very thoroughly, a thin consistency is fine. Do not apply stain to any of the sharpened points as the stain gives the impression of bark which would have been cut away.
All-in-all, you will have a very realistic piece of scenery for your games which can always be extended with more sections or towers. Using the leftovers from the rampart matches a short palisade can be made to ring the fort at a distance to create an additional obstable for the attacker.
This project takes some time and patience, but I think the results are worth the effort.
Back to Table of Contents -- Courier Vol. 2 #3
To Courier List of Issues
To MagWeb Master Magazine List
© Copyright 1980 by The Courier Publishing Company.
This article appears in MagWeb (Magazine Web) on the Internet World Wide Web.
Other military history articles and gaming articles are available at http://www.magweb.com