 I should mention that all my gameboards were created to accommodate specific battlefields of the Franco-Prussian War, for use with my 6mm “1870” armies. Those wishing to make more generic boards in other scales will find much applicable information here, but will have to make a few adjustments according to the scale used. For any historically accurate gameboard, topographical maps are, if not critical, at least enormously useful. Modern topos of 1:50,000 scale are the most readily available at specialty map stores, but often need be complemented with data from more contemporary maps; the extent of towns, woods, roads, and other features at the time of a historical battle may of course differ radically from those shown on modern 1:50’s.
Having secured your basic reference documents and maps, you need to determine a scale. For my “1870” games, 1 inch (about 2.5cm) equals 100m, which works out to about 1:4000 scale. This can help you determine your vertical scale, and the overall size of your board. Most of my boards are about 6 feet by 9 feet (about 7.2 by 10.8 km), which makes a nice size board well able to accommodate most FPW battles with room to spare for maneuver. A gameboard this size is made in three pieces (“segments”) each 3 by 6 feet – which when stacked vertically just fit into the rear of my Volvo station wagon.
I always create a sketch map from which to work, onto which I’ve transferred the data that will figure on the gameboard. Only those contour lines which will be represented by layers of styrofoam are included, for instance, as are simplified town plans, woods, etc. The map is gridded into one foot squares, and small adjustments are made as necessary to avoid important features (roads, for instance) running afoul the board’s join lines.
Then, its down to the friendly home improvement/builder’s supply store for the raw materials. The white styrofoam insulation board that I use generally comes in 8 by 4 foot sheets; I strongly recommend that you use the 2 inch thick sheet as the base layer of your board, and as much of the 5/8 inch sheet as you’ve determined is necessary for vertical development. Have it cut on the spot to whatever dimensions are best for your own board and the storage capability of your vehicle, and pick up the white glue and spray adhesive, too. You’ll find felt, T-shirt fabric, dye and straight pins at your local fabric store, and much of the rest of the materials at a hobby crafts store.
CARVING THE GAMEBOARD
 Lastly, but most importantly (and expensively), you’ll need a hot knife. Not the electrified wire variety, but a professional type, used by insulation installers. It should have a well-insulated handle and a free standing blade at least 3 1/2 inches long, to enable you to cut long strips of styrofoam (using that metal yardstick as a guide), free carve, and melt precisely. It is absolutely indispensable for anyone serious about working with styrofoam. I use a 110v model, which cost about $100 ten years ago. Call your local insulation specialists and ask them where you can get such a tool locally.
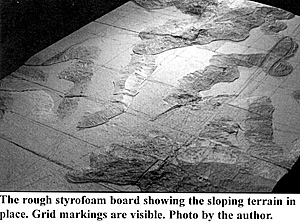
Now you’re (finally) ready to begin. Using a grease pencil or felt tip pen, transfer the grid of the sketch map onto the base layer of styrofoam, and mark the intended position of each of the second layer pieces. Although it may vary with each board, as a rule of thumb I use a separate layer for each 30m of elevation, this gives an exaggerated vertical scale, which is in keeping with the figures rather than the horizontal ground scale. With your precious new hot knife, cut each of the marked 5/8 inch thick pieces so that they fit their designated places, paring down the sides to give a realistic slope. Although its terrain-specific, most slopes should generally be no greater than about 30 degrees off horizontal; most are less than that, resulting in some pretty thin edges.
Once you’ve carved the edges of all the second layer pieces to your satisfaction, glue them down on the base layer board, weighing them down with some heavy objects and securing the thin edges with straight pins. Allow these to dry at least 24 hours. Once dry, remove the straight pins and do any additional detail work necessary with the hot knife. This might include “blending” the pieces together, carving railroad or road cuttings, or flattening portions of the slopes for houses or other surface objects that will require a level position on which to rest. This done, repeat the process with the next layers until all have been built up and blended together with your trusty hot knife.
FABRIC COATING THE BOARD
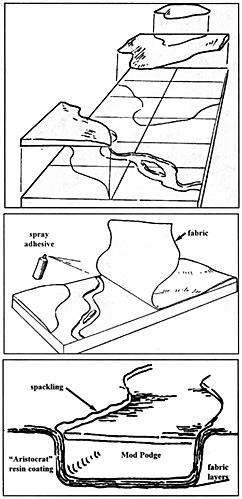
The next step is adding the fabric; first the felt on the styrofoam, and then the T-shirt fabric over the felt. The felt layer is necessary to smooth out the cut and melted styrofoam, and gives an extra layer of protection to the board. Cut the felt to fit each board segment with a little bit to spare, and lay it on top of the styrofoam. Pin the fabric down with a row of straight pins widthwise across the middle of the board, and fold back one half of the felt on the other. Now, in a well-ventilated area, and with no valuable items within a few feet, coat the styrofoam thoroughly with spray adhesive — paying particular attention to river beds, slopes, and declivities. Spray the folded-back side of the felt too, and wait about a minute for the adhesive to get tacky. Then flip the felt back onto the tacky styrofoam, and smooth it down, especially in those river beds, etc. Repeat the process for the other half of the board segment. Remove the pins, and, with a razor blade, trim the excess felt flush with the edges of the board.
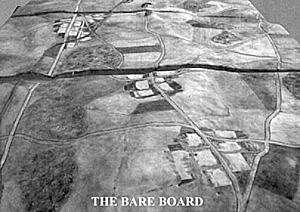
The T-shirt fabric should be dyed to give a nice base color before it can be mounted on the board, unless you’re making a winter board and want a white surface (this is why you got 100 percent cotton double knit, incidentally; a cotton-polyester blend won’t dye nearly as well). Two to four 1 1/8 ounce boxes of dye usually suffice for the fabric covering a 6 by 9 foot board: light green for summer boards; beige/tan for fall boards. Allow for about 10% shrinkage, and DON’T cut the fabric into pieces before dyeing! They’ll individually shrink, throwing your careful measurements off by a wide margin. Cut them to fit your board segments after dyeing, with enough extra to overlap all four sides. If the board edges don’t fit perfectly because you were a little too enthusiastic with your hot knife, glue a bit of extra felt along the board edges to fill in these gaps. Attach the T-shirt fabric using the same technique you used for the felt, one half board segment at a time, using extra care when flipping the T-shirt fabric back onto the sprayed felt surface (if you stick two parts of your sprayed T-shirt fabric together accidentally, you’ve got a major problem). Pat down and smooth out very carefully, avoiding wrinkling the fabric, from the middle out towards the edges.
ADD A LITTLE WATER
 Riverbeds and ponds need special attention while the styrofoam work is being done. Since they are often on the base layer, the river beds must be carved and melted into the styrofoam in situ. Don’t make the beds more than 1/2 inch deep, and keep the sides fairly steep. Once the fabric layers have lined the riverbeds, coat them with spackling all the way up the banks, to keep the river material from soaking into the fabric. If the spackling tends to dry white, mix in some grey-brown acrylic paint first. I usually airbrush the dry spackled river bed a dirty brown as well.
Next, mix up some Mod Podge with a bit of grey-brown acrylic paint thrown in for an opaque water effect. Carefully pour the colored Mod Podge into the riverbed, and allow to dry for at least 24 hours. Like thick white glue, it will contract when it dries but never mind; it’s just there to give color and volume. Over the Mod Podge goes the clear Aristocrat resin top coating. This stuff will not contract or sink, and acts as a hard top coat for your water bodies. It’s often difficult to get the two-part Aristocrat to cure perfectly, so pay attention to measuring precisely.
Streams – being very small obstacles — are generally just a brownish line airbrushed down the middle of a declivity. The declivity itself is formed by simply running some blunt instrument along the board surface with sufficient pressure to form the depression. A bit of Mod Podge brushed onto the stream can give it a bit of “glitter”.
The Battlefield in Miniature
Back to Table of Contents -- Courier #86
To Courier List of Issues
To MagWeb Master Magazine List
© Copyright 2003 by The Courier Publishing Company.
This article appears in MagWeb (Magazine Web) on the Internet World Wide Web.
Other articles from military history and related magazines are available at http://www.magweb.com