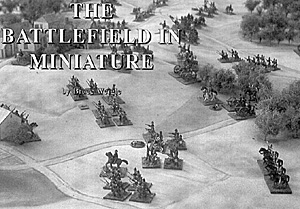
An “1870” game in progress: a Prussian attack upslope against a French line anchored on two villages (Villers-Bretonneux, 27 Nov 1870). Bare trees and winter fields; the slight rise along the center of the game board was a critical terrain feature. Photo by the author. The author also developed the 1870 rules for the Franco-Prussian War.
The hills always looked a bit superfluous, however, and, even when moved underneath the cloth, still just looked like large green bumps. Once I started hosting “1870” games at conventions, the terrain and set-up time requirements became staggering; much more needed to be set up than could possibly be done in an hour, even without the time required for the troops’ initial deployment. A typical historical game board, 6 ft by 9 ft (about 7km by 11km), might encompass a dozen or more villages, several forests, and several corps worth of soldiers in 6mm scale, this could easily total over 150 buildings, 400 trees, and several hundred stands of troops). Obviously, some method was needed that could accurately model the terrain, and enable the whole board to be set up at home then simply carried into the convention intact.
The styrofoam boards were the solution (I use white insulation board, but understand that the common pink or blue boards work, and can be worked, equally well). Using several layers of custom-cut and sculpted styrofoam laminated together, unique terrain boards could be created that were lightweight, strong, and required no additional details be added. Once finished, with the buildings, trees, and troops in place, the board segments were simply stacked on top each other, (using styrofoam “spacers” to keep each segment well clear of the one beneath), and loaded into the station wagon. Once at the convention the stacked board segments were then carried to the appointed table and set up within perhaps 30 minutes of the game’s start time. The troops, incidentally, were usually covered with a few rags to keep them from bouncing during the trip.
Otherwise, the only preparatory work needed was to remove the rags and spacers, dress the formations, strap the board segments securely together, and hand out scenario notes and cheat-sheets to the arriving players. Very little fuss, indeed! And, the return trip was equally easy; since most of the troops remained on the board, the necessity of many well-padded transportation boxes was minimal.
Much of the attraction of fighting miniature battles for me comes from the realism of the terrain on which the battle is fought. Not only does attractive terrain have an esthetic appeal of its own, but it should invite wargame commanders to pit their wits against the “lay of the land” as well as the hosts of their opponents – and use that terrain to their own advantage. Further, the closer one can come to replicating “real” terrain, the better able he is to appreciating the difficulties a historical counterpart might have had maneuvering bodies of troops on that terrain.
My interest in constructing accurate and aesthetically pleasing gameboards, naturally, began while observing others’ efforts. For years prior to attempting my first “permanent” styrofoam and cloth board, I haunted the game tables at HMGS conventions, cheerfully plundering good ideas and noting techniques to avoid. I still do. My belated thanks to all those gamemaster/board designers who took the effort to enhance the visual impact of their little battlefields, and inspire me to evolve a system of my own.
MATERIALS NEEDED
* Available in most fabric stores where you get the felt.
All my boards are made of styrofoam because it’s cheap, readily available, lightweight, and easily worked (after you get the hang of it). Covering the boards with cloth protects the styrofoam, and provides a convenient surface for painting the terrain details. Pin-based trees are easily stuck into the board without pre-drilling holes, and can be removed without damaging the surface. In my humble opinion, styrofoam is as close as anyone has come to an ideal board material (just ask GeoHex©). Make sure you’ve got good ventilation while melting the stuff, however; one whiff and you’ll see why.
The Battlefield in Miniature
 My search for a satisfactory game board began, like many gamers’, with a green felt cloth. Various “hill” pieces, roads, rivers, buildings, and trees were added as required on top.
** See the Hot Wire Foam Factory advt in this issue for a good, reasonably priced unit.
Back to Table of Contents -- Courier #86
To Courier List of Issues
To MagWeb Master Magazine List
© Copyright 2003 by The Courier Publishing Company.
This article appears in MagWeb (Magazine Web) on the Internet World Wide Web.
Other articles from military history and related magazines are available at http://www.magweb.com