Starting Positions
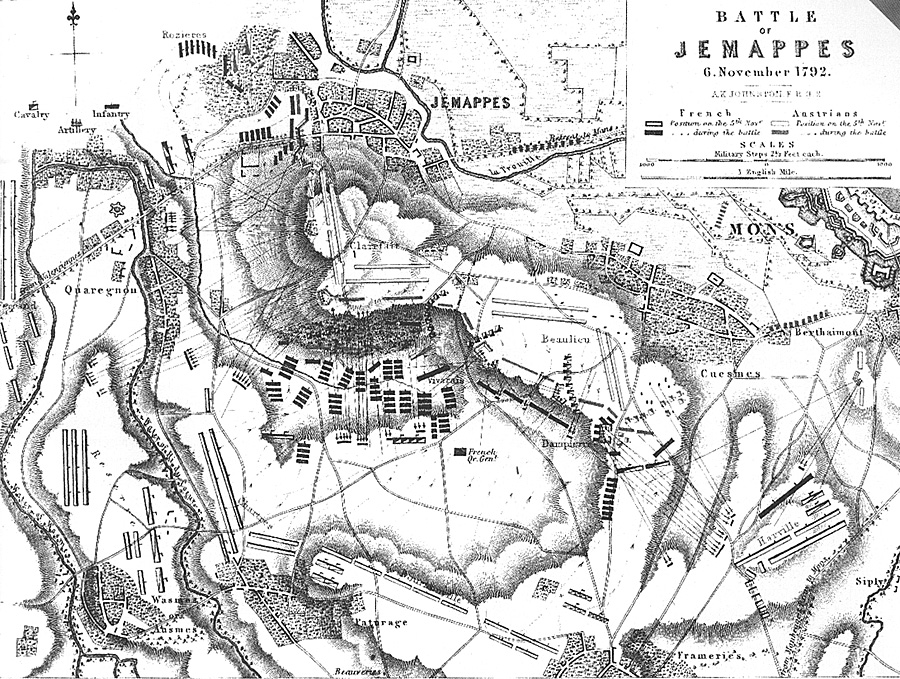
In outpost skirmishing during 4th and 5th November the French have approached the village of Quaregnon, occupied the villages of Paturage and Framieres, and have forced the Austrians back to their final position covering the (weak and obsolete) fortress of Mons. The scene is set for a decisive assault on 6th November. The Austrians know that their position has several weaknesses, since their centre and right have the river Trouille directly to their rear, with only two narrow bridges offering access to the safety of the North bank. Their defences are also undermanned, in view of the four mile frontage they are attempting to hold. On the other hand their position has many strengths, being based on some 14 redoubts and gun positions running along a line of heights and (whatever its technical weaknesses) a fortified town and its garrison.
Behind their left flank is the road to Brussels, crossing Mount Panisel covered by the high ground of the Bertaimont suburb (held by Beaulieu). In the centre is the ridge above Cuesmes (Clerfayt), and on the right is a wooded hill (Lillien), above the villages of Quaregnon (Tyrolean Jaegers) and Jemappes (Loudon) itself, covered on the West, North and East sides by streams, marshy waste ground, ditches and water-meadows that are practically impassable to formed bodies of troops - only to infantry skirmishers.
The French began an artillery bombardment at 7 am, (i.e. three hours before the action of the game starts at 10 am). The Austrians have replied with their own artillery during the same period, although neither side has yet realised that these exchanges have actually produced no tangible result whatsoever. At 10 am, however, the game begins and the French are free to storm forward in any way they wish (according to the orders that the `Dumouriez' player will have issued before the game starts).
The question is - with what energy will their commanders attempt to execute their orders? Roll a D6, and allow perfect execution for 5-6, a two hour delay and then only a half execution for 3-4, and no execution at all for 1-2. Note that the actual deployment had Ferrand on the left, opposite Quaregnon; Egalite supported by the reserve between there and Paturage; Beurnonville in Paturage and Framieres, with de Harville on the right flank. In the wargame, however, the Dumouriez player will be free to re-arrange this initial deployment as he sees fit.
NOTE: Austrian losses in the real battle were claimed to be about 1,200 men, including some 400 POW. French sources sometimes revise this upwards to as many as 4,000, which may actually be fair if one counts the high level of desertions during the week after the battle (however, Alison's assumption of 5,000 in the battle itself is surely ludicrously high). French losses have never been authoritatively quoted, to the knowledge of the present author, but may well have been as high as 3,000. Yet the memory of this battle has been so deeply corrupted by revolutionary mythology and rhetoric that Alison happily quotes 6,000 French casualties - nor did one deeply serious and respected reference book, published in Paris as late as 1994, blush to announce that no less than 50,000 French and 18,000 Austrians had been killed at Jemappes (let alone all the wounded, missing and prisoners)!
Orbats for Jemappes
French Forces (45,000)
Commanded by Dumouriez
Ferrand:
- 5 Regular, 4 Volunteer, 5 Federe battalions: 1 cavalry squadron, 2 batteries
Egalite:
- 3 Regular, 7 Volunteer, 2 Federe battalions: 3 batteries
Reserve:
- 4 Regular, 7 Volunteer, 1 Federe battalions: 12 cavalry squadrons, 2 batteries
Beurnonville:
- 4 Regular, 8 Volunteer, 1 Federe battalions: 4 cav. squadrons, 3 batteries
de Harville:
- 4 Regular, 9 Volunteer, 1 Federe battalions: 4 cav. squadrons, 2 batteries
Austrian Forces (13,000)
Under Duke Albert of Saxe-Teschen
Advanced posts:
- 5 Tyrolean Jaeger companies
Loudon, Extreme Right:
- 7 Free companies
Lillien, Right Wing:
- 2 grenadier, 2 line battalions, 3 squadrons and 2 batteries
Clerfayt, Centre:
- 2 grenadier, 1 line battalions, 4 squadrons and 3 batteries
Beaulieu, Left Wing:
- 3 battalions and 1 battery
Cavalry Reserve:
- 8 squadrons
Moons garrison:
- 3 battalions and 3 batteries

Valmy and Jemapps 1792
- Historical Background
Wargaming Scenario: Valmy: 20 Sep 1792
Wargaming Scenario: Jemappes: 6 Nov 1792
Back to Battlefields Issue 10 Table of Contents
Back to Battlefields List of Issues
Back to Master Magazine List
© Copyright 2001 by Partizan Press.
This article appears in MagWeb.com (Magazine Web) on the Internet World Wide Web.
Other articles from military history and related magazines are available at http://www.magweb.com