Battle of Jemappes
6th November 1792
The French Attack
by Dave Hollins, UK
| |
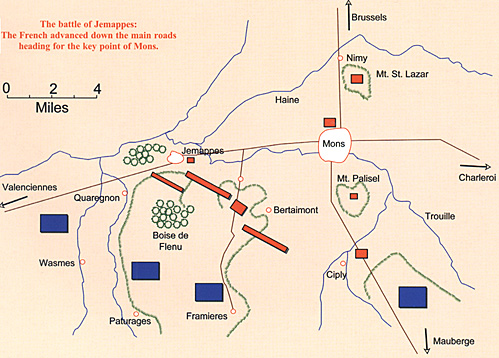
The battle of Jemappes: The French advanced down the main roads heading for the key point of Mons. Once the Austrians were forced to retreat, Harville was to seize Mont Palisel immediately and from there, take the hills around Nimy (Mont St Lazar), in order to cut off the Austrian line of retreat back on Brussels. Bernouville and the centre/right of Dumouriez’s army were to attack the fortified hills between Cuesmes and Jemappes, as soon as the northern (left) wing had secured Quaregnon and there was thus, no longer any risk of counterattack on the left flank of the centre. The attack was to be started by a heavy artillery bombardment. Around 7 a.m., on 6th November, the French opened fire from all their heavy cannon targeting the redoubts and batteries on the Austrian right and centre. Eight 12pdr and four howitzers in the centre plus six 12pdr and two howitzers on the right wing could respond. As the French artillery bombardment began, GD Ferrand began his attack on Quaregnon. The six companies of Freikorps, which had occupied the village on the previous evening, evacuated it and fell back on Jemappes. However, for the time being, the French did not advance beyond Quaregnon and the woodland to the south-east remained in the hands of the Austrian Jäger. Also that morning, a detachment from Harville’s corps attacked around Ciply, but was driven back by the Mihailovich Freikorps. Soon after, the second Division from Harville’s corps arrived at Framieres, after marching through Genly, while around 10 a.m., several more battalions and squadrons marched towards the hills at Bertaimont, but they did not advance any further. Part of Harville’s heavy artillery took position on the highest part of the flat ground west of Ciply and opened fire in support of other French guns firing on the fortified positions in the Austrian centre. The advances by both French wings forced Duke Albert, who was at Bertaimont, to commit his reserves this early. As the French attack seemed mainly directed at the Austrian right and centre, the battalion of IR17 was sent from Mons to reinforce the centre on the hill south-west of Cuesmes. In contrast, FML Beaulieu believed the moment was favourable to move over to the offensive in his sector and requested the Duke to send him the battalion designated for this, which was done. Soon after, two squadrons of Koburg Dragoons were despatched from the centre and GM Lamberg’s eight squadrons were sent from Cuesmes to the left wing.
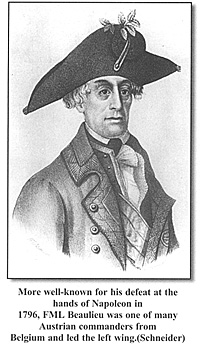
More well-known for his defeat at the hands of Napoleon in 1796, FML Beaulieu was one of many Austrian commanders from Belgium and led the left wing.(Schneider) The French outposts initially fell back, but were soon reinforced, at which point Beaulieu abandoned his operation and withdrew his troops back to the Bertaimont hills. As the French advance against the FML Lillien’s troops began to develop significantly around 10 a.m., FZM Clerfayt took over command of the right wing. He ordered four battalions from there, (which up to now had been stood under cover), to advance on to the Jemappes hills and moved the two Grenadier battalions (Leeuven and Pückler) from the centre closer to the right. As the French centre was still standing in its original position formed up in lines to reduce the impact of the Austrian artillery, as they waited to change into assault columns, these moves seemed unremarkable. Once the Würzburg battalion, also in the centre, had been withdrawn about 1000 paces as far as the depression in the ground because of the enemy artillery fire, the defensive positions in the centre had been completely evacuated by their defenders – only one redoubt remained occupied by a Pioneer Hauptmann and 40 of his men. In the meantime, having been informed that Lt-General Harville’s troops were all in position, General Dumouriez had ordered his left wing to take Jemappes and towards midday, despite General Ferrand making only slow progress against this village, also ordered his centre and right forward. “Exactly at noon (these troops) put themselves into columns in a flash and advanced with the greatest rapidity and the best spirits towards the enemy entrenchments”. The formation they used, which must have been a surprise to the Austrians, was the Column of Attack, where the 4th and 5th peletons (essentially companies but evened out across the battalion in action) would form the lead division with pairs of peletons behind them at half-distance, a drill prescribed under the 1791 regulations. These were then formed en echequier (chessboard style), in two battlelines, so that on reaching musketry range, each battalion could then deploy on this centre division to form a line. If necessary, bayonets would be lowered quite early and all the ranks would close up to form a tighter mass (closed column) for a direct assault. The columns were led by several batteries, which would both cover the deployment of the columns and support their fire. (The French historian Lauerma would later describe its deployment as too “linear” and despite its numerical superiority and high consumption of ammunition, the French guns inflicted relatively few casualties). With the centre (under Egalite) and right, Lt-General Bernonville advanced in good order, cavalry on the flanks and behind the main line, towards the Cuesmes hill. For the line regiments, shouting their old Royal period battle cries, the deployment from its columns into line was straightforward and, having deployed, they opened fire on reaching 200 paces from the Austrians. Contrary to popular myth, the French troops were now able to fight like professionals – Dumouriez would later report: ”In all the movements that I made them perform under enemy fire, I saw them manoeuvre and march as if they were on the parade ground. In the preceding three days especially, I have admired their precision in executing the manoeuvres and deployments, which I ordered”. Dampierre describes the process: “We marched in column up to a quarter of cannon range. Then since we were losing men, (the 104e in particular taking heavy casualties), Generals Dumouriez and Bernonville ordered me to deploy the columns … The movement was made as if on a peacetime parade ground … As soon as eight battalions had finished deploying, I commanded them to march forward and beat the charge.” As the Austrian centre had been evacuated by its troops, Bernonville was initially successful. The two squadrons of Austrian cavalry still in the centre fell back and in a considerable hurry, the artillery was being removed from its fortified positions, but the French troops were already pressing forward into these fortifications and a Hussar squadron took several guns, which could not be removed in time. Only the redoubt occupied by the Pioneers was still held by the Austrians. However, Oberstleutnant Prince Anhalt-Cöthen soon succeeded in halting his division of Koburg Dragoons, at which he turned them about and put the French Hussars to flight. Together with a squadron of Latour Chevauleger, which had been rushed from the left wing in support, and had moved up, riding round to the east of the Cuesmes hill, he recovered the guns, which had just been lost. The Austrian cavalry then pressed on against the French infantry, who fled the earthworks and Cuesmes hill, which they had only re-cently occupied. In the meantime, Duke Albert had despatched the battalion of IR17 Hohenlohe and the ten squadrons, which had previously been sent to the left wing, to help the centre. Nevertheless, Dumouriez had noticed the rearward movement of Bernonville’s infantry; he personally rode over and with his senior commanders rallied his broken troops. The most successful was the Duc de Chartres, who rallied his troops in the Flenu woods to form a massive column, which he called the “bataillon de Mons” supported by a single cannon. Followed by the 5e and 17e regiments also in column, the Mons advanced again.
Austrian Dragoon: Austrian cavalry superiority could do little to negate the French 3:1 advantage in numbers. Soon after, the Cuesmes hill was once again under French control. Only now did the Würzburg battalion advance from its position, only to run into effective French musketry and canister fire and fled in disorder. FZM Clerfayt despatched the Leeuven Grenadier battalion from the Austrian right in support, but they could make no real progress under the hail of French fire. The battalion of IR17 was still marching up, when the decisive moment of the battle took place on the Cuesmes hill. In the meantime, General Ferrand had advanced towards Jemappes and the hill to the south. He planned to encircle the village and had sent six battalions to the north of the road against the north side of it, while nine battalions and the cavalry turned towards the south-east and joined in the action being fought by the French centre, leaving three battalions in Quaregnon. The French cavalry was only able to fight by squadrons and was having little impact. Unhappy about the slow pace of Ferrand’s advance, General Dumoriez ordered his General Adjutant Thouvenot to hasten the assault. The French centre itself was in a difficult position. Certainly, the Austrian Jäger had evacuated the wood on the southern slope after a brief clash, but the attack against the upper part of the hill had been driven back twice, especially by the tenacious resistance of IR41, (who lost 14 officers and 400 in the battle), while the Blankenstein Hussars and Koburg Dragoons attacked the enemy repeatedly. However, the bravery of these troops could not make up for the four to one numerical disadvantage and they could not withstand the overwhelming enemy artillery fire for too long. So, eventually after repeated assaults, the French infantry were able to establish themselves on the upper part of the hill. The Fight for JemappesNevertheless, there was still an opportunity for the Austrians to turn the tide of battle: If the entrenched village of Jemappes could be held as a flank strongpoint by the Freikorps companies, then the Austrian battalions in the centre and right wing, who were still not discouraged despite the heavy fighting, could attempt a counterattack to drive the enemy from the hill south of Jemappes. Up to this point, the two Austrian Grenadier battalions, Morzin and Barthodeiszky, had maintained their position on the slope extending from the crest of the hill towards the village with stubborn bravery. Here the French were running into real problems: Leclaire states that of his assault columns, only three peletons were able to deploy under the Grenadiers’ “diabolical fire”, which forced many of the French to seek refuge at the rear of the columns. In Austrian headquarters, they were confident that the right wing was completely secured by the impassable river Haine, the flooded water meadows along it and by the occupied fortifications in front of Jemappes. There was thus great consternation at the news that, aided by the local inhabitants, three French battalions had outflanked this wing by constructing bridges over the Haine, made of a large barge, planks and ladders, and were now marching towards Jemappes from the north. Very quickly and only just in time, a division from the Morzin Grenadiers rushed into the village and despite heavy fire from the enemy, who were now pressing into the village, the Grenadiers were able to halt the French advance, but this success could at best only delay the inevitable and under the cover of the Grenadiers’ defence of the village, most of the Austrian right wing and the artillery began its retreat followed by the centre over the bridge over the Trouille and down the main road to Mons, so that there was heavy congestion at the eastern exit from Jemappes and on the bridge. The rest of the right wing fell back along the northern slopes of the hills through Cuesmes. In the meantime, despite some panicky withdrawals, the French centre had climbed the hills, but the units, which had been exhausted by the assault and had lost some cohesion, remained on the hills, which they had taken together with Lt-General Beurnonville’s men, thereby depriving the French of a complete victory by failing to achieve the possible capture of a large part of the Austrian force as it fell back through the narrow defile. After a five hour cannonade, the actual infantry action had only lasted about two hours. By 2 p.m.., the result had been decided around Jemappes and Cuesmes. Following Beaulieu’s counterstroke, the French had not disturbed the Austrian left wing. This remained in position on the Bertaimont hills and they only retreated once the result of the battle had been decided at Jemappes. The Freikorps and Hussars had retreated from the area around Ciply and the two companies had withdrawn from Mont Plaisel. Harville’s corps followed this wing very cautiously and only now and then fired a few cannonballs at its rearguard. The Austrians sustained casualties of 305 dead and 513 wounded, the bulk of which they attributed to canister fire. 413 prisoners were lost and five dismounted guns were abandoned in the entrenchments. According to Dumouriez, the French lost 6-700 dead plus 1300 wounded. After the French troops had rested in the position they had taken, Dumouriez ordered them to move on around 4 p.m. and headed for Mons. Duke Albert was forced to abandon the Netherlands and withdrew on Cologne. A week later, Dumouriez would enter Brussels. Battle of Jemappes 6th November 1792
Armies Take Position The French Attack Long Term Effects Order of Battle: Austrian Order of Battle: French Back to Table of Contents -- First Empire # 77 Back to First Empire List of Issues Back to MagWeb Master Magazine List © Copyright 2004 by First Empire. This article appears in MagWeb.com (Magazine Web) on the Internet World Wide Web. Other articles from military history and related magazines are available at http://www.magweb.com |
 As dawn broke, Dumouriez directed
twelve 16pdr and twelve 12pdr cannons plus
12 howitzers to form up in front of the army in
such a way that each of the Austrian earthworks
could be brought under enfilading fire
by two batteries, each comprised of a pair of
artillery pieces. Lt-General Harville was
tasked with advancing in line with the right
wing to surround the Austrian left wing located
on the hills around Bertaimont and to
crush it with artillery fire.
As dawn broke, Dumouriez directed
twelve 16pdr and twelve 12pdr cannons plus
12 howitzers to form up in front of the army in
such a way that each of the Austrian earthworks
could be brought under enfilading fire
by two batteries, each comprised of a pair of
artillery pieces. Lt-General Harville was
tasked with advancing in line with the right
wing to surround the Austrian left wing located
on the hills around Bertaimont and to
crush it with artillery fire.
 FML Beaulieu now undertook an attack with part of
his infantry and several cavalry squadrons
against the French on the Frameries plateau.
FML Beaulieu now undertook an attack with part of
his infantry and several cavalry squadrons
against the French on the Frameries plateau.
 Facing them, the Austrian cavalry, which was
greatly hindered by the ditches and hedges,
suffered heavy casualties from the fire to their
front and had to turn back.
Facing them, the Austrian cavalry, which was
greatly hindered by the ditches and hedges,
suffered heavy casualties from the fire to their
front and had to turn back.