
Battles of Aspern-Essling
and Wagram 1809
Part II
Wagram 5 - 6 July
Illustrated with Modern Photographs
Article and Photos © by John Salmon
| |
A brief summary of the opening movesAs I described in part I of this article, at the battle of Aspern Essling Napoleon had received his first major defeat. The Austrian Hapsburg Archduke Charles had prevented the Emperor from crossing to the north bank of the Danube and had forced him to retreat with heavy casualties.
The great invincible Emperor, defender and promulgator of the ideals and concepts encapsulated by the French Revolution, champion of the modern age, fought to a stand still by one of the oldest dynasties in Europe. Napoleon defeated, a ripple of excitement permeated the courts of Europe as the news spread. For some, such as the Prussians, there was a glimmer of hope that the disgrace of Jena/Auerstädt (1806) might be reversed in a new war. For others, such as the new kingdom of Württemberg, which had provided Napoleon with substantial support and troops, there was grief at the losses sustained by their soldiers and apprehension that the defeat of the Emperor could also lead to their downfall. [1]
In Britain there was a certain amount of satisfaction that the years of intrigue and substantial financial subsidies were finally paying dividends. The British would soon embark on an expedition to Walcheren in the Netherlands as part of a concerted effort to support the Austrians. In the Iberian Peninsula Sir Arthur Wellesley would soon win a victory over French forces at Talavera on 27/28 July 1809, that would bring him the title of Wellington. The strategic situation was indeed worrying, but although Napoleon had been defeated in one battle the campaign was far from over, and the Emperor was never more dangerous than when his back was to the wall.
Victor, But...
Archduke Charles may have been proclaimed the victor but he had not grasped the initiative, instead he remained largely inactive, content to observe. Napoleon on the other hand was determined to expunge the stain on his record.
Contrary to his own view that he learnt nothing from his last battle that he did not know in his first, Napoleon, examined the faults that the earlier battle had revealed in his tactics. The main reason for his defeat was identified as the single, fragile link between his forces on the south bank and those on the north. To rectify this Lobau Island was soon converted into a formidable fortress whose cannon could protect the many landing areas Napoleon determined to gain on the north bank of the Danube. See maps. New and more numerous bridges were constructed that could withstand the adverse efforts of the Austrians and Danube. Reinforcements were called up which gave Napoleon a force numbering some 188,000 men and a remarkable 500 guns.
The Austrians observed some but not all of this activity from their observation posts on the Bissam, a mountain that overlooked the area. They used high powered telescopes which could peer across to Lobau Island. The French however used the woods and trees of the island to cover their dispositions, they also made use of the night to move their troops around. The Austrians had gathered their forces to a point where they numbered some 155,000 and 450 guns. More reinforcements were expected under Archduke John but did not arrive in time for the battle. Archduke Charles expected an attack but was convinced that it would be in the area of Aspern, in consequence of which he had field fortifications built in this area. Napoleon however was the master of the unexpected.
On the night of 4/5 July he launched his pontoon bridges across the narrow waters separating Lobau from the north bank and his troops poured across. Their objective was not Aspern but Gross-Enzersdorf further to the east. Even the best laid plans run into difficulties and soon two French corps became intermingled. It is in the ability of officers to sort out such confusion that true battle skills lie, despite many difficulties they maintained momentum and overcame their difficulties. Austrian efforts to stem this tide were uncoordinated and ineffectual. The day was punctuated with desperate assaults attempting to halt the French who responded with skill and tenacious determination to push forward. By nightfall the French occupied a large wedge of land from Aspern to Wagram.
Napoleon was aware that Archduke John was approaching from the east with 12,500. If they arrived before he had defeated Charles they would pose a serious threat to his rear. On the 6th he was therefore determined to push the battle forward and defeat the Austrians. Unexpectedly though it was Charles who launched the first attack of the day against the Saxon corps under Bernadotte near Aderklaa. The Saxons were routed and Bernadotte disgraced by Napoleon who sent him from the field. Massena's corps was directed to bolster the front and hold the Austrians. However the main Austrian effort of the day was an attack in force against Aspern, it's aim was to sever Napoleons communications with Lobau Island. The situation became so bad that Napoleon had to order Massena to withdraw from the Aderklaa area and move south to counter the Austrian attack. Assisted by massed artillery from Lobau Island, which Napoleon had specifically positioned there to cover just such an attack, Massena stabilised the situation and halted the Austrian attack.
Over to the north east around Markrafneusiedl, Napoleon's own flanking movement under Davout had got under way. Despite fierce fighting, Davout's men forced the Austrians back and managed to gain a lodgement on the Wagram Heights. From this location they would be able to roll up the dominating Austrian position which overlooked the battlefield. With the pressure on the Austrians mounting Napoleon judged the time right for his main attack.
Macdonald's corps moved forward towards Gerasdorf. It suffered greatly from Austrian artillery and a major gap appeared in it's ranks. 112 guns were rushed forward from the reserve and plugged the gap with their fire. The momentum of the attack was maintained and eventually the Austrian line was pierced. This was the battle wining moment of the day; with his army split in two Charles ordered a withdrawal. Napoleon had gained a victory, and one that would prove decisive for the campaign.
The cost of Wagram was high, casualties on both sides were around 40,000 each, a true slaughter field as a battlefield is called in German (Schlactfeld). Napoleon had gain access to the north bank of the Danube and inflicted major losses on the Austrians, he now started the pursuit which was intended to harry the retreating enemy and cause his real disintegration. But the Austrians were far from being a demoralised foe, at Znaim on the 10/11 July Charles turned on Marmont's Bavarian corps which was soon outnumbered. It was only the timely arrival in the late evening of Massena, and latter Napoleon with Davout's and Oudinot's corps that prevented Marmont from suffering a severe drubbing. The action was renewed next day but peace talks had commenced and by evening officers were calling out 'Peace! Peace! Cease fire!' [2]
On 12 July an armistice was concluded although the final peace agreement would not be completed until mid October in Vienna.
Wagram, although a severe loss to the Austrians was not a major catastrophe, such as the Prussians had suffered at Jena/Auerstädt. What it did do was to convince Archduke Charles that the cost of continuing the war was too great. The Austrian army had inflicted major casualties on Napoleon's forces but had also suffered grievously in the process. The role of the army in Austrian strategy was more than just as a force to fight external enemies, it was the one unifying element that the Hapsburgs could use to hold their disparate empire together. If it was weakened to such an extent that it could not overawe the many nationalistic forces within the empire then the Hapsburg dynasty itself might be in danger. These thoughts were uppermost in Charles' mind. His brother Frances, the emperor, violently disagreed with him in this instance, but once an armistice was agreed he could not gather sufficient energy within his own court to resume the fight. Napoleon's victory then was one of moral as much as physical force.
The peace agreement would force Austria to give up yet more provinces in the west as well as a large indemnity. Napoleon's chief prize though would be the Hapsburg Princes Marie-Louise. By divorcing Josephine and marring this young princess he aligned himself with one of the oldest and most prestigious royal families in Europe. By doing so, Napoleon hoped to achieve two great aims, a male heir, something which Josephine was unable to give him, and legitimacy. On March 20 1811 he achieved the first of these goals when Marie-Louise gave birth to a son. The second goal was never within Napoleon's grasp. He would always remain an outsider to the royal courts of Europe. In 1813 Austria would once again fight against him and be a major participant in the campaign which forced his first abdication in 1814. Napoleon's son would never sit upon a throne as Emperor of the French.
As you move inland from the Danube to the Marchfeld which contains the Aspern-Essling and Wagram battlefields the first thing you notice is how flat the area is. I live near Cambridge and am used to being surrounded by fairly flat land. Compared to the Marchfeld, Cambridge is like the Alps. To describe the area as flat as a bowling green is to do it a disservice. It is incredibly flat. Napoleon's command post during the Wagram battle was on a hump that could have been mistaken for a slightly enlarged mole hill. Even so if offered the best views around the Battlefield. The fabled Wagram Heights rise up like the Himalayas, even though they are only some 20 meters high. I emphasis the flatness so that when you view the photographs you will understand why there appears to be little to distinguish one flat field from the next. With few points of reference it is difficult to pick out photogenic views.
David Chandler, Dictionary of the Napoleonic Wars, Greenhill Books, 1993.
Many thanks to Alan Rooney of Midas Battlefield Tours for a most interesting and enjoyable trip to Austria in 1997. It was good to have an expert along to navigate us through the flat terrain and describe the battles, as well as finding excellent Pizza parlours.
As always, many thanks to my wife Elizabeth who translated the German text on numerous memorials. She has also had to suffer proof reading this and many other efforts, her patience is never ending.
[1] See John H. Gill, With Eagles to Glory, Greenhill Books, 1992.
More Aspern-Essling
|
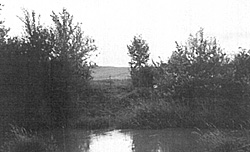 The Russbach looking south. Marked as a river, it is really a big stream, and yet, a formidable obstacle to men, horses, and artillery.
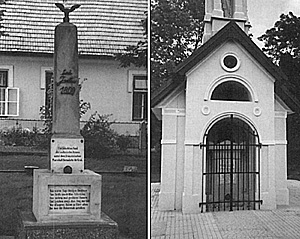
 At right, monument marks Napoleon's command post. Inscription reads: "Here stood on 6 July 1809 the headquarters of the Emperor Napoleon."
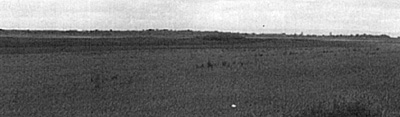 Loooking north to Deutsch Wagram and the so-called Wagram Heights.
 Two Photos at right:
 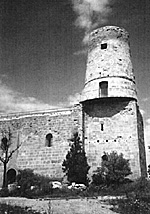 Mill in Markgrafneusiedl, village was the scene of Davout's attack that turned teh Austrian left flank.
 Looking north towards the Wagram heights. The coach (bus) in the center of photo is on the roadway, which runs on a ledge about halfway up the slope.