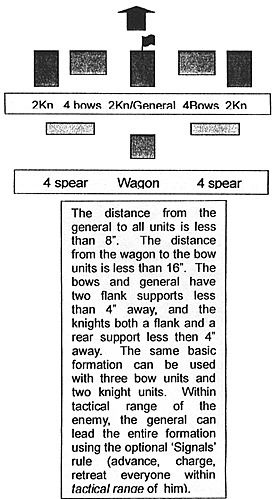
 I prefer knights formed in two-stand units in wedge or conrois (remember, we are attacking!), missile and spear units in four-stand units two ranks deep (three if they are trained bows or long spear/pike armed). If we assume the command has a supply wagon, the deployment formation would look something like this:
This formation has several advantages. Every unit has a net ‘+1’ to its base morale. The knights and bows have a spear unit to the rear if they are broken through or retreat. Furthermore, you can use inexpensive units in the second line (Feudal English Fyrd are as little as three points per stand, or 12 points each for these two units). Though they are mostly present for morale purposes, cheap spear units can defeat disordered knights if they move into contact with them, pre-empting their charge. If a flank threat develops, the right or left flank knight and spear units can face 90 degrees to the outside flank to face the new threat. This deployment has many possibilities for this command, including the flexibility to face new threats and breakthroughs to its front line of troops.
Be certain to keep the second line within support range after the knights charge ahead. If you are using the Uncontrolled Mounted Charge optional rule, you won’t need charge chips for you knights, so you can order the spear units to advance. Eventually, you may need a free general with the reserves to order your units up to keep the formation compact. However, be certain to leave spaces one stand wide at opportune places for forward units to rout or retreat through. This will keep you spear units viable against units breaking through.
Moving the Mixed Deployment Battle
Notice that with the general in the center front, we also maximize his capabilities. We are using one general to move seven units. Once within tactical range, the optional Signals rule is needed to continue moving forward. However, if you aren’t using it, you should still have three chips to charge all the knights, or two chips to order the archers to Advance or Defend with the archers. When the archers disorder someone with their shooting, next turn you can charge before the unit reforms. This battle can also have a unit or two clearing the flanks or skirmishing ahead, but the Signals rule will not permit skirmishers to move in front of the general as written.
Once you are within tactical range of the enemy, you would have to alternate with the skirmishers moving on one turn and the rest of the battle moving together on the other turn once you close with the enemy unless you have extra orders from other generals to do this. Of course, while you are outside of tactical range of the enemy, the entire battle moves freely with Strategic Movement. If your general enters melee, he will not be able to issue orders. I would recommend two battles such as this up front, with a reserve battle to their rear with the general that has the highest number of orders available commanding it. He can then intervene with his orders or the reserve units as necessary.
I can also see using this formation for English armies that would have three longbow units and only two trained knight units up front. One can have a general in the unit, and they can both charge frenzied when the time is right. The rear support will still be some form of spear unit, probably English or German spears in the early lists and Welsh in the later lists.
 CAVALRY-HEAVY DEPLOYMENT
This deployment is for facing another army that is strong in knights. You know that you are going to have a showdown with his knights and your missile units are too weak to be of great use, or merely offer targets for his knights to crush. You are planning for a charge that will win or at least ‘lock’ all the resulting melees. Again, I am assuming that your knights can wedge or at least form conrois, and two-stand units are best for this. Weaker archers and spears are still in four to six stand units. This is my preferred deployment:
When the time comes to attack, this formation has several advantages. First, I would charge in two waves - the three forward knight units first. Then next turn, any melee you lose or lock, you have a unit available to charge. The key is to NOT expand your wedge/conrois into a two stand wide line. Let your opponent expand while you remain in a disordered column. Remember, you can only charge an enemy stand that is not blocked by one of your stands. The details must be worked out carefully, and the opportunity is not always there, but in the long run, those second two knight units will save you more often than not. This goes back to the first axiom of MW: gathering every positive modifier possible for every unit at all times. Knights in the charge have most of their modifiers - if they lock, they have very few. A fresh knight unit charging in can crush a locked enemy knight unit, and stop or push back a winning enemy knight unit. Either way, you are improving your command’s position on the field by either turning a lock into a winning melee, or a loss into a lock.
Next time, we will look at some defensive options for deploying a feudal host. This occurs with commands that have little or no cavalry, when all of your cavalry is outclassed in either quality or quantity or both, or when terrain and enemy troop types such as elephants and camels force you to think defensively (though Rich Jarosz would just go ahead and charge the elephants anyway!). In these situations, it is not always best to use these deployments. However, I will stress that these formations are still potential winners in any situation - it’s just that the odds may be improved with variations on them.
Deploying the Feudal Host Medieval Warfare Techniques
Back to Saga # 86 Table of Contents
Back to Saga List of Issues
Back to MagWeb Master Magazine List
© Copyright 2002 by Terry Gore
This article appears in MagWeb (Magazine Web) on the Internet World Wide Web. Other military history articles and gaming articles are available at http://www.magweb.com