Although the Battle of Lodi [during Napoleon's first Italian campaign] is most known for the seemingly reckless rush of a massive French infantry column across the Adda River, when a detailed account of this day's events is reconstructed a more complex picture begins to emerge, one which shows both sides employing a series of tactical measures.
After the loss at Fombio, 8 May, 1796, the Austrians under Beaulieu were forced to fall back towards the Adda River. The Austrians showed a brave front throughout their retrograde movement and the retreat could not be confused with a rout. Reaching the town of Lodi on the Adda, they initially attempted to make a stand on the near side of the river.
Bonaparte and the French advance guard neared Lodi at nine o'clock in the morning. Quickly, all French cavalry in the vicinity was ordered to mount up and attack the Austrian outposts that had been hastily set up to guard the approaches to the town. This impromptu effort was supported by four pieces of light artillery which had been quickly attached to a team of coach horses supplied by some nobility of Pliasance, who themselves had just arrived on the scene. Acting with celerity, the ad hoc force succeeded in capturing an Austrian gun and pushing in the outposts.
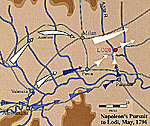 At right, map of Napoleon's pursuit to Lodi. Larger Map (slow download--196K).
Bonaparte and his staff sensed
the gravity of the moment.
This relatively minor action harvested much greater rewards than could have been reasonably expected. Beaulieu's resolve to defend the town in force was unsettled by this sudden success, and he ordered the Austrian army to evacuate Lodi. A single infantry battalion, from the Austrian Nadasti Regiment, and two cavalry squadrons were left behind to hold out against the French, while the main body of the Austrians immediately began to cross the single bridge over the Adda River.
As these first tentative probes were underway, Bonaparte made plans for the main offensive effort and ordered the main body of the French army to hasten forward. Responding to their commander's orders, Augereau's Division, which had halted at Borghetto, and Massena's, resting at nearby Cassel, both hastened forward.
 Meanwhile back in Lodi, a brisk cannonade broke out on both sides, which appears to have once again caught the Austrians off guard. Mixing pusillanimity with foolish optimism, Beaulieu committed a second strategic error. He failed to destroy the one object which would have certainly slowed down the French advance. Still resolved to maintain a footing on the near side of the Adda, the defenders had been unwilling to dismantle the bridge, the most effective delaying tactic available under the circumstances. The earnestness of the French cannonade, however, soon convinced Beaulieu and his staff of the unfeasibility of maintaining their position in the town. The last of the Austrian troops were soon ordered to hurry across and rejoin the main Austrian force.
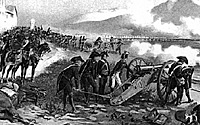
Once across the bridge, Major Malcamp, who commanded the retiring Austrian force, positioned several cannon on the bridge facing the French across the river. To ensure a cross fire, additional guns were placed along the bank to the left and right of the bridge. Bonaparte on his part employed a similar tactic, placing his artillery in a battery along the near bank, and personally supervised the placement of two pieces. In an account penned sometime after the battle, the First Consul calculated that Beaulieu had positioned as much as thirty artillery pieces on the bridge and along the bank, though this was probably a gross exaggeration and is at odds with other contemporary accounts. Bonaparte goes on to mention that the mutually-inflicted cannonade was "very brisk" and continued for "several hours."
It was at this point that a sizeable portion of the French army arrived on the scene.
Beaumont's cavalry and some supporting artillery were ordered to cross the Adda at a ford half a league above Lodi. Once across, it was to work its way back towards the bridge at Lodi and bear down on the Austrian right flank. Unfortunately, the French cavalry encountered unexpected difficulties and suffered costly delays crossing the ford. As it turned out, this deprived them of participating in the main brunt of the battle.
Fortunately for Bonaparte and the French, the infantry elements encountered no such obstacles. As they reached Lodi in dribs and drabs, Bonaparte immediately started to organize these troops into a single, closed order column. General Dupas and a composite battalion of carabiniers were placed at the head of the column and were followed by a composite battalion of grenadiers. One account has Bonaparte and his generals organizing the massive column while harassed from a "tremendous" fire from Austrian artillery. Grivet writing in the 1860's, on the other hand, writes that the column was formed under the relative protection of a rampart overlooking the river.
Bonaparte was in his typical form
and at no loss how to
seize this opportunity.
Regardless of where they formed it, Bonaparte and his generals led their column to the bridge. The Austrians were ready, and almost as soon as the head of the column set foot on the bridge the Austrian artillerymen discharged their pieces which had been loaded with canister.
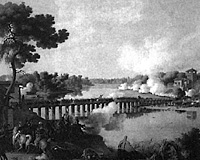 Enfiladed by the Austrian artillery positioned on either side of the bridge, not to mention having to sustain the pieces directly in front of them, the French suffered heavy losses and immediately fell back. Twice more the column attempted to advance across the bridge, but each time it suffered the same fate as the original effort. Bonaparte and his staff sensed the gravity of the moment. The column was reinforced with fresh troops, and Bonaparte and five generals (Berthier, Massena, Cervoni, Dallemagne, chef de brigade Lannes, plus chef de bataillon Dupat) placed themselves at the front of the column.
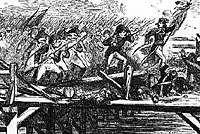
Fortunately for the French, the brisk and almost continuous fire from the artillery on both sides momentarily produced a thick pall of smoke which obscured the French column's movements from their adversaries on the far shore. Bonaparte was in his typical form and at no loss how to seize this opportunity. For the fourth time, the French infantry rushed forward in closed column. The Austrians, their vision still obscured by the dense smoke, did not see the French advance until it was too late. Taken by this momentary surprise, panic spread through the Austrian ranks and the men recoiled backwards.
Apparently, one of the causes of the Austrian defeat was an unthinking application of the prevalent artillery doctrine by their gunners in front and on the sides of the bridge. Round shot ("cannon balls") was used when the enemy was still at long and then medium ranges, while canister was resorted to during the final moments. This made perfect sense if the enemy had advanced in the traditional formation, that is in line. However, forced to advance over a narrow bridge, the French infantry was in a very lengthy column. Had the Austrian gunners had a moment to reflect they would have realized that they should have used round shot to plough holes throughout the entire length of the advancing French column. Instead, they followed the conventional wisdom, designed for the open battlefield, and inflicted heavy casualties, but only at the head of the column.
Although the front of the column was successfully stymied, the remainder survived to press on, and as the column neared the far bank many of the carabiniers and grenadiers on the sides of the column jumped into the river. Wading through the water, they reached the far shore where they spread out on both sides of the bridge in extended order and fought as skirmishers.
Aided by these skirmishers, the remainder of the heavy column managed to make its way over the bridge where it marched directly towards the Austrian line which had retired some distance from the bank. Fortunately for the advancing French forces, the undulating nature of the ground afforded partial protection from Austrian musket fire and so they were able to form a substantial bridgehead relatively unmolested.
Bonaparte and his generals
threw themselves in front
of the men.
As the French column moved away from the banks of the Adda, it divided into a number of smaller platoon-sized closed columns. The battalion of carabiniers remained in the center with the platoons from the grenadier battalion to its rear fanning out to the right and to the left. The whole was preceded by numerous skirmishers. The confident demeanor of the advancing French, the effect of the well-placed artillery on the Lodi side of the river, and Beaumont's cavalry now at last bearing down on the right flank ensured the success of the French bridgehead.
The Austrian cavalry, forced into inactivity up to this point, attempted to turn the situation around, and advanced to charge the oncoming French infantry. The latter, however, sensing success "were not easily intimidated". Meanwhile, additional French divisions led by generals Rusca, Augereau, and Bayrand, arrived and entered into the fray. The Austrians, unnerved by the unexpected French success at Lodi bridge, threatened by the French cavalry on their right flank and the flood of new French reinforcements, finally began an unchecked retreat.
The French, however, were unable to administer an effective pursuit. Many of the rank and file had marched more than ten leagues, and night was falling fast. The battle finally ended, and the Austrians lost about 20 pieces of cannon, and two or three thousand men who were either hors de combat (i.e., casualties - dead or wounded) or taken prisoners.
This more expanded account of the day's action shows that what had typically been recounted as simply several precipitous rushes across the narrow Lodi bridge, when looked at in its entirety from the time the French first approached Lodi until the Austrians were finally driven from the field, was tactically more diverse than has been usually portrayed. A quick recapitulation of the tactical events demonstrates this.
The French began the original assault on the town by combining light artillery with the available cavalry. Later, both sides lined the bank on either side of the Adda with all available artillery to produce a convergent fire upon the bridge's exits. The actual assault delivered by a French closed infantry column was formed from elite grenadiers and carabiniers.
The Austrians repeatedly repelled the massive column by firing canister when the French reached the halfway point across the bridge; this was not as effective as if they fired round shot at the narrow columns on the bridge.
 After each repulse, Bonaparte and his generals threw themselves in front of the men and frantically worked at restoring the formation and men's confidence. Seizing the opportunity afforded by a lull in the wind with the attendant thick "fog" of smoke produced by the seemingly incessant artillery fire, Bonaparte rallied his men a third time and was able to approach the Austrians on the far side unobserved until almost the last moment when it was too late to fire the artillery.
Meanwhile, many of the French infantry in the column on the bridge jumped into the river on either side, where they began to fight as skirmishers. Once on the far side, the main body fragmented into a number of platoon-sized columns which systematically fanned out so that the force occupied a frontage more consistent with normal fighting requirements.
Clearly, the battle of Lodi demonstrates the first criterion needed to demonstrate the importance of tactical practices and tactical level events during the resolution of any military confrontation. These low level events and practices are found to occur repeatedly throughout the entire engagement rather than only infrequently or sporadically. In this particular confrontation, at the very least tactics has the same importance as minor movements such as feints and body movements in boxing. Although not necessarily the "deciding factor", their importance lies in their frequency of occurrence as well as the degree to which they set up the major events which did decide the issue.
More of With Musket, Cannon and Sword
-
Introduction
Battle of Lodi (May 10, 1796)
Battle of Sedyman (October 7, 1798)
Theoretical vs. Practical Musketry
Speed of a Cavalry Attack
Concentrating Counter-Battery Fire
Back to Table of Contents -- Napoleon #2
© Copyright 1996 by Emperor's Press.
This article appears in MagWeb (Magazine Web) on the Internet World Wide Web.
The full text and graphics from other military history magazines and gaming magazines are available at http://www.magweb.com