Well, who can remember itís been so long...
I started this about two years ago and never finished, but I just did get it all done. So to recap everything so far, briefly, I wanted biggish (14Ė16 2 X 2 foot) squares because storage for small squares (56-64 1 X 1 foot squares for a 4 X 8 table) on my table would be a problem. I bought two sheets of 1/4 inch masonite and had it cut into 2 foot squares. This, obviously, gave me 16 squares with which to plan my terrain around. My main idea was to have two pieces that could fit together to form a very large and tall hill. Then I also wanted some river sections and for a simple yet quite variable selection I went with two straight and two curved pieces. The remaining sections (8) for now would be flat. The eight flat sections would be just that flat. I have 10 pieces of terrain made by Howard Whitehouse and myself plus those made by my son Ben. These are all irregular shaped and will fit nicely anywhere on a flat table to break up the Ďflatnessí. They all fit quite nicely in with the square sections. How long the flat sections will actually last I donít know.
The remaining six (we have only completed the first 14 of 16 sections) sections I designed over the course of the last year. I took a sheet (8 1/2 by 11) of heavy card stock and cut it into two-inch squares. On another I drew a 4 by 8 inch tabletop. I started by drawing several sections with roads straight, curved crossroads and fit them on the tabletop with flat sections. They started to look really good. A week later I dismissed the roads, at least for now, who has roads in the desert, maybe some tracks on the Northwest Frontier or in the jungle but it would still not be considered road for my play with TSATF. So for now no drawings of road sections.
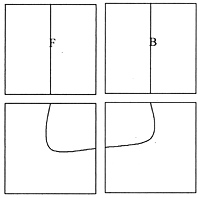
Next I worked on rivers/streams, I wanted some variety and thought about four straight river sections and two curved. Well four straight sections is pretty limiting when you think about it, you can only use them one-way. So scratch four straight sections and go with three, but for right now two will have to do, as the project needs to move along. What size/width river should I use? too wide and I lose gaming area, too narrow and it will look silly. I have a large paddle-wheeler that I would like to continue to use, but on a 4 by 8 table the whole square would have to be a river to make it look right. So I decided to make the stream between 2 and 4 inches wide. Each stream section on the edge of each section centered on 12 inches from either end, regardless of straight or curved section so they all fit together. One straight section has a ford while the other is made to take a smallish two span bridge.
 This means there is a small island in the middle of the stream for the center span. This river section is straight sided deep and very rocky, while the other straight section has variable banks and a gentle slope to the ford. The ford is covered with HO scale track ballast and glued down. The two curved sections have rather steep banks and are not crossable, although there is one short stretch of ballast in the streambed to represent a sand bar, where several figures could make a last stand but not cross without swimming.
At right are the four river sections as drawn and constructed, they are not to any scale (except to fit in that space). The F = ford and the B = bridge. I figure that there must be at least twelve set-up variations using just these four river sections and flat sections not to mention hill sections.
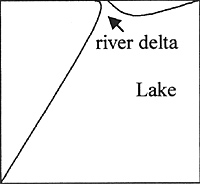
Later on I will make section 15 which will be a river delta/steamer landing/lake. It will only fit at a corner but at least my steamer can be used. Thinking more on it, I could use half the table as a major river/lake.
 This will give me enough are for canoes a small village besides the landing.
The last sections concerned the mountain I wanted, since storage will be a problem they could not be exceedingly tall, there needs to be sufficient room to hold figures on each level may be even a gun and crew, the sections must be able to join and make a rather large feature while also making either a small pass on the narrow end of the table or a broad pass on the wide side.
From this drawing you can get an idea of the mountain, now if you take each one and reverse the positions you get a pass. So these are nice and versatile on one hand, but somewhat limiting on the other, as there are only four ways to use these and only on the edge. So to have a hill with game space completely around it I will need to make another section (16). But, since I have terrain pieces I donít need it for a while.
 To ease your/my mind on not having sections with roads they could, if necessary, be delineated some other way later. I donít know how yet, there are flexible road pieces available, so may be that is the answer.
So now that I have played with the design for about a year. I needed to consider construction techniques. The terrain I want is more like a topographic map than actual terrain. That is I want the levels distinct in order to hold figure flat rather than at an angle, this will make movement easier and delineate extra movement needed to cross the thresh hold from one level to the next. So a side view of the mountain/pass sections will look like stair steps rather than a smooth line.
Terrain Making Tabletop Squares for Wargames
Back to The Heliograph # 138 Table of Contents
Back to The Heliograph List of Issues
Back to Master Magazine List
© Copyright 2003 by Richard Brooks.
This article appears in MagWeb.com (Magazine Web) on the Internet World Wide Web.
Other articles from military history and related magazines are available at http://www.magweb.com