Historical Situation:
After crossing and securing the north end of the Arnhem road bridge during the evening of 17 September, LTC Frost's 2nd Battalion dug in and awaited the inevitable counter-attack by the German defenders. This was not long in coming, elements of a number of hastily-commandeered units arriving piecemeal from the north, east and south to try to pry the British out of their lodgements. Fighting on the 18th was bitter and inconclusive; the Paratroops held their positions in the face of all attacks but expended valuable men and ammunition in doing so.
Fighting continued throughout the 19th, the Paratroops continuing to give better than they got, but they suffered a steady – and irreplaceable - stream of casualties and used up valuable ammunition stocks, still waiting for reinforcements and resupply. Bombed, shelled, and shot at, the Paratroops continued their stand through the 20th, though by day's end, their positions were almost untenable, most of the troops were casualties and most of their ammunition had been expended. The morning of the 21st saw the Germans undertake an intensive mopping up operation that opened the road bridge to traffic before noon, although shots continued to be fired around the bridge for two more days.
This scenario allows players to fight out the initial German attacks – after the death ride of the 9th SS Armored Recce Battalion across the road bridge – on the afternoon of 18 September. This scenario is best played with three players to a side though it will work (albeit with some effort) with fewer players.
German Player (begins scenario with initiative)
Lead elements, Kampfgruppe Knaust, with:
- 1 BC (+2) (HQ elements Veteran) MAJ Knaust
1 SMG Squad
1 HMG
1 FO for 120mm Mortar, offboard, 10 fire missions
2 Companies (Green), each with:
- 1 CC (+1)
1 FO for 81mm Mortar, offboard, 10 fire missions
2 Rifle Platoons, each with:
- 1 PC (+1)
2 Rifle Squads
Assault elements, Kampfgruppe Brinkmann (Veteran), with:
- 1 BC (+2) SS-MAJ Brinkmann
1 SMG Squad
1 FO for Heavy Artillery, offboard, 3 fire missions
1 FO for 81mm Mortar, offboard, 8 fire missions
1 FO for 75mm IG, offboard, 7 fire missions
2 SdKfz 251/1
1 Armored Car Company, with:
- 1 CC (+2), in SdKfz 234/1
1 Armored Car Platoon, with:
- 2 SdKfz 234/1
- 2 SdKfz 234/2 "Puma"
2 Recce Companies, each with:
- 1 CC (+2)
1 HMG
1 SMG Squad
1 SdKfz 250/8 w/75mm IG
3 Recce Platoons, each with:
- 1 PC (+1)*
2 Rifle Squads
* 1st Platoon has PC (+2)
3rd Company, 21st Panzergrenadier Regiment (Regular), with:
- 1 CC (+1) SS-CPL Trapp
1 HMG
1 FO, 81mm Mortar, offboard, with 7 fire missions
3 Platoons, each with:
- 1 PC (+1)*
3 Rifle Squads
* 1st Platoon has PC (+2)
Deployment
A. 3rd Company, 21st Panzergrenadier Regiment enters from the west game board edge.
B. KG Knaust enters from north game board edge on or east of the highway.
C. KG Brinkermann enters from east game board edge.
The three German combat formations must begin their entry onto the game board at least 2 initiative phases apart, e.g.: The first formation enters some elements on German initiative phase 1; The next formation may not begin to enter the game board until at least German initiative phase 3; and the last formation may not begin to enter the game board until at least German initiative phase 5. Any German formation may delay entry, e.g., the second German formation mentioned in d, above, may enter later than German initiative phase 3.
Objective:Clear the British from their positions.
British Player
2nd Battalion, the Parachute Regiment (Veteran), with:
- 1 BC (+2) LTC Frost
1 FO for 3" Mortar, onboard, 7 fire missions
1 FO for 75mm Howitzer, offboard, 9 fire missions
1 HMG
3 Snipers
A Company, with:
- CC (+1)
1 2" Mortar, onboard, direct fire only, with 8 fire missions
1 PIAT Antitank Weapon (assign to a Rifle Squad)
3 Platoons, each with:
- 1 PC (+1)
2 Rifle Squads
B Company, with:
- CC (+1)
1 2" Mortar, onboard, direct fire only, with 8 fire missions
1 PIAT Antitank Weapon (assign to a Rifle Squad)
2 Platoons, each with:
- 1 PC (+1)
2 Rifle Squads
Attached elements, 1st Parachute Squadron, Royal Engineers, with:
- 1 PC (+1) CPT MacKay
4 Rifle Squads
Attached elements, 1st Airborne Recce Squadron, with:
- 1 CC (+1) MAJ Gough
1 HMG
2 Platoons, each with:
- 1 PC (+1)
2 SMG Squads
Attached AT Section, 1st Air-Landing Anti-Tank Battery, with:
- 2 6pdr AT guns
Attached Brigade HQ Elements, with:
- 1 CC (+1)
1 PIAT Antitank Weapon (assign to a Rifle Squad)
1 Platoon, with:
- 1 PC (+1)
2 Rifle Squads
C Company, 3rd Battalion, with:
- CC (+1)
1 2" Mortar, onboard, direct fire only, with 8 fire missions
1 PIAT Antitank Weapon (assign to Rifle Squad)
2 Platoons, each with:
- 1 PC (+1)
2 Rifle Squads
1 Platoon, 9th Field Company, Royal Engineers, with:
- PC (+1)
2 Rifle Squads
Deployment
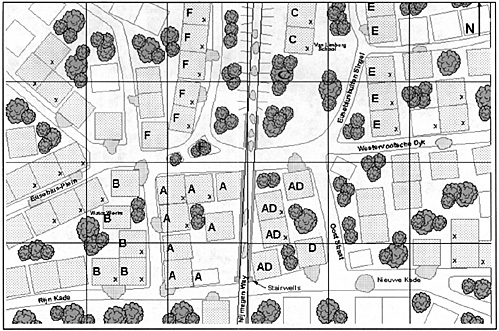
A. A/2nd Battalion deploys in any areas marked "A".
B. B/2nd Battalion deploys in any areas marked "B".
C. The 1st Parachute Squadron, Royal Engineers deploys in any area marked "C".
D. The 9th Engineer Field Company deploys in any area marked "D".
E. The Attached Brigade Elements deploy in any area marked "E".
F. The FOs for the off-board 75mm and on-board 3" Mortar,as well as the 3" Mortar and one of the 6pdr AT guns,deploy in any area marked "F".
G. Other elements deploy in any area marked "A" through "F".
H. All British troops deployed in building sectors are hidden at game's start.
Objective:
Deny the highway to the Germans by maintaining LOS to it.
Scenario End and Victory Conditions
The scenario ends at the end of any German initiative phase when either four or more German companies are demoralized (see Scenario Rule 6, below) or the German commander declares the game to be over.
At game's end award the German player 2 victory points for each building sector marked "A" or "C" and 1 victory point for each building sector marked "B", "D", "E", or "F" that is German-controlled at game's end. A building sector is German controlled if the German player was the last to solely occupy the building sector or currently occupies it (solely or otherwise).
If the German player has 20 or more victory points the Germans have decisively won. If the German player has 10 or less victory points the British have decisively won. Any other result is a draw – one side or the other may have the upper hand but the results so far are inconclusive.
Scenario Special Rules
1. If LTC Frost is killed, MAJ Gough becomes BC during the next British initiative phase and any surviving Recce troops become battalion troops.
2. The 3" Mortar may not move during the game.
3. The 2" mortars may only fire using direct fire during the scenario and:
- a. May move or fire during an initiative phase, but not both.
b. Have a Heavy Weapon arc of fire (Crossfire 6.1).
c. May not fire at targets closer to themselves than the width, in squad stands, of their smoke pattern.
d. Expend a fire mission each time they are.
e. Fire once per British initiative phase.
f. May not perform reactive fire.
g. Are subject to the normal target proximity (Crossfire 6.3) and target priority (Crossfire 6.3.1) rules.
4. The Highway:
- a. The highway, connecting the road entry points marked "3", is a raised roadway that gives access to the Arnhem road bridge just off the south edge of the game board.
b. The ledges/shoulders of the highway act as low walls to troops on the highway immediately adjacent to them.
c. Troops on the highway are only visible to troops at ground level if they're adjacent to the edge/shoulder.
d. A vehicle gun firing from the highway can only fire at the second stories of two-story buildings to which the vehicle has LOS.
e. Two story buildings and wooded areas marked "A" and "C" all block LOS to and from the highway. All terrain features block LOS between the highway and ground level.
f. The highway blocks all ground-level LOS across it except through the two underpasses.
g. The highway can only be crossed by passing through one of the two underpasses or by driving over it via the embankment at its north end.
h. The highway is accessible only from the embankment at the north end of the map and via the two stairwells at the north end of the south underpass. The stairwells take an entire move action to ascend or descend and are treated as open ground for spotting and firing.
i. The two sets of retaining walls are impassable.
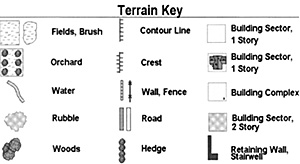
5. The rough ground areas on the game board represent rubble spills, destroyed vehicles, and other unnatural impediments to movement, etc., that battles produce.
6. German companies become demoralized when they lose more than half of their stands, excluding their PCs. Demoralized companies will extricate themselves from the battle by retreating off the closest game board edge.
7. Statistics for the two German armored cars and a halftrack, the SdKfz 234/1, SdKfz 234/2, and SdKfz 250/8, whose statistics don't appear in Crossfire, allow:
| Vehicle | Arm | Acc | Pen | HE/EFF | HD |
|---|---|---|---|---|---|
| SdKfz 234/1 | 2/1 | -1 | -3 | 4/1 Sqd | Yes |
| SdKfz 234/2 | 2/1 | 0 | -1 | 4/2 Sqd | Yes |
| SdKfz 250/8 | 1/1 | -2 | -2 | 4/2 Sqd | No |
8. Though it's hard to enforce, this scenario plays much better if the German players are not allowed to discuss their table top plans with one another after the game starts. A major advantage enjoyed by the British was the lack of coordination on the part of the German commanders.
Notes
Much of the map detail for Arnhem was taken from Badsey's and Kershaw's books, with reassurance taken from Allen's game. The British OB was relatively straightforward - an understrength paratroop battalion, with some engineers and recce troops that were present for the battle, as well as the 1st Airborne Brigade HQ. Kershaw provided a wealth of information on the German OB and made clear how cobbled-together an affair the German defenses really were!
Allen's Storm Over Arnhem provided a major dose of inspiration to this effort - his OB information and associated designer's notes explanations were quite convincing in that they generally matched what else we'd read and made very reasonable extrapolations on the other sources to, for example, give a tentative strength to the 1st Airborne Recce Squadron elements that actually made it to the 2nd Battalion area around the bridge. Some details in his German OB have been overtaken by time (e.g., Kershaw) but all-in-all, Allen developed a very plausible OB for the battle. Some troops in Arnhem deployed outside the game board (e.g., medical troops and Company C) and don't appear…
The highway was the dominant terrain feature, giving access to the road bridge (just off the south game board edge, by the way), splitting the battlefield, and generally complicating matters for everybody involved.
More Crossfire
-
Crossfire Market Garden: Introduction
Crossfire Market Garden: Scenario 1: Arnhem
Crossfire Market Garden: Scenario 2: Nijmegen Heights
Back to Table of Contents -- Courier #76
To Courier List of Issues
To MagWeb Master Magazine List
© Copyright 1999 by The Courier Publishing Company.
This article appears in MagWeb (Magazine Web) on the Internet World Wide Web.
Other military history articles and gaming articles are available at http://www.magweb.com