 Scenery Construction
The Sand Fort Walls:
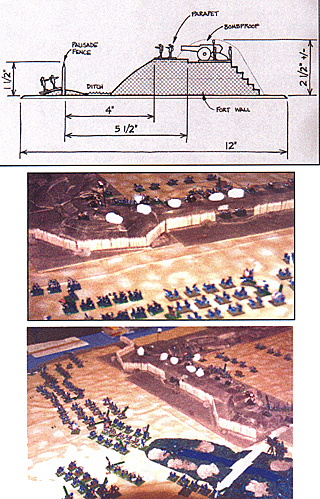
The construction of the fort walls was a relatively simple process. First, 1/8" particle board was cut to a uniform width of 12" (wide enough to build the walls and the palisades fence on), and used to glue the Styro-foam walls to. The walls were built in 12"-18" long straight sections or corners, which fit together to make storage and transport much easier. 3/4" thick foam was stacked to the proper height, and then trimmed on both sides to form the slopes (see the section diagram below).
The mounds between batteries were leftover pieces, shaped and rounded, then glued to the top of the parapet. Once the glue had dried, all of the cracks were filled with filler (I used Durham's Water Putty). After the filler had dried, the final stage included painting the walls with latex paint, sprinkling on some sand (that I got out of the backyard), and shaking off the excess. The finished result was a `sand fort.'
The Palisades Fence:
The fence is comprised of two pieces; the actual wood fence and the base to allow it to stand upright. First, the fence is made of round toothpicks, cut in half, leaving two posts of equal length, with pointed ends on each. I lined the posts side-by-side to the desired length, and then glued two 1/8" wide balsa strips to one side as horizontal bracing. I made lengths of fencing from l" to 6" long in 1" increments to accommodate all of the irregular shapes in the palisade fence line.
To hold the fence upright, I glued long, triangular shaped wedges about 3/8" high, to each side of the palisade fence location in front of the fort walls, leaving a gap equal to the width of the toothpicks used for the fence. Like the walls, I covered the rest of the base and the wedges with latex paint and sand. When finished, the fence sections can be wedged into the gap and will stand on their own. They can be removed when destroyed by the Union infantry. (See the section diagram).
Optional Expanded Scenario
If two tables were used, the second table would represent the northern end of the peninsula. In this scenario, Hoke's Confederate division and the Union's First and Third Divisions could be deployed to represent the rear guard action. Contradictory to what actually occurred, Hoke would be ordered to assault the Union troops that were beginning to construct hasty sand works and rifle pits. If Hoke were successful and able to punch a hole through the Union rear guard, he would be able to threaten the troops attacking Fort Fisher and force a withdrawal to the waiting Union naval transports.
Editor's Note:
The author of this outstanding scenario does not specify officer ratings. Assume that unless marked, divisional officers are average (+2) and brigade officers are +1. Also, assume all infantry to be carrying rifled muskets. The gamemaster may adjust this if desired.
For more information on the capture of Fort Fisher, see the Official Records, Series 1, Vol. 46, Part 1, beginning with page 393.
The Second Assault at Fort Fisher North Carolina January 13-15, 1865
- Background and Campaign
Fort Fisher Order of Battle: Union
Fort Fisher Order of Battle: Confederate
Fort Fisher Confederate Artillery Chart and Placement (extremely slow: 429K)
Fort Fisher Map (121K)
Fort Fisher Scenery Construction and Optional Expanded Scenario
Back to Table of Contents -- Charge! # 5
Back to Charge! List of Issues
Back to MagWeb Master Magazine List
© Copyright 2004 by Scott Mingus.
This article appears in MagWeb.com (Magazine Web) on the Internet World Wide Web.
Other articles from military history and related magazines are available at http://www.magweb.com