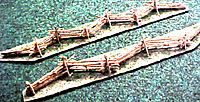
 Start with a piece of medium cardboard the length
of the fence section you want to build and about I Y2"
wide. Paint the cardboard a terrain color and flock it as
you wish (you may also do this as the last step). Lay
out lengths of rail on the cardboard in a "zig" pattern: /
/ / / / /. Fasten them down with white glue. It's a good
idea to place a "zig7' at each end of the section, with
the tip of the end rails touching the very edge of the
cardboard where it will connect with the next section.
Then glue the "zag" rails on top of them, with a little
overhang. Keep adding rails in alternating zig-zags
until your model fence is four or five rails high.
Start with a piece of medium cardboard the length
of the fence section you want to build and about I Y2"
wide. Paint the cardboard a terrain color and flock it as
you wish (you may also do this as the last step). Lay
out lengths of rail on the cardboard in a "zig" pattern: /
/ / / / /. Fasten them down with white glue. It's a good
idea to place a "zig7' at each end of the section, with
the tip of the end rails touching the very edge of the
cardboard where it will connect with the next section.
Then glue the "zag" rails on top of them, with a little
overhang. Keep adding rails in alternating zig-zags
until your model fence is four or five rails high.
The end of the worm fence section presents a difficulty. Glue an upright "post" made of a slightly thicker twig. As the end rails are added, glue thcm to the post. The end is shorter than the rest of the fence but not too bad. If this bothers you, insert a small piece of twig between each rail and glue in place. When in a rush I have even left off the post and just glued the rails in a stack, but they look as though they are precariously balanced there.
Once the fences are the height you want, glue some leaning poles in place at each crisscross. As an option, lay a last rail on top of the crisscross poles. If you want more robust fences that resist rough handling, leave off the poles and the top rails.
You can place completed sections end to end on the wargame table, and if you have kept your zigs and zags straight, they will look like one continuous fence. Make some sections with the zigs and zags in the opposite direction, that is, laying your first set of rails \ \ \ \ \ \ This will give you more flexibility in setting up your fenced areas, especially comers. Model sections of varying lengths for odd-shaped or smaller fields.
Scratchbuilding Fences and Stone Walls
Back to Table of Contents -- Charge! # 3
Back to Charge! List of Issues
Back to MagWeb Master Magazine List
© Copyright 2004 by Scott Mingus.
This article appears in MagWeb.com (Magazine Web) on the Internet World Wide Web.
Other articles from military history and related magazines are available at http://www.magweb.com