 This scenario is designed to handle up to 4-8 players (2 Zulu players, and 2-4 British players).
During the siege of Eshowe (pronounced ee-Show-ee), Colonel Charles Knight Pearson, commander of the No.1 (right flank) column, decided to raid and burn eSiqwakeni (royal military kraal) and personal umizi (homestead) of Prince Dabulamanzi KaMpande, King Cetshwayo's brother.
Dabulamanzi was a young, aggressive and popular local Chief induna in his thirties. He was responsible both for leading the attack on Rorke's Drift (22 January 1879), and together with Chief induna Mavumengwana kaNdlela - Chief induna Godide's brother- was instrumental in the frequent skirmishes with the garrison of Eshowe's cattle guards, and mounted raiding parties under Major Barrow's command.
This was part of a deliberate policy of antagonizing the garrison and an attempt to force them into the open while avoiding a serious confrontation. The King refused to allow a direct assault upon Eshowe, which by this time had formidable defensive works constructed, and Rorke's Drift had already demonstrated that attacking a fortified position was both costly and inevitably unsuccessful, stating that "If you put your face into the lair of a wild beast, you are sure to get clawed."
During one of Major Barrow's forays into Zululand, sometimes as far away as twenty miles, he discovered eSiqwakeni, consisting of 62 huts, only about seven miles northeast of Eshowe. Colonel Pearson announced on the evening of February 28th his plans to raid and burn the kraal. Pearson planned this sortie to raise the moral of the garrison, and to put the Zulus on the defensive.
Raiding Party
The raiding party mustered at midnight on Saturday, March 1st. This force comprised thirty mounted troops (known as "Uhlans"), a small company of about sixty Royal Engineers, four weak companies of 2nd Battalion/3rd (East Kent) Infantry Regiment ("The Buffs"), one company of 99th ("Duke of Edinburgh's" Lanarkshires) Infantry Regiment, forty Royal Marine Light Infantry of the naval detachment from H.M.S. Active, a Royal Artillery gun and the Natal Native Pioneers. Colonel Pearson personally led this force of about 500 men, and also took along the bandsmen of "The Buffs" to act as stretcherbearers.
"The Uhlans", as they called themselves, were made up of Imperial Mounted Infantry and Natal Volunteers which volunteered to stay behind with the garrison when Pearson ordered the rest of the mounted troops back to the Lower Drift at the end of January. The mounted infantry were from the 99th Regiment, but the Natal Volunteers were from various irregular mounted units such as the Natal Hussars, Stangar Mounted Rifles, Victoria Mounted Rifles, Durban Mounted Rifles and the Alexandria Mounted Rifles, which initially formed part of Pearson's No.1 Column. They were under the over-all command of Captain Charles Shervinton, 1st Battalion/2nd Regiment of the Natal Native Contingent.
Accordingly the force marched out from Eshowe at 2:00 am, a clear warm night, with the "Uhlans" as scouts. Just before dawn, about 4:30 am, the British were in position on a hill overlooking eSiqwakeni which lay about three-quarters of a mile away while the Zulus still slept. Colonel Pearson delayed the attack, however, to wait ten minutes until the gun could be hauled up the hill and into position. This delay was costly, as an imbubi boy from a umizi on a hill about 500 yards to the left of the British position, saw the British and "fled like a hare" towards eSiqwakeni. Some of the mounted troops tried to intercept him, but the boy eluded them and reached the kraal.
Quick Raction
The Zulus reacted quickly, but most were quickly driven off when the gun started shelling the kraal, and collected on eNtumeni Hill, which overlooked the kraal about 1500 yards away, where they began to engage in a firefight. Eventually the order was given to storm eSiqwakeni which was done without loss, and subsequently the kraal was set aflame.
The Zulus, reinforced with more ibutho that began arriving from nearby kraals and umuzi, then started to work around the British flanks while increasing their fire on the British at the kraal. Seeing his forces seriously threatened, Colonel Pearson ordered a withdrawal before Dabulamanzi's personal umizi could be burned.
During the British retreat the Zulus continued to harass their rear, having previously gotten into some dense bush about 300 yards away from the British, and continued to fire on the marines who were acting as the rear guard. The British wisely took a longer, but more open route back, with Zulus pursuing them to within two miles of Eshowe, taking advantage of any patch of bush or surrounding hilltop the British did not occupy, but the British managed to keep them at bay. With the arrival of the British back at Eshowe at 10 am the raid was complete.
While the British incurred no casualties on the raid, it was considered by many officers as a "most unsatisfactory expedition" and "a badly organized outing". The Zulus got the better of the engagement, which did nothing to improve the morale of the garrison of Eshowe.
RULES USED & SET-UP REQUIRED
The rules used were GDW's Soldier's Companion rules, which while unfortunately hidden under their Space: 1889 game logo, (and so therefore many historical miniature garners ignored), are (I feel) the best set of colonial rules that give both ease of play, are realistic and most importantly give the best "feel" of the period. If you do not have access to a copy of these rules, then the scenario can easily be adapted to the set that you use.
The scenario was designed for 6'x12' game table, but could be played on a smaller table (5'x8') if movement rates and ranges are reduced accordingly, otherwise the Zulus would be on top of the British in no time. Figure scale is 1 figure equals 5 men, with officer and NCO figures at 1 figure equals 1 man scale. While the scenario was designed for 25mm scale, 15mm will work equally as well, but will not look as visually appealing for this type of scenario and period on the tabletop. Ground scale is 1" = 20 yards, with 1 turn = 5 minutes.
Since Soldier's Companion rates units according to their unit value, if another set of rules is used then these can easily be adapted. Unit values are as follows in descending order: Elt = Elite, Vet = Veteran, Exp = Experienced, Trn = Trained, Grn = Green. Note that Irr = Irregulars, which under Soldier's Companion have certain restrictions.
Likewise, Soldier's Companion uses a Fieldcraft Rating, which translates to a saving throw (D6) if the unit is in Open Order (i.e. skirmishing). A unit's Fieldcraft Rating is given in ( ) under the Unit Value in the unit rosters.
All Zulu units, no matter what the Unit Value, are to be considered rated as 'Green' when using firearms (i.e. -1 To Hit under Soldier's Companion rules). This reflects the Zulus' untrained ability with firearms as well as their method of firing, which was usually done by holding the rifle away from their shoulder due to the recoil.
GM BACKGROUND
This scenario is based on the aforementioned historical incidents, but since no exact numbers of Zulus engaged are known, these have been added on which regiments may have been massing in the area to form another impi for an attack on Fort Eshowe. In addition, the British forces have been altered slightly by adding two mounted units for scouting purposes, because mention is made of mounted troops. This is, of course, pure speculation on my part, but does make sense and Rives a better Rame.
The scenario will require the British to take the offensive quickly, before the rest of the Zulu regiments arrive from off-board and subsequently start to surround the British positions. It is great to have a Zulu scenario where the British must be aggressive instead of sitting back and waiting for the Zulu hordes to throw themselves against the superior firepower of the British, which unfortunately happens in most Zulu games. Naturally, as in one of the playtest games, the British can elect to take a defensive posture once the Zulus start to appear, which will lead to a British defeat due to the fact that they will probably be forced to withdraw without being able to destroy the kraal. This would do nothing for the low morale at Fort Eshowei!
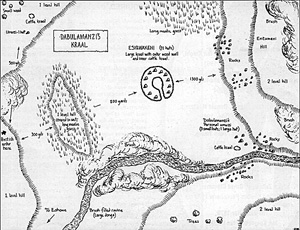
Terrain required is relatively simple, as the area in which the scenario takes place has a hill on each side of the board and the krsal in the middle with areas of thick bush and a ravine (conga) to one side. There is a small umizi (1 hut with a small cattle kraal) on another hill about 500 yards (25") from where the British enter. Dabulamanzi's own umuzi (1 large hut, 3 smaller huts and a cattle kraal) lies between the conga and the base of eNtumeni Hill. A small wide hill, covered with long wet grass (mealie), lies about 300 yards (15") from the hill on which the British forces first deploy and about 800 yards (40") from the kroal. About 300 yards (15") from one end of this hill is the bush covered conga. There are a couple of rocky outcroppings as well, especially on eNtumeni Hill, which Zulus can take cover in.
Larger map - very slow (116K)
Jumbo map - very slow (358K)
British Forces & Notes
Zulu Forces & Notes
NOTES
1 The Kraal gives medium cover to any just inside (i.e. behind outer wall),and gives soft cover to any inside the huts in the kraal or fighting amongst the kraal. The smaller umizi give soft cover to any inside the huts/area.
2 Areas of brush are thick shrub end the long wet mealie grass is at least waist height. Both can easily hide figures/units except mounted, and give soft cover.
3 Rocky outcroppings give medium cover, as well as using the edge of the ravine, which Is really a conga. The conga is a barrier to cross (i.e. takes half of original movement to cross), and a unit may not charge across the conga, but may charge out of it if the unit started the turn already in the conga. The ravine is covered with brush for most of its length, especially on the plain proper
4 At start of game have each Zulu player roll 1 D6 for those ibuthos which are not on the board vet. This is the Zulu Offensive Turn in which the ibutho arrives, but this is not to be known to the other Zulu players.
5 Zulu ibuthos enter at random points on the board, as follows: (roll 2D6 for each ibutho) 2-4 = NW corner, 5-6 = From N just below hill thru brush/grass, 7-8 = On hill NE corner, 9-10 = On E side of hill, 8D6" from the NE corner, 11-12 = On hill SE corner. Note that ibuthos entering from off-board may not be hidden unless there has been some firing AND the off-board ibuthos have heard the firing (Zulu rolls 1D6; 1-5 = hear firing if artillery or 1-2 hear firing if small arms). If firing has been heard then ibuthos may enter board hidden (player's option) if concealing terrain is within 12" of their entry point.
6 Army Morale: British = 7 (out of 10 units; they are tired & hungry) Zulus without reinforcements = 13 (out of 18 units; defending homeland & fighting hated enemy)
- Zulus with amaNtuli ibutho (6 units) reinforcements = +0
- Zulus with umHlanaa ibutho (8 units) reinforcements = +4
- Zulus with Nsugamgeni ibutho (8 units) reinforcements = +6
- Zulus with uMzinyati ibutho (4 units) reinforcements = +5
When number of units stated: above are either Demoralized or Broken/Routed, then Army Commander must roll 1D6 to keep his forces from dispersing, as follows:
- British Commanders: 1 = British units remain on field
2-6 = All British rout from field - Zulu Commanders: 1-2 = Zulus War Bands remain on field
3-6 = All Zulus rout from field
Once the Army Commander is required to check Army Morale, another check will be required whenever an additional unit or War Band is demoralized or Broken/routed. This Army Morale check reflects an Army Commander's presence to inspire his troops to fight on no matter what.
7 The British mission is simple. Capture and burn all Zulu dwellings, especially the kraal;, after dealing with whatever resistance is encountered, then retire off-board from same edge (Southeast) entered from. If British lose 50% or more casualities, then it is a loss.
8 Zulu mission is also simple. Protect the draal, umizi and cattle, while destroying as many white pigs as possible!
FURTHER READING
Brave Men's Blood, Ian Knight,Greenhill Books, 1990
British Forces in Zululand 1879, Ian Knight,
Osprey Publishing Ltd., 1991
Fearful Hard Times, Ian Castle and Ian Knight,
Greenhill Books, 1994
The Washing of the Spears, Donald R. Morris,
Simon and Schuster, Inc., 1965
They Fell Like Stones, John Young,
Greenhill Books, 1991
The Zulu War - A Pictorial History, Michael Barthorp,
Blandford Press, 1980
The Zulu War, David Clammer,
David and Charles Publishers, 1973
The Zulu War 1879, Ian Knight and Ian Castle,
Osprey Publishing Ltd., 1992
Back to Battlefields Vol. 1 Issue 6 Table of Contents
Back to Battlefields List of Issues
Back to Master Magazine List
© Copyright 1997 by Partizan Press.
This article appears in MagWeb (Magazine Web) on the Internet World Wide Web.
Other military history articles and gaming articles are available at http://www.magweb.com