Following the American defeat at Brandywine on September 11, 1777, General Washington withdrew his army to Chester, situated along the Delaware River, where he attempted to reorganize his forces. The British General Howe waited a day before sending General Cornwallis in pursuit and this gave the Americans enough breathing space to recover and evade the pursuit.
However, suppose that Cornwallis had caught up with Washington's rearguard at Chester? This is the basis for our wargame scenario, which I call the Battle of Chester Courthouse. The individual units are based on a figure to man ratio of 10 to 1 and the unit strengths are derived from the order of battle listed in The Philadelphia Campaign, by David North; Combined Books, Inc. 1993.
The American Forces
Major General Nathanael Greene's Division of Washington's army has been left at Chester to fight a rear-guard action against Cornwallis' column of the British army. Greene's forces include the two brigades of his own division: the 1st Virginia Brigade commanded by Peter Muhlenberg and the 2nd Virginia Brigade commanded by George Weedon. Additional assets include two light 3pound cannons and three units of Pennsylvania militia under the command of Colonel Armstrong.
| Muhlenberg (90 figs.) | Weedon (90 figs) | Armstrong (98 figs) |
|---|---|---|
| 1st Virgina St. (20) | Stewart's Btn. (10) | York Militia (40) |
| 13th Virginia (20) | 2nd Virginia (20) | Lancaster Militia (30) |
| 5th Virgina (20) | 6th Virginia (30) | Chester County (20) |
| 9th Virginia (30) | 10th Virginia (30) | Artillery (8 crew) & 2 guns |
The total number of figures for Greene's army is 278 which equates to 2,780 men at the 10:1 ratio used in this wargame. Each brigade should also add separate skirmish figures. I normally allocate 6 skirmish figures per brigade. As shown above, Greene's army divides conveniently into three separate commands.
The British Forces
Lord Cornwallis' column consists of five units of infantry, one light dragoon regiment (2 squadrons) and two light 3-pound cannons. The British forces are divided into 2 brigades as follows:
| Brg.-Gen. James Agnew (126) | Brg.-Gen. Edward Matthew (94) |
|---|---|
| Converged Light Battalion (40) | 1st Btn/ 42nd Regt. (30) |
| Converged Grenadier Btn. (40) | 44th Regt. (30) |
| Queen's Rangers (40) | 17th Light Dragoons (20) |
| Skirmishers (6) | Artillery(2 guns & 8 crew) Skirmishers (6) |
Total British figures are 220 or 2,200 men using the 10:1 figure to man ratio in this wargame. Although the British have fewer men at their disposal and they are required to attack in this game, the quality of their troops are significantly higher than those of the American forces.This is reflected in the morale ratings of the respective troops.
Morale Ratings
Morale ratings reflect a combination of training, skills and fighting spirit of the individual regiments in the wargame. British units are considered to be better trained, which in turn gives them more confidence than, their American counterparts. Thus their morale levels are stronger (i.e. higher). Using a scale of 1 (highest morale level) to 5 (lowest morale level), with "3" representing average units, Cornwallis' men are decidedly better than Greene's.
I rated the converged Light and Grenadier Battalions "class 2", but in light of the fact that these troops represent the elite of the British army, it would not be unreasonable to rate them as "guard class" or "class 1". The 42nd and 44th Regiments of Foot are "elite" or "class 2" as is the Royal Artillery. The Queen's Rangers and the 17th Light Dragoons are "average" or "class 3".
The Americans, on the other hand, are a rather dodgy lot. Armstrong's Militia are all rated "class 5" or "untrained" and have no bayonets, which puts them at a distinct disadvantage in hand-to-hand combat, also known as melee. In Muhlenburg's Brigade, I rated two of the units "4th rate" or "poor" quality and two units were rated "class 3" or "average" troops. Both categories are considered to be trained troops and have bayonets. ln Weedon's Brigade, I rated the tiny l0-figwe unit of Stewart's Regiment as "class 2" in order to compensate for its size; the 2nd and 6th Virginia regiments were rated "class 3"; and the large 10th Virginia (30 figures or 300 men), which was fighting in its first campaign, was rated "class 4".
My general rule of thumb for the American units is to rate the unit lower if it is a large 30 or 40 figure unit, rate all state units as 4th rate, and sprinkle in a smattering of 3rd rate units. The elite 2nd rate units should be rare in the Continental Army. A few notable examples of elite American troops in the 1777 period include Maxwell's light infantry, Morgan's Rifles, the Delaware Regiment, and the 2nd Canadian Regiment. American artillerists have some training so I tend to rate them as "average" or "class 3".
Special Rules
As stated earlier, the American militia have no bayonets; however, they are allowed to fire at full effect and make a full evade move to the rear once per game. The downside to this is that it will take them three full turns to recover to a good morale state. If you believe that this tactic is more appropriate for the period after Cowpens, then this rule can be optional.
All troops may operate in close order lines, march columns or open-order formations. The latter formation is usefull for moving through rough terrain or through open fields while advancing towards artillery positions. It is a poor formation if the unit becomes involved in band-to-hand combat. All British regulars may move and fire, while Americans may not fire if they move. This reflects the superior training of the British regulars. Remember, the Americans have not been through Valley Forge training yet.
Initial Set Up
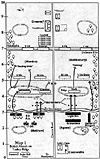 Refer to Map 1 (at right) for the initial deployment of British and
American forces. The game table is six feet wide by ten feet long
and the troops used are 25mm figures.
Refer to Map 1 (at right) for the initial deployment of British and
American forces. The game table is six feet wide by ten feet long
and the troops used are 25mm figures.
Note the numbers on the left side of the map which mark the number of feet of table length. This will help you set up your wargame table and determine where to deploy your troops. The action is meant to flow across the ten foot length of the game table rather than across the shorter width. This leaves little room for flanking maneuvers. The scenario represents a defense in depth by the Americans and we shall assume that there are thick woods along each table edge. This, in part, explains why the British are required to make a frontal attack across the length of the table.
The British will deploy one brigade on each side of the Chester Road, which runs down the middle of the table from Cobb's Farm to the town of Chester. The British may deploy as far forward as the edge of Turkey Creek, which is fordable for all types of units at any point. Troops should deduct 2" from their normal movement when they cross the creek or any other linear obstacle, such as a fence line.
In our game, Cornwallis placed his most powerful brigade, that of Brigadier General Agnew, to the right of the Chester Road, while the smaller brigade of Brigadier General Matthew was deployed to the left of the road. Players may use their own discretion as to which brigades are deployed where as well as to the opening formation into which they are deployed.
The Americans are required to post Armstrong's militia units along the heights, known by the locals as Turkey Ridge, that overlook the creek of the same name. There should be snake rail fencing across the table width at this point to afford the militia some "light cover" and "rested fire" against the British advance. It is my thinking that no general could get his militia to deploy in the open sans cover>, and that the militia would refuse to fight if so ordered. Given their lack of training and respect/fear of the redcoats, the milita will be more at ease if they are deployed in some form of cover, i.e. woods, behind fences or walls, etc.
Greene must then place one of his Continental brigades on each side of the Chester Road. Note the second line of snake rail fence beyond the militia's position. Each brigade is required to deploy at least two units along this line. Finally, a cross road known as the Delaware Pike intersects the Chester Road in the last third of the game table. I lined both sides of this shorter road with stone walls which provide "hard cover" against small arms fire and "soft cover" against artillery fire. Here, each American brigade will be required to deploy at least two units.
Beyond the crossroads lies the town of Chester. It consists of a small country courthouse and two or three other small houses or barns. The town is also flanked by small hills on each side. The Americans may deploy their artillery anywhere on their side of Turkey Creek.
Victory Conditions
The British must either capture the stone wall along the Delaware Pike or be in a position to threaten the American defense of this line by the end of the game. In otherwords, if at the end of six game turns it is obvious that the British are either holding the stone wall or outflanking it, then they will have won because the American position will become untenable, forcing General Greene to retreat.
The American victory conditions are to either hold the stone wall at the end of turn six or inflict 30% casualties (dead, wounded and routed troops) on the British army. The game is considered a draw if the British hold the wall but have lost 30% or more of their army.
Accordingly, the onus of the attack is on the British and they must move forward aggressively if they expect to win, given the relative lack of time.
Game Rules
I used a modified version of Rusty's Rules for Horse and Musket Warfare for this game, although any 18th Century set of rules such as Age of Reason, 1776, or Washington's Wars should suffice. Rusty's Rules works very well for small-scale actions such as this one and should result in a definite conclusion in 3-4 hours of play.
Skirmisher Rules
One of the modifications that I made to Rusty's Rules involves the addition of skirmisher stands to each brigade. I allot 6 skirmishers per brigade, based 3 figures per stand. Skirmishers may move 10" per turn and are unaffected by terrain obstacles. Also, they do not take morale tests, but they also will not close to within 6" of any formed unit (excludes artillery, which is considered unformed).
Firing is relatively simple: we use percentage dice (D100) for each figure firing. If 6 skirmishers are firing, then roll D100 6 times. To score a hit at under 12", the player must roll 25% or less for each figure firing. At ranges of 12.1" to 24", the player must roll 10% or less. You may want to limit firing over 12" to rifle-armed skirmishers only. Skirmishers stay on the table until every last one of them are killed.
Wargame Report: The Battle at Chester Courthouse: Refight
Back to American Revolution Journal Vol. I No. 2 Table of Contents
Back to American Revolution Journal List of Issues
Back to Master Magazine List
© Copyright 1997 by James E. Purky
This article appears in MagWeb (Magazine Web) on the Internet World Wide Web.
Other military history articles and gaming articles are available at http://www.magweb.com