Opening Moves
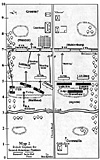
This initial troop deployment and the British assault on Turkey Ridge are depicted in Map 1. Here we see that Cornwallis placed his strongest brigade, that of General Agnew to the right of the Chester Road while Matthew's brigade and the Royal Artillery were posted on the left. Note that the Queen's Rangers are initially deployed in a march column to start the game.
Matthew opened the battle with a bombardment of the Lancaster Militia, ensconced along Turkey Ridge, behind the snake rail fence. The artillery shells and small arms fire from British skirmishers hardly phased the militia, so Matthew was resigned to rooting them out with musket fire and the bayonet. Accordingly, the 44th Regt. advanced towards the ridge to pin down the Lancaster militia while the 42nd Regt maneuvered its way around the militia's flank.
On the other side of the road, Brigadier General Agnew employed the same tactic of pinning and flanking, using the Light Battalion and the Grenadiers to pin the York militia, while the Queen's Rangers marched around the left flank of the York militia. It seemed that such tactics would inevitably force both militia units off Turkey Ridge, for if they held fast and reacted to the frontal assault, they would be compromised by the flanking movements. Cornwallis was no fool and he expected to be taking on the second line of Continentals in short order.
Turn Two
On the British left, the 44th Regt. advanced within musket range of the Lancaster and Chester militia units, which levelled 50 muskets (500 men) and brought the 44th to a staggering halt with the opening volley of the game. This seemed to surprise General Matthew, who moved the 44th back out of musket range since its job was merely to pin down the militia until the 42nd Highlanders could column march their way around the flank (this they proceded to do).
On the British right, the Light Battalion moved forward a full move and dared the York militia to fire on them, which the unit did to little effect. Skirmishers from Agnew's brigade peppered the militia with a lively fire that disordered the militia (i.e. they failed their morale test from the musketry, but became only disordered, rather than routed due to a "morale effects" dice roll). They held firm to their snake rail fence. Meanwhile, the Queen's Rangers continued their march around the flank of the York militia. General Greene made no effort to support the first line of militia by advancing Continentals to the front. It appeared that the militia would have to fend for themselves.
Turn Three
The York militia recovered their morale and delivered another volley into the Light Battalion (dropping a single figure to casualties). At the same time, skirmishers from Muhlenberg's Brigade advanced to the militia's front and began to pick off some of the Queen's Rangers. It was now becoming apparent to Agnew that he would have to shed some blood before he could drive the York militia off Turkey Ridge.
On Matthew's side of the field, the 44th took more casualties from skirmish fire as well as from the battery of Continental Artillery that Greene had moved up the Chester Road in support of the militia line. However, the Lancaster militia elected to "fire and voluntarily rout" from the 42nd Regt., which was on the verge of smacking them in the flank. (Here, luck played a major role as the Americans won the initiative for this turn, otherwise, the militia would have been annihilated by the Highlanders).
The American brigade commander, Colonel Weedon, advanced the 6th Virginia Regt. to challenge the 42nd Highlanders. This rash move dumbfounded the other American players, for it had been their plan to slow down the British attack with the militia, skirmishers and artillery and to vigorously defend the second and third fence lines. Weedon paid for this silly move almost immediately, for British skirmishers fired a few rounds into the 6th Virginia, which promptly routed.
[Editor: I attribute the rout to the low morale grade of this unit, which undoubtedly felt quite exposed out in the middle of an open field facing two units of redcoats]
Over on the British right, the York militia also employed the "fire and retire" tactic to avoid getting skewered by the bayonets of the advancing Queen's Rangers. So far, it appeared that the British tactics were working to perfection. With the York militia retreating, the Queen's Rangers elected to charge into the 1st Virginia State Regt, which held a secure position behind the second line of snake rail fencing.
The Rangers, to their surprise, were repulsed by the saucy Virginians. Nevertheless, the British had now cleared Turkey Ridge of American militia and prepared themselves for the task of rooting out the second line of the American defense.
[Editor: prior to this turn, the Americans deployed behind Turkey Ridge were not placed on the game table, to simulate the effects of "dead ground". Once the Redcoats were on top of the ridge, they could see the remaining American units, which were now placed on the game table.]
Turn Four: Assault on the Second American Position
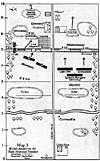
 Please refer to Map 2 at right which depicts the British attack on the
second line of defense.
Please refer to Map 2 at right which depicts the British attack on the
second line of defense.
Up to this point in the game, the British had not sustained many casualties, save for the 44th Regt., which had been mauled by the American militia on the British left. Events continued to favor the Redcoats during this turn.
On the left, the 42nd Highlanders finally deployed into line and routed the green 10th Virginia Regt. with a well-placed volley of musketry. The 44th was reluctant to move up in tandem with the Highlanders, so General Matthew ordered the 17th Light Dragoons forward in column to lend support to the 42nd.
Meanwhile, things looked good for the British on the right, where the 1st Virginia State Regt. was pinned down in a firefight with the Queen's Rangers. Inexplicably, the 13th Virginia, which provided support to the right of the 1st Virginia State, decided to voluntarily withdraw to the safety of the stonewall that bordered the Delaware Pike (which formed the third and final line of defense for the Americans).
Muhlenberg's order to one of his own units compromised his defense of the second line and left Weedon and Greene scratching their heads in wonderment. At the end of Turn Four, the British were in firm control of the second line of defense and prepared themselves for the final push against the stonewall.
Turn Five
The British consolidated their hold on the second American position during this turn. On the left, the 42nd swept the Lancaster militia (who were still recovering from their earlier problems) and ran off the field and headed home. They broke through the ranks of the 2nd Virginia and the 6th Virginia (both located behind the stone wall) disordering them. At the same time, the 17th Light Dragoons formed up into a column of squadrons on the Delaware Pike, where they had an excellent (and mouthwatering) view of the entire American right flank (British left).
It appeared that Cornwallis was one cavalry charge away from a smashing victory. Things were just as gloomy for the Patriots on the British right, where the 1st Virginia State routed from a renewed attack by the Queen's Rangers. Behind the Rangers, the elite converged battalions of the Light and Grenadier troops formed up for the final assault on the Delaware Pike's stone wall.
 Refer to Map 3 at right for a depiction of affairs at the end of Turn Five.
Turn Six: The British Move in for the Kill
Brigadier General Matthew launched a glorious cavalry charge down the Delaware Pike that should have clinched the victory, but somehow Weedon's exposed brigade managed to avoid the coup de grace. The 17th Light Dragoons piled into the flank of the 6th Virginia, the first unit that they encountered in the road, and annihilated that regiment.
The next unit in line for certain death was the 2nd Virginia Regt. Somehow these plucky fellows managed to form a square in the middle of the road and stopped the British Dragoons cold.
[Editor: they should thank their lucky stars for hot dice because they only had about a 5% chance of passing their morale and they managed to roll a 4% on percentile dice.]
The plucky dragoons where then bushwacked by some American riflemen, perched safely in nearby trees. This compelled the horsemen to retire behind the 42nd Regt where they hoped to recover from the days fighting.
The 42nd Highlanders leveled their muskets at this juicy target and fired into the square of the 2nd Virginia, but these Continentals held firm and possibly saved Greene's army from certain destruction.
On the British right, the Queen's Rangers ended a long and gloryfilled day by routing the 13th Virginia Regt. from the field. Yes, this is the same Continental regiment that compromised the defense of the second line by their early withdrawal.
At this point in the game, General Greene decided that he had inflicted enough damage on the British and that it was time for his troops to fall back on Washington's army. Cornwallis would certainly be in no condition to pursue, based on the days bloodletting.
Greene's subordinates urged him to stay and fight, reasoning that the British would lose a lot more men if they hoped to capture the one wall. There was a certain logic to their argument. Matthew's brigade was spent with the 42nd and 44th both losing 40% of their men, while losses for the 17th Dragoons approached 50%.
Matthew rallied his remaining troops back behind the safety of the second snake rail fence line, deciding that his units were too depleted to press home the attack.
On the British right, the Queen's Rangers had also taken a large number of casualties, and so they were pulled out of the front line for the day, to recover and provide rear support for the rest of the brigade. They had born the brunt of the fighting in this sector, so now it would be time for the Lights and Grenadiers to finish off Muhlenberg's Brigade.
The game was halted at this point. The British had taken a beating, losing 38% of their men as either casualties or routed units (Queen's Rangers routed on the last turn). Yet they gave as well as they received, inflicting 39% casualties on General Greene's army.
The majority of the American losses were in the form of routing units, largely militia units. It appeared that had the wargame continued for another turn, the British still had enough muscle left in Agnew's Brigade to carry the American left (British right), but probably at a high cost. On the other side of the field, Matthew's and Weedon's brigades had fought to a standstill.
Conclusion
If this scenario seems vaguely familiar, it is because it was patterned after the battle of Guilford Courthouse in the Southern Theater of the American Revolution. The wargame outcome was surprisingly similar to the actual battle, with the British winning the field at a Pyrrhic cost.
Our group played this scenario twice, and on both occasions, the British made it as far as the third line of defense after suffering heavy casualties. It appears that the British were about one regiment short (perhaps a Loyalist unit) of having enough battle assets to carry the third American position. Accordingly, I would recommend giving the British players two brigades of three units, and adding a third British player (Cornwallis) to handle the artillery and the cavalry reserve. I hope that you will give this scenario a try and have as much fun with it as I did.
Wargame Report: The Battle at Chester Courthouse: Initial Set Up
Back to American Revolution Journal Vol. I No. 2 Table of Contents
Back to American Revolution Journal List of Issues
Back to Master Magazine List
© Copyright 1997 by James E. Purky
This article appears in MagWeb (Magazine Web) on the Internet World Wide Web.
Other military history articles and gaming articles are available at http://www.magweb.com