On the 9th of May, 1796, Napoleon Bonaparte, Commander-in-Chief of the Army of Italy, wrote to Citizen Carnot, saying:
The last sentence may well be one of the main reasons why another battle took place the next day. A battle that has since been shrouded in controversy and myth: The Battle of Lodi. Some accounts seem to indicate that the battle needn't have happened. But these accounts failed to take into consideration Napoleon's orders from the Directory, the events leading up to the battle, the fog of war, and the last sentence in that letter.
The main aim of the French in northern Italy in 1796 was to attract attention. It was hoped that, if they attracted enough attention, they would compel the Austrians to weaken their forces in Germany by transferring troops to Italy. The French troops in Germany would then gain the advantage. This was the strategy planned by Lazare Carnot, a leading member of the ruling five man Executive Directory, and the plan that General Bonaparte was ordered to put into action.
On the 27th of March, 1796, the young general, aged 27, took command of the Army of Italy and he was soon to lead it into action against both the Austrian and the Piedmontese armies. However, the French forces were in a terrible state, so much so that he wrote to the Executive Directory on the 8th of April:
Indeed, the day before he wrote this letter, Napoleon received one from General of Division, Andre Massena:
Not only was the physical state of the French army bad but they were also low mentally and bad on discipline. An example of this was when Napoleon had to break up the third battalion of one Demi-Brigade and disperse the men into other regiments because they had refused to march. Others said they would fight as they were paid: in other words, they wouldn`t. Even so, a month after taking command, he had not only transformed the army into an effective fighting force, but he had also transformed it into one that had knocked the Piedmontese out of the war.
Of Austrians and Piedmontese
However, he was helped in this by the fact that the Piedmontese were not given much help by their so called Austrian Allies. And the reason for this was because the Austrians, like the French, also saw the German front as the main area of combat and not Italy.
The Piedmontese army was commanded by Baron Von Colli, an Austrian himself, but even so, the Austrian army failed to work with their allies. They, again like the French, distrusted the Piedmontese, who they felt might change sides at any time. An unlikely event since the King of Sardinia, Victor Amadeus the 3rd, disliked the revolution, and against his minister's wishes, had decided to ally himself with Austria. So generally, neither the Piedmontese or their Austrian allies were aware of each others intentions or movements.
The level of distrust can be summed up in the state of some of the Austrian troops sent to aid them in the campaign against the French. Various accounts appear to indicate that the Austrian army was vastly superior to the French in discipline, clothing and arms. However, this may not be entirely accurate. Although it is true that some of the units involved, such as the IR4 Deutschmeister, were excellent; and those transferred from Germany, sent against Napoleon later in the campaign to fight at Castiglione, Arcola and Rivoli, were veterans and some of their best, it is possible that many of those opposing him now were not so good.
A letter sent to Napoleon on the 9th of April from Lallemont, the Minister of the French Republic at Venice, describes some of them:
This must have raised Napoleon's hopes of success as he planned the next stage, that of destroying the Austrian army. An army commanded by the 75 year old General Johann Beaulieu. Perhaps his hopes were raised too much and he may well have believed, as the last sentence in his letter to Carnot seemed to suggest, that he could just as easily defeat the Austrians as he did the Piedmontese. He was soon to find out otherwise because the Austrians, like the Spanish in the Peninsular campaigns, no matter how many times you defeated them, had the habit of coming back for more.
But, on the other hand, Napoleon was a gambler, his luck was in, and most of his gambles paid off, one way or another. Added to this his popularity with the troops was rapidly growing, inspired by his method of winning battles by marching and outflanking an enemy, rather than directly attacking them head on. However, a battle was on the horizon in which he would ask them to do just that.
The armistice between the French and the Piedmontese had been signed on the 28th of April, but Napoleon had already begun to move his forces against the Austrians. It was clear in his mind that, although an armistice had the effect of pulling the Piedmontese out of the war, they could still, if they had reason to do so, field an army of up to 60,000 men in his rear. Only a third of these would be regular troops, the rest being militia, and, although many of these were now in the process of being disbanded, the threat was still there.
In fact he wouldn`t receive definite news of peace until the 21st of May. However, Napoleon wasn't one for hanging around. He also wanted to force the Austrians northwards away from the present area of combat (see photo at left) in which the Austrians were able to employ their superiority in cavalry, to areas more suitable to infantry (see photo at right). North would also lead to Milan (see map below), and its capture, apart from the financial gain, would be a great psychological victory.
To convince the Piedmontese to obey the armistice the French needed a quick victory over the Austrians. With this in mind he had to take up every opportunity that came: to attack and bring the Austrians to battle. He also needed to move his troops into richer areas that could more easily afford to pay for their supply needs. The need for a good food supply was urgent and had almost caused them defeat earlier on at Dego and San Michele. In both cases, after taking them, the hungry French foolishly went out foraging. The Piedmontese and the Austrians took advantage of this, counterattacked and drove them out. The French, after they had eventually been rallied and reorganised by Napoleon, then had to counterattack and retake them again.
Beaulieu's Positions
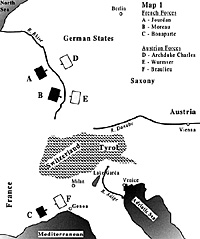
By the 6th of May Beaulieu had positioned himself along the River Po from the River Sesia to the outskirts of Piacenza. It was strongly believed that the French would attempt a crossing at Valenza and he wanted to be in a position to concentrate his forces to outnumber and ttack them as they tried to cross. However, Napoleon outmanoeuvred the Austrians and crossed in force at Piacenza (see map below).
By the 7th the Austrians were advancing in haste towards the French bridgehead. The French success at crossing however was marred the next day when General La Harpe was accidentally killed by his own men in a night action at Codogno. His troops panicked but the situation was saved when Louis Alexandre Berthier, Napoleon's 42-year-old Chief of Staff, took command. Some accounts report that at least two more attempts were made and each time the French were forced back with great loss. What happened next after these initial attacks is unclear. However, according to Nosworthy's account, it seems possible that the smoke from the constant cannon fire formed a fog, which, for the time being, blinded the Austrian gunners. Not being able to see their targets the Austrian artillery fell silent. Taking advantage of this, Napoleon, along with Colonel Jean Lannes and Generals Massena, Dallemagne and Berthier, who, in one account, was said to have seized a flag, led the troops once more across the bridge.
The French advanced quickly, too quickly for the old warrior Beaulieu and he ordered a rapid retreat, first to Lodi and then to Crema. This left the road to the rich city of Milan open for Napoleon. However, the French dared not attempt to march on the city while the Austrians remained positioned on their right flank along the eastern side of the River Adda. However, if they remained in that area Napoleon was sure he could force Beaulieu into a battle. On the other hand, if the Austrians continued their retreat northwards Napoleon would lose his chance of a decisive victory. In order to bring them to battle he had to cross the River Adda as quickly as possible before the Austrians moved away, and the best place to do this was via the bridge at Lodi.
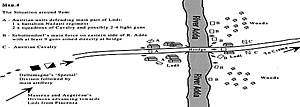
On the other hand, failure to destroy the bridge may well have been simply the fault of the Austrian intelligence. By all accounts Sebottendorf was clearly unaware that the French were advancing so quickly. One account states that he was so unaware of the approaching French that he had given the okay for his tired troops to start cooking. The fault with the intelligence may well be true, although it was generally good on both sides during the campaign. As good as it was, the information was only as good as when the spy actually spotted the enemy. By the time he reached headquarters the enemy may well have moved on and in a variety of unknown directions. Indeed, a rearguard might actually become an advance-guard. Whatever his reasons, the swift advance of the French and the speed in which they pushed in his outposts, took him by surprise. So much so, that when the French advanced into Lodi itself, it was defended by just one battalion of infantry (the Nadasti regiment), two squadrons of cavalry and perhaps two to four guns. The rest of Sebottendorf's troops were now positioned on the east bank, along with the main bulk of his artillery.
The Bridge
The wooden bridge itself was said to be 200 yards long, and possibly as many as three to six cannons were aimed directly at the mouth of the eastern end of the bridge. At least three more were positioned either side of it to create enfilade fire. Added to this would be the musket and rifle fire from the Austrian infantry. (It is possible that the Austrians were positioned in two battle lines. The first, consisting of three Grenzer battalions, were placed along the eastern bank of the river.
The second, consisting of five battalions of infantry, were positioned a little further back.) However they were positioned, it was clear that anyone crossing would have no cover and come under intense fire. (A bit like trying to walk from one end of a football pitch to the other while being shot at all the time and without being able to move out of the way.) Anyone managing to arrive at the other end of the bridge would then be blasted by the fire of massed muskets and rifles. Certainly, any attempt to cross the bridge was going to be very costly in terms of human life.
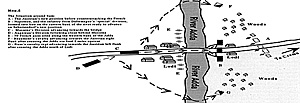
The first French units to reach Lodi, along with Napoleon, was Dallemagne's special Division created by Napoleon, which consisted of all the Demi-Brigade grenadier and carabinier companies, numbering around 3,000 infantry. With these were 2,000 light cavalry and possibly up to four light guns. (The time of arrival varies from an early 9.00am to a later 11.30am) Massena's Division of 8,000 men, General Pierre Augereau's Division of 6,000, and the main batteries of artillery, were hurrying towards Lodi as quickly as they could. These units were tired after all previous days heavy marching and fighting and Massena, followed by Augereau, wouldn't reach Lodi until around 5pm. This meant that Sebottendorf actually outnumbered Napoleon by two to one at the beginning of the battle. This was to happen in many combats between the French and the Austrians, but, as usual, the Austrians, for one reason or another, failed to take advantage and generally ended up becoming outnumbered themselves. Of course the fog of war has a lot to do with this and neither side knew accurately how many troops opposed them at any set time.
Fog of war or not, the French immediately attacked the Austrians and quickly overcame their outposts and the Austrians retreated back to the eastern side of the river. Between 11am and 1pm, Napoleon was able to position some guns to cover the bridge to prevent any attempts at destroying it. He then had to wait until Massena and Augereau arrived with their divisions. While he waited he ordered General of Brigade Beaumont, with most of the cavalry and some horse artillery, to find a way across the Adda north of Lodi, and to attack the Austrian right flank. This took some time and it wasn't until much later in the day that Beaumont managed to cross via a ford a few miles upriver. If the Austrians had attacked at this point, who knows what might have happened. As it was, they sat back and waited, although the main reason for this might be because they too were tired and hungry.
'Le Petit Caporal'
The main French artillery began to arrive and Napoleon was said to have sighted many of them personally, earning himself the title 'Le Petit Caporal'. As more and more guns arrived, the French were eventually able to field about 30 guns and a savage artillery duel began which lasted for several hours. Although they were causing the Austrian artillery great damage, as far as Napoleon was concerned, time was passing by and also his chance of bringing Beaulieu to battle. He must have been extremely pleased when, just before 5pm, Massena arrived with his Division. While Massena was getting his tired troops into position on the outskirts of Lodi, Napoleon, eager to get going, formed Dallemagne's troops into a long column ready to storm the bridge. Some reports say they were formed six abreast. By 6pm, Napoleon, observing the carnage caused by his artillery and believing that Beaumont had probably crossed the Adda by now and would be attacking any minute, ordered the troops forward.
With a roar and the usual, blood stirring shouts of `Vive la Republique!` the French charged across the bridge. The Austrians held their fire until the French reached half way. When they did fire they let loose with canister (sometimes referred to as grapeshot in many accounts) and the front of the French column disappeared in a mass of blood and dead bodies. The French wavered, the Austrians fired again, and more men fell. Again, according to Nosworthy's account, the sight of the French attacking out of the smoke took the Austrians by surprise and caused them to panic.
To add to their discomfort, some of the French troops had jumped off the bridge and waded through the water to the other side were they fired on the startled gunners. The French infantry column then smashed into the Austrian line forcing it back. As the rest of the column arrived the French advanced on the Austrians who had now fallen back to a new position. (Map 5) Although the Austrian infantry must have caused considerable casualties to the French as they advanced along the bridge, they were prevented from causing further losses once the French reached the other side. The reason for this, again according to Nosworthy's account, was because the advancing French were given some protection by the undulating ground. This in turn, meant that the French could successfully form a bridgehead.
Austrian Counterattack
The French, now formed into line, advanced steadily but as they did so, Sebottendorf, who even at this point still outnumbered the French, ordered a counterattack. So ferocious was the attack that the French were forced backwards towards the River Adda. Things looked bad for Napoleon until the timely arrival of Massena's troops who now crossed the bridge unmolested.
Following close on his heels came Augereau's Division. At the same time, Beaumont appeared on the Austrian right flank and General Rusca, with a regiment of cavalry, was said to have swam across the Adda south of Lodi, and was now advancing on their left flank. The odds were now reversed and under such pressure the Austrian infantry began to fall back. They were replaced by the Austrian cavalry, who, not yet in action, now attacked in a last desperate attempt to stem the French advance. But their attack had little effect on the French infantry who were resolved not to give in after all their efforts to take the bridge. In the ensuing action there were many individual deeds of bravery on both sides. One such example was that shown by Grenadier Laforge of the 21st Demi-Brigade de Bataille: 'alone, he killed 5 Uhlans and caused the rout of an entire squadron.' [5]
It was now clear to Sebottendorf that he couldn't hold the position any longer. He had carried out his command as rearguard successfully but it was time to leave and to take as many men as he could with him. He ordered a retreat to Crema to join up with Beaulieu, and the cavalry were given the job of covering the retreat. One account states the retreat was also covered by troops from the IR16 Terzi and the IR4 regiment, commanded overall by Colonel Count Attems, who had two horses shot from under him and was himself killed in the action. They were also aided by some guns. This they managed to do successfully, aided probably by the fact that the French, after so much marching and fighting, were too exhausted to pursue them effectively. The Austrians had lost the battle, although it had not been the decisive action that Napoleon desired. However, it did help to keep the Piedmontese in order and to increase the reputation of both Napoleon and the French army.
Trying to obtain detailed casualty lists proved equally as difficult as trying to find accurate orders of battle. As usual, the accounts vary, with 153 Austrians and 350 French killed generally offered as the usual result of the action. However, although the casualty rate was fairly low in most Napoleonic battles, compared to later day actions, these figures seem far too small, especially when we consider the size of the battlefield, the amount of artillery and canister involved and the ferocity of the fighting. It seems even smaller when we consider that the French lost over 1,000 troops at Dego and nearly as much killed and wounded in the siege of the ruined castle of Cosseria. The Austrians were also said to have lost a further 1,500 men taken prisoner and as many as 16 guns.
Sebottendorf managed to join up with Beaulieu who then retreated towards the important fortress of Mantua. The French army was in urgent need of resting and of being re-equiped, and so, on the 14th of May, Napoleon triumphantly marched them into Milan. At that time he was seen as a liberator and was virtually showered with financial contributions. His troops however, saw him as the best paymaster they ever had. It was the first time many of them had been paid since 1793.
In hindsight, it could perhaps be said the battle of Lodi should not have taken place, considering it did not result in a battle with Beaulieu. However, in a sense, Lodi was the crunch, the turning point in the campaign. It gave the French Army of Italy confidence in themselves, and more importantly, confidence in their leader and his ability to march or fight them to victory. And, although it wasn't a large scale action, it was a perfect example of how to use all arms.
This was achieved by Napoleon using whatever came to hand as soon as it arrived. Firstly, he had his artillery pin the Austrians in position. Secondly, he launched his infantry across the bridge. Thirdly, while this was going on, he sent his cavalry to outflank the Austrian positions. In comparison, the Austrian cavalry were kept inactive until ordered to counterattack late in the battle.
There have been accounts which seem to want to persuade the reader that Napoleon owed his military skills to others. This might be true in one sense. However, although he did read the works of other military practitioners such as Bourcet, Guibert and Du Teil, to name a few, he still needed his own personal genius to put theory into practise. For example, I could read hundreds of books on football written by Cantona, Linekar and Ian Rush, but it wouldn't necessarily make me a brilliant player on the field. And on the field of battle is where Napoleon proved he had digested the theory almost to perfection. The tactical or the strategic victory of Lodi was perhaps not as important as the psychological effect the battle had. Napoleon himself later claimed that the events at Lodi inspired in him for the first time, the thought that perhaps he was destined for greater things. He also knew from that day on that his soldiers would do what he wanted, no matter what the danger. It would take a few more months and several more hard fought battles, but he was almost correct in his letter to Carnot, when, on the 8th of May, he said that they would become the masters of Italy.
The French should be allowed a maximum of four attempts at crossing the bridge. Their cavalry should not come into action against the Austrian flanks until the fourth attempt is made. A victory can be claimed if they force the Austrians to retreat. The main Austrian cavalry, apart from two squadrons on the west bank, must not be used until counter-attacking the French on the eastern bank. They can claim a victory if the French fail to capture the bridge after their fourth attempt. They could also claim a partial victory if they haven't been forced to completely retreat by the end of play.
(Calculated guess)
(Total: 19,000 men & 30 guns) C in C: General Napoleon Bonaparte
General Massena's Division:
General Augereau's Division:
(Total: 10,500 men & 20 Guns) [1] Page 80: THE BONAPARTE LETTERS AND DESPATCHES. Volume 1. London 1846
GESCHICHTE DES KK INFANTERIE REGIMENTES HOCH UND DEUTSCHMEISTER. AMON (1879) (extracts provided by Dave Hollins)
CAMPAIGNS OF NAPOLEON: David Chandler (London 1995)
ATTACK IN THE WEST: W.G.F Jackson (London 1953)
BATTLE TACTICS OF NAPOLEON AND HIS ENEMIES: Brent Nosworthy (London 1995)
THE RISE OF GENERAL BONAPARTE: Spenser Wilkinson (Reprint. Hampshire 1991)
A MILITARY ATLAS OF THE NAPOLEONIC WARS: V.J. Esposito & J.R Elting (London 1964)
NAPOLEON`S GREATEST ADVERSARIES: Gunther E. Rothenberg (London 1982)
NAPOLEON`S MILITARY MACHINE: Philip J. Haythornthwaite (Kent 1988)
NAPOLEON`S CAMPAIGNS IN ITALY (Osprey Men-At-Arms No 247) Philip Haythornthwaite & Richard Hook
THE NAPOLEONIC SOURCE BOOK: Philip Haythornthwaite (London 1990)
Various other books in the Osprey Men-at-Arms series covering the French and Austrian armies
Related
This article appears in MagWeb (Magazine Web) on the Internet World Wide Web.
'We have at length crossed the Po. The second campaign is begun. Beaulieu is disconcerted. He calculates very ill, and constantly falls into the snares that are laid for him. Perhaps he meant to give battle: for that man has the daring of madness and not that of genius: but the 6000 men who were forced yesterday to cross the Adda, and who were defeated, will weaken him much: another victory and we are masters of Italy.'
[1]
The Situation Before Lodi
 Larger Map (slow download: 63K)
'I have found this army not only destitute of everything, but without discipline, and in a state of perpetual insubordination.' [2]
'The salt meat causes many disorders: it is time for this unwholesome food to be discontinued. We are in urgent need of shoes. We are in want of arms.' [3]
'The Austrian troops according to the report of the Milanese themselves, are in bad condition, excepting the cavalry. They consist chiefly of elderly men, boys of fifteen or sixteen, Polish recruits raised in Galicia, who march by compulsion and desert in platoons.' [4]
The Build Up To The Battle
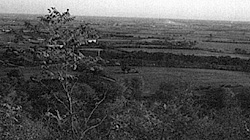
The area Napoleon didn't want to fight in, which was better suited to Austrian cavalry.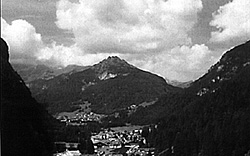
The area northwards that Napoleon elected to fight over, better suited to French infantry. Larger Map (slow download: 79K)
 Larger Map (slow download: 55K)
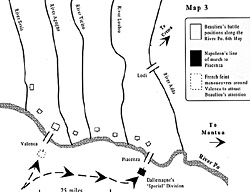
The Battle of Lodi: 10th May, 1796.
Beaulieu now had the main part of his army at Crema. However, he had to slow the French down so that other units could reach him safely and he could concentrate his forces. With this in mind he left Feldmarschall Leutnant (Lieutenant General) Sebottendorf with a sizeable force to act as a rearguard at Lodi. Accounts vary the number of men he commanded from 8,000 to 12,000, and, as usual in early Revolutionary campaigns, accurate figures are hard to come by. A calculated guess puts Sebottendorf's command at around 8,500 infantry, 2,000 cavalry and 20 cannons. Accounts vary of how many guns he had, which ranged from a low 12 to a high 30. My figure of 20 is hopefully more nearer the mark.
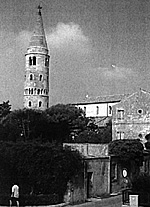 The town of Lodi itself is split by the River Adda with the main part situated on the western bank while the eastern side held mainly a few and woods. Some accounts also mention there being some ramparts or town walls on the western bank, which, if they did exist, would give the French troops some cover as they prepared to attack. However, I came across no clear details or descriptions concerning their size, length, condition or their actual positions. The narrow Italian streets (See photo at right) were ideal for defence by infantry and would take some time to clear, and although many accounts state that Sebottendorf did not intend to defend the town, Nosworthy's indicates that he did. This seems possible and may well be one of the reasons why he didn't set in motion any plans to destroy the bridge: he needed it himself in case he had to retreat.
 Larger Map (slow download: 38K)
 Larger Map (slow download: 40K)
After the Battle
Conclusion
The Wargame
Orders of Battle
French Army of Italy
General Dallemagne's `Special` Division:
3,000 infantry (All Grenadier and Carabinier companies)
2,000 cavalry (Commanded by General de Brigade Beaumont)
4 light guns (possibly 4 pdrs)General Massena's Division:
8,000 infantry
General Augereau's Division
6,000 infantry
Artillery:
26-30 guns
Possible French Cavalry Regiments at Lodi under General Beaumont:
7th & 13th Hussar regts
10th & 24th Chasseurs a Cheval regts
5th, 15th & 20th Dragoon regtsPossible French Infantry Regiments:
1st, 3rd, & 8th Legere Demi-Brigades
84th, 21st & 51st Line Demi-Brigades4th & 25th Legere Demi-Brigades
39th & 69th Line Demi-BrigadesArtillery:
Possibly 4 & 8pdrs
Austrian Rearguard at Lodi
C in C: Feldmarschall Leutnant Sebottendorf
8,500 infantry
2,000 cavalry (possibly all light cavalry: dragoons, hussars and at least one uhlan regt)
20 guns (possibly 3pdrs & 6 pdrs)Possible Austrian Regiments at Lodi:
Nadasti Infantry Regt
Infantry Regt No 16 Terzi
IR4 Deutschmeister.
IR8 Huff.
IR26 Schroder.
IR27 Strassoldo.
IR43 Thurn
Grenzer: two composite Karlstadt district battalions & SzluinerNotes & Source List
[2] Page 23: - ditto -
[3] Page 25: - ditto -
[4] Page 28: - ditto -
[5] HISTOIRE DU 21e REGIMENT D`INFANTERIE.General Pierre Bertin.Gueniot 1992 (extracts provided by Keith Redfern)
Back to Table of Contents -- First Empire #32
© Copyright 1996 by First Empire.
Other military history articles and gaming articles are available at http://www.magweb.com