October 1813 saw Wellington’s army burst across the frontier into France and eventually over the Bidossa, November saw the fall of the Nivelle line and early December saw the Allies before Bayonne. Soult’s hastily reorganised forces were falling back to Bayonne, around which he intended to make a stand. Wellington’s forces were widely dispersed, in order to contain Soult, between the coast and the Adour River and straggling the Nive River. The wily Soult concentrated his forces against Wellington’s left (North of the Nive) and between the 9th and the 11th of December made numerous forays against General Hope’s forces. The intensity of these attacks increased to the extent that Wellington withdrew divisions from his right flank to reinforce his left.
This was Soult’s objective. Wellington had been forced to leave Hill commanding two divisions on the South bank. However, a pontoon bridge built earlier meant that if Hill was attacked in force and could hold out for at least four hours then Wellington could reinforce him in strength.
Unfortunately for Hill torrential rain on the 12th, higher up the Nive, saw the river rise dramatically and the pontoon bridge was broken. He was now isolated until this was repaired. During that night Soult began shifting his forces to the South of the Nive, across bridges within Bayonne.
This movement was observed by the Allies, but was thought to be a feint as all Soult’s efforts had been striving to drive Wellington’s away from the Northern coast and his possible supply from the sea. Although no troops were redeployed to counter this the Allies responded by standing to all the front line units throughout the night. Soult left 3 Divisions to guard Bayonne.
Hill’s Dispositions
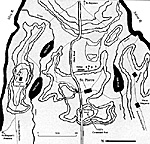
 General Sir Rowland Hill commanding the sector bordered by the Nive and the Adour rivers, a wedge with the apex at Bayonne, had chosen an excellent position centred around St. Pierre. He had the 2nd Division and Le Cor’s
Portuguese Division, some 14,000 men, and 12 guns to hand. His cavalry and Morillo’s Spanish Divsion had been
deployed several miles in his right rear to counter a threat from Paris’ and Pierre Soult’s commands and were to take
no part in the coming action.
General Sir Rowland Hill commanding the sector bordered by the Nive and the Adour rivers, a wedge with the apex at Bayonne, had chosen an excellent position centred around St. Pierre. He had the 2nd Division and Le Cor’s
Portuguese Division, some 14,000 men, and 12 guns to hand. His cavalry and Morillo’s Spanish Divsion had been
deployed several miles in his right rear to counter a threat from Paris’ and Pierre Soult’s commands and were to take
no part in the coming action.
Hill deployed Pringle’s brigade on his left flank in front of the Chateau of Villefranque, they also occupied the Chateau which was a strong stone building. Pringle’s front was protected by low boggy ground and thick woods that would hamper any French attack. Barne’s Brigade, Ashworth’s Portuguese and 10 guns of the artillery were placed before and around St. Pierre. The Portuguese having the benefit of a long low impenetrable hedge. The remaining two guns were kept in reserve.
 On the right on the Partuohira heights was Byng’s brigade. Byng had placed the 1/3rd out on its own at the Western most point of the heights with the balance of his brigade around Vieux Moguere. Le Cor’s Portuguese were situated at Horloppo. Hill realised that he was in a desperate situation, he did not know how long he would have to face the coming storm, until the pontoon bridge was repaired he could expect no support from Wellington. Soult realised that if he could press home his attacks and rapidly defeat Hill, before further Allied divisions arrived then he would destroy nearly a third of Wellington’s disposable forces and be in a position to reverse the trend of the campaign forcing the Allies back over the mountains and into Spain.
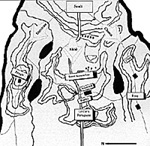
The Battle The morning of Monday 13th December broke with a heavy mist under cover of which Soult formed his order of battle. D’Erlon, having D’Armagnac’s, Abbé’s and Daricau’s divisions of infantry, Sparre’s Cavalry (which were to take no further part owing to the terrain) and 22 guns, marched in front followed by Foy and Maransin with the remainder of the French Army in reserve, as the roads did not permit any other order. At half past eight Soult pushed back the British picquets in the centre spreading along the flanks of the valley, Soult deployed 22 guns on a prominence before the British centre.
As the cannons roared from both sides, Soult’s plan began to unfold. Daricau set off towards General Pringle, Abbé moved against St. Pierre and once he was engaged, D’Armagnac was to attack in the direction of Vieux Moguerre and the unfortunate 1/3rd. Foy and Maransin were eventually to support Abbé and D’Armagnac.
 The British Left
Daricau’s 5,000 men struggled forward against Pringle’s 1,800 men and pushed in the British skirmish line. The wooded and swampy ground broke up the French columns and although they managed to reach the chateau and make one attack upon it, in four hours they were unable to make any impression.
The French repeatedly attacked in dense skirmish lines but were repeatedly driven off by the British musketry, losing some 450 men to Pringle’s loss of 180.
The Centre The hard fighting Abbé, threw three brigades against Hill’s centre in the main French attack. Hill had set up his command post on the Horlopo knoll from where he could view the entire battlefield, General Stewart who actually commanded the 2nd Division - but under the close supervision of Hill - was to control the action in the centre. Hill had deployed the three light companies from Barnes’ brigade, four Portuguese light companies form Ashworth’s line battalions, a company of rifles and the entire 6th Cacadores. Abbé’s attack made in two columns was preceded by an even denser swarm of skirmishers. Artillery from both sides caused severe casualties. Hill’s batteries made the French advance along the main road a deathly affair.
The French skirmishers, falling into disorder as they crossed low hedges and walls, slowly pushed back the Allied lights until they reached Ashworth’s four line battalions. The stoic Portuguese halted this advance and pushed the French columns back down the slope. Abbé not to be discouraged continued to pour in troops and the struggle continued for three hours with out the French gaining the crest. When the French made any head way, companies from Barne’s brigade were sent into the line where necessary.
 Bunbury’s disgrace
Once Abbé’s troops had got forward and into action, D’Armagnac sent forward Chasse’s brigade against Byng. Colonel Bunbury of the 1/3rd panicked as this brigades skirmishers came on, and no doubt feeling exceedingly isolated ordered a very rapid withdrawal back towards Vieux Moguere.
Although Bunbury could not have stood for long, the two supporting battalions could have moved up to reinforce him if he had held for a short while, various historians and contemporaries declared Bunbury a coward for his lack of fortitude.
Fortunately, D’Armagnac and Foy, elements of whose command had now come up, were a little unenthusiastic in forcing the issue, this coupled with some skilful tactical play by Byng meant that it was three hours before the three British battalions were forced from the heights down to the western edge of the southern Mill Pond. Notably, Chasse’s brigade acting unaided by either units of it’s or supporting Divisions, when it left the field suffered no more than 160 casualties for the entire day.
Peacocke’s lack of resolve. Simultaneously with Byng being cleared from his heights, a series of mini-disasters was overtaking the Allied centre. Stewart ordered the 71st forward to the left of the main road and into the thick of the fighting. Colonel Peacocke, newly arrived commander of the excellent 1/71st, decided that it was all to much for him and retired his unit. The 71st, were somewhat disgruntled by this as they were used to the hard fighting of their recently deceased Colonel Cadogen. Peacocke as with all officers lacking in morale fibre made his way to the rear and found an excuse to be elsewhere than required. Hill found him beating some Portuguese ammunition bearers, urging them to the front. Stewart lead the grateful 71st personally back into the attack, where they restored honour to themselves.
Ross commanding the Portuguese artillery in the Allied centre was now wounded and carried off. The Portuguese gunners who had until now fought bravely, decided that this was now a good time to abandon their guns, shaming their fellows in the infantry who were fighting like lions.
The Allied Counter Attack.
Hill’s line was now being forced off the crest and Stewart committed the last of his personal reserve 7 companies of the 1/92nd to the centre. The 92nd, as is compulsory with Highland Regiments in moments of desperation, charged into action behind their colonel and single piper shrieking out the ‘Cogag na shee’. Byng had now been forced back to a position level with Stewart.
Hill now took personal command of the centre, Le Cors’ Portuguese division was sent forward to counter attack in the centre. He withdrew the 1st provisional battalion and the 1/57th from the right to counter attack in the centre, this left the 1/3rd to hold up the French on the right.
After a few volleys the French centre attack collapsed and began to fall back. Hill had used every spare man available to strike back, however, he was now secure in the knowledge that the pontoon bridge had been repaired and that the6th and 3rd Divisions with Wellington were coming to his aide.
On the left Pringle also counter attacked and managed to drive his opponents, who were disheartened by the Abbč’s complusory withdrawal, to within 800 yards of the Bayonne defences.
3pm and The Battle closes.
Wellington arrived at Hill’s centre and declined to take command of the battle, declaring the day to be Hill’s alone, The 6th and 3rd Divisions he had brought with him were within half a mile of St. Pierre, as Abbé retreated. On the right furious fighting continued, Hill returned what remained of Byng’s brigade to the right and sent in one of Le Cors’ brigades. This was sufficient, coupled with the sight of the retreating French centre for Soult’s left to fall back to the Partouhira heights where Foy was posted with a division and a half. Foy was driven back following some long range fighting.
Some 2,500 French men had fallen along the 900 yards front that Stewart had commanded. A 1,000 Portuguese and British had fallen repulsing them from that sector. Wellington upon inspecting the field declared it the bloodiest he had ever seen. A tribute to both the Portuguese who had borne the brunt of the fighting and to the indomitable French Infantry when one considers the numbers actually engaged, the lack of cavalry and the limited artillery available to the protagonists.
Soult withdrew into Bayonne having lost some 3,300 men. The Allies casualties were between 1,500 to 1,800 men and Generals Barnes, Ashworth and Le Cor being wounded.
Notes on the Battlefield
All of the mill ponds were surrounded by swampy ground that made movement impossible for formed bodies. This effectively divided Hill’s front into three sectors that were from left to right 400, 900 and 500 yards wide. The three principle heights of the Allied position were long low hills each with a steep prominence or knoll as indicated. Hill’s command post was the highest position within his lines and from there he had a view of the entire battlefield.
Orders of Battle
Battle of St. Pierre
Anglo-Portugeuse Order of Battle
Commander in the Field: General Sir Rowland Hill
2nd Division: General Stewart 802 Officers, 6,173 Men
- Barne’s Brigade
- 1/50th Foot
1/71st Foot
1/92nd Foot
1 coy 5/60th Rifles
- 1/3rd Foot
1/57th Foot
1st Provisional Battalion (2/31st, 2/66th)
1 coy 5/60th Rifles
Pringle’s Brigade
- 1/28th Foot
2/34th Foot
1/39th Foot
1 coy 5/60th Rifles
- 6th Portuguese Line - 2 Bns
8th Portuguese Line - 2 Bns
6th Cacadores - 1 Bn
Le Cor’s Portuguese Division 507 Officers, 4,163 Men
- Da Costa’s Brigade
- 2nd Portuguese Line - 2 Bns
14th Portuguese Line - 2 Bns
- 4th Portuguese Line - 2 Bns
10th Portuguese Line - 2 Bns
10th Cacadores - 1 Bn
- 2 Portuguese foot batteries 12 guns
Soult’s Forces
D’Erlon’s ‘Corps’
1st Division - Foy 9 Battalions 5,216
1st Brigade:?
- 76čme Ligne, 6čme Léger
- Units not known
2nd Division - D’Armagnac 10 Battalions 5,914
1st Brigade: Chassé
- 28čme Ligne, 75čme Ligne
- Units not known
3rd Division - Abbé 8 Battalions 6,372
1st Brigade: Rignoux
- 27čme Léger, 63čme Ligne
- 94čme Ligne, 95čme Ligne
4th Division - Taupin 9 Battalions 6,098
1st Brigade: Rey
- 32čme Ligne, 43čme Ligne
- 53čme Ligne. 58čme Ligne
5th Division - Maransin 9 Battalions 5216
1st Brigade:?
- 12čme Léger, 45čme Ligne
- Units not known
6th Division Daricau 6 Battalions 5519
1st Brigade: St. Pol
- 21čme Léger, 100čme Ligne
- 28čme Léger, 103čme Ligne
Artillery
- 44 guns
Sparre’s Dragoons
- 3 Regts.
As can be seen this order of battle is far from complete, ‘?’ indicates where I have been unable to establish for definiteor make and informed speculation as to the brigade commander. There are three brigades in the above orbat shown as units not known. I have identified the following s brigade formations but I am unable to confirm their Divisional location or their brigade commander.
- A) 9čme Léger, 24čme Ligne
B) 88čme Ligne, 96čme Ligne
C) 16čme Léger, 8čme Ligne
D) 51čme Ligne, 54čme Ligne
Obviously we have four brigades for three places, however, one of these would have been assigned to the Reserve or the Bayonne Garrison or to the 7th or 9th Divisions. If any one can expand or correct this further, please write in to me care of the editor.
Related
Back to Table of Contents -- First Empire #21
Back to First Empire List of Issues
Back to MagWeb Master Magazine List
© Copyright 1995 by First Empire.
This article appears in MagWeb (Magazine Web) on the Internet World Wide Web. Other military history articles and gaming articles are available at http://www.magweb.com