The big problem in designing the scenario is how to make it balanced without making the Union forces as "dumb" as they were handled historically. However, with limitations on troop quality and command ability, it's possible to reflect the Yankees' problems without insuring a Rebel victory.
(13 points: 40% -- 5/4, 60 % -- 8/7)
Colonel Edward D. Baker, benefit 0/2M, points 3
(8 points: 40% -- 3, 60 % -- 5)
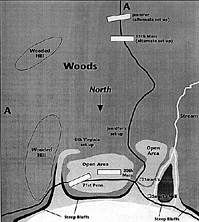
The game begins about the time Baker arrived on the field, at 2:30 pm. For the Union, the 15th and 20th Massachusetts and the 71st Pennsylvania start as indicated, and Baker and the section of mountain howitzers begin anywhere along the bluff edge. Baker must remain stationary for the first turn, then may move
normally.
For the Rebels, the 8th Virginia and Jennifer's command may set up in the areas indicated, in whatever formation is desired.
All units on the board at "game start" have already fired their opening volleys.
The 18th Mississippi may enter on the first turn, deployed in any formation, along the east edge of the board within 12 inches of the road.
On turn three, the 42nd New York and the James rifle may enter anywhere along the bluff edge. The infantry begins disordered, and the artillery spends the first turn stationary, then
may move normally. (This reflects the time spent scaling the nearly 100 foot bluff.)
On turn three, the 17th Mississippi may enter anywhere along the the line marked by an "A." It may enter either in march column and move normally, or deploy in another formation on the edge of the board. In the latter case, it it treated as having moved.
Yes, it was a small battlefield.
The woods should all be treated as light woods, and broken terrain under Johnny Reb rules. The ravine to the east and south is rough terrain. The stream to the west should also
treated as rough, but is fordable. The two buildings, the Smart Farm and Smart's Mill, have no effect on play.
The north edge of the board immediately adjacent to the large clearing is Ball's Bluff, overlooking the Potomac River, and is very difficult to move up and down. Any unit arriving or departing along this area ia automatically in disorder. Departing units must have a half move left to leave (unless routing).
The game runs from 2:30 pm until about 6:30 pm, sixteen turns in Johnny Reb.
Union troops gain a major victory if they drive the Confederates from the field (Baker's goal.) They score a minor victory if they can hold their position, but inflict more casualties than they take. If Baker is killed, the Union can not score a major victory.
Confederate troops score a major victory if they rout all Union forces on the board. It's a minor victory if they either force the Union into a withdrawal, or push them past the 40 percent bar on advancing and take less casualties than the Union. Any other result is a draw.
1. Command: The command structure on both sides had a profound effect on the battle. There was no unified Confederate command during the battle, since the brigade commander, Evans, was several miles away in Leesburg. In fact, a dispute broke out between the three surviving regimental commanders afterwards over who had exercised overall command, but "after- action reports" indicate none really did. The Union troops would probably have benefitted from such an arrangement, considering their commander. To reflect this, the optional rule, limiting the number of orders per turn, should be used for the Union. In other words, Baker would get one order per turn. The Rebels, however, should be allowed to give one order per regiment, to reflect their individualized, decentralized command structure.
2. Baker: While tactically incompetent, Baker was particularly inspiring during the battle, and his death demoralized the Yankee forces. To reflect this, use the following two rules:
B: If Baker is killed, the Union immediately becomes demoralized, and the Union's stall and withdrawal numbers change from 40 percent and 60 percent to 30 percent and 50 percent respectively. (In the order of battle, the number after the slash reflects the lower percentage.) This means that if Baker is killed, the Union can only lose one other unit before losing its ability to advance. On the plus side, the succeeding Union commander is rated as average, an improvement. 3. James rifle: Don't forget that the James rifle represents only one gun, and all fire strengths are halved. (By the way, the guns can only be moved by prolong on top of the bluff, since bringing up limbers was out of the question.)
4. Balance: If the Union forces are winning too easily (it is possible), consider ignoring the isolation rule for the Rebels, since the regiments fought more or less independently anyway or give them a commander (average rating, benefit 1) on the assumption that one of the regimental commanders managed to take de facto command. If it's the Confederates that are rolling over their opposition, give Baker more orders per turn, or delay Rebel reinforcements.
The only restriction on these units is that the 20th Massachusetts must remain in the bluff clearing until the 15th Massachusetts moves to within ten inches or Baker arrives on the board (the mission of the 20th Massachusetts was to support the withdrawal of the 15th Massachusetts, if necessary.) The other units arrive as indicated in the order of battle of the historical game.
Large Scenario Map (slow: 105K) Ripple Effect: Battle of Ball's Bluff and Its Aftermath
This article appears in MagWeb (Magazine Web) on the Internet World Wide Web. Besides the historical import in the previous article, one of the reasons that the October, 1861 engagement at Ball's Bluff, Virginia is an attractive wargame that it is one of those battles that make a good introductory battle for a new Civil War buff, but is still challenging enough for more experienced players. The level of command, a brigade on each side, is about the perfect level for the Johnny Reb rules the author uses. It also has the big advantage of being easily within reach of gamers with limited space and resources. There are about four regiments on each side, and the terrain can be set up on a kitchen table, with perhaps even a little room left over for dinner!
Union Forces
15th Mass., 600 men, green, smoothbores
20th Mass., 300 men, green, smoothbores
71st Penn., 500 men, green, rifle-muskets (Also known as the 1st California)
42nd N.Y., 200 men, green, smoothbores (Actually represents 2-3 companies of the 42nd, but has no effect on play.)
1 Section, Batt. I, U.S. Art. (2 x 12 lb. Mountain Howitzers), elite
H Section, Batt. B, R.I. Art. (1 x 12 lb. James Rifle), average
Confederate Forces
Jennifer's Detachment, 300 men, Average, Smoothbores (Represents a group of companies from several regiments, as well as a small unit of dismounted cavalry.)
8th Virginia, 400 men, average, smoothbores
17th Mississippi, 500 men, average, smoothbores
18the Mississippi, 400 men, rifle-muskets
Deployment
Terrain
Victory Conditions
Special rules and notes
A: Baker gives no benefit to firing or melee, but does give a +2 to morale to any unit he is with.
 5. Alternate deployment: If the Rebs are really winning too easily, try this. Move the start of the game back to noon, when the first real engagements at the bluff began. This gives the Union player a chance to get a better position than in the historical deployment. Only the 15th Massachusetts and Jennifer's detachment are on the board at start, with the 20th Massachusetts arriving on turn one at the edge of the bluff, in disorder, and the 8th Virginia arriving between the marked points (see the 17th Mississippi above) on turn three (12:45 pm.)
Jumbo Scenario Map (slow: 402K)
Back to The Zouave Vol VIII No. 2 Table of Contents
Back to The Zouave List of Issues
Back to Master Magazine List
© Copyright 1994 The American Civil War Society
Other military history articles and gaming articles are available at http://www.magweb.com