When General McLaws advanced ... he found the
enemy's line of skirmishers--cavalry dismounted--behind a
line of heavy rail (fences). General Alexander (of the
artillery) was ordered to knock the rails about them and
drive them out, and he was partially successful, but the
enemy got back before our infantry could reach them, so
we had to carry the lined by assault.
From Manassas to Appomattox
The line officers and foot soldiers of the American Civil War were quick to recognize, and seek, that most precious of battlefield commodities, a little bit of cover. Nearly every first-hand account of Civil War battlefields mentions or even dwells on various landmarks. And most of these landmarks were notable, from the perspective of the soldiers who actually did the fighting, for the amount of shelter from flying lead they afforded.
The gallant lads of the Union army found respite in the shallow dip of land before the flaming defenses near Fredericksburg. Numbers of luckless Billy Yanks, repeatedly sent forward in hopeless, fruitless charges, survived only by lying perfectly flat in this slight depression, until darkness permitted them to back away from the bristling Confederate position to safety.
The Fredericksburg defenses were themselves anchored on the famous sunken road in front of Marye's Heights. There Cobb's Georgians could shoot, reload, and shoot again, in ranks three or four lines deep more or less protected from return fire both by the sunken road and the stone wall which bordered it.
Walls and fences, in fact, were amount the most common sources of battlefield cover for northern and southern soldiers alle in the agrarian age of the Civil War. Stone walls were proof against musketry and grape, for the most part, and very little short of a direct artillery hit could dislodge a soldier from behind a well-built stone wall.
Stone walls were not always handy, though. The farmers and landsmen of 19th century America, in the era before wire fences, were very likely to divide their fields and demarcate their property with readily available wood. East and west, the battlefields and byways of the Civil War were crisscrossed with and bordered by rail fences, hewn from the living trees which covered so much of America in that time.
Although wood rail fences were not impervious to shot and shell by any means, they afforded an identifiable landmark behind which to rally, and some little protection from harm on the deadly fields of the Civil War.
Wood fences, unlike cold stone, also provided benefits in addition to cover. Most frequently, rail fences constituted a source of fuel. Woe betide the farmer when a brigade of soldiers, Yank or Reb, camped beside his rail fences. By morning, more often than not, the rail fences would literally be gone. The ashes of campfires marked their demise, where they provided light, warmth, cookfires and hot coffee to the passing troops.
Like their counterparts of more than a century and a quarter past, your miniature tabletop regiments will probably be grateful to find a friendly rail fence, made of real wood, cutting across those terrible open fields where a soldier longs to find just a bit of cover. The rules for Johnny Reb, for example, provide that a unit receives a saving roll when it enjoys the cover of a wood fence. This article and the accompanying illustrations will show you how to build simple, good-looking rail fences which will add a striking and realistic look to your miniature battlefields.
Chronicles of the Civil War often refer to ' "snake rail fences. " These fences were essentially rails stacked six or eight high in an interlinking zig-zag pattern. This design required little in the way of hardware yet provided a serviceable barrier to livestock and most other interlopers, if not marauding infantry.
Snake rail fences for miniature purposes, though, are a nightmare, since they end up taller than most miniatures, are difficult to build in modular (i.e., easily combined in various patterns) form, and can be hundreds of yards wide in scale distance on your miniatures tabletop. It is suggested that you try the fencepost and double rail style rail fence described below for the best compromise between appearance and utility for miniature battles.
The miniature fences described are keyed to 15mm miniatures. Please adjust the height and length for 10mm or 25mm miniatures. Measurements are given in approximate English and metric units, to accommodate readers of the The Zouave both in the United States and abroad.
Before beginning your rail fences, accumulate the following materials:
- Wooden Dowel, 1/ 16 -inch/2 mm diameter
(approximately the diameter of a common wooden match,
which can, with the head nipped off, be substituted in a
pinch if no dowel is available). You may use round or
square dowel; either looks fine, and both are available at
hobby shops, especially those catering to radio control
aircraft modelers.
A sharp precision knife (such as an "X-acto" knife) for cutting dowel and sheet styrene.
Medium brown wood stain (or paint to simulate wood if you have no stain)
White glue ("Elmer's" glue, in the United States, a waterbased all purpose adhesive)
Masking tape
Sheet styrene plastic (or thin, rigid cardboard, in a pinch, although sheet plastic makes a much stronger and more durable module) to be cut into rectangular bases. Sheet styrene may be found in most hobby stores, and can be cut as follows: Mark the desired dimensions lightly on the plastic with a pencil, using a ruler or other straight edge, then score the plastic deeply with a precision knife (again using a straight edge), and snap the pieces apart along the score lines.
Green modeler's paint (oil or acrylic) to pain the bases
The miniature fences described in this article are to be built in "modular form, made up of any number of similarly constructed modules (that is, individual fence units) which can, when placed end to end, be combined and recombined endlessly to fit your scenarios and your changing miniature battlefields. I have found it most useful to make up many fence units 2 inches (5 cm) long, which can be juggled to fit the contours of most miniature scenarios calling for wood fences.
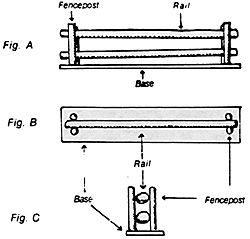
An individual fence module is made up of six lengths of dowel, mounted on a base, as follows:
- 4 vertical "fenceposts" about 1/2 inch (1.2
cm) high
2 Horizontal "rail" just less than 2 inches (5 cm) long, longer if you desire.
Figures A, B, and C depict finished modules from the side, from above, and from the end, respectively. You can make longer or shorter modules, as you wish, simply by lengthening or shortening the horizontal "rails" to suit your needs.
Likewise the height of the modules can be adapted to different sized miniatures by modif*g the length of the "fenceposts" to make taller or shorter fences. A good rule of thumb is that the top rail of the fence module should be about chest high on a standing miniature. As long as your patience and zeal hold out, you can make as many fence modules as you desire. It is best to start an "assembly line," making numbers of fence module components and assembling them in groups.
Begin by cutting pieces of dowel to the lengths described above. You may wish to sand the ends of the dowel lightly to smooth any splinters or rough bits left from the trimming process. After trimming, color the lengths of dowel with a light wash stain to resemble fairly dark wood. after staining, the experienced modeler may wish to lightly drybrush the stained dowel with a light to medium gray wash to give the impression of "weathering. " Stain your dowel in easy stages, and let it dry fully before beginning the next step of the assembly process.
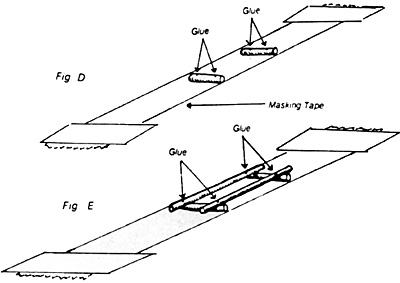
Place a length of masking tape on your work surface, sticky side up and fix it in place by taping the ends down.
Place two fenceposts a little less than 2 inches (5 cm) apart on the masking tape, using the straight edge of the tape to align the bottoms of the fenceposts. Refer to figure D. Place a small dot of white glue about a quarter of the way from the top and bottom of each fencepost, on the upper surfaces as indicated on Figure D. Let the glue sit for a few moments, so that it becomes "sticky" or "tacky." Carefully place the fence rails on the glue, and let the glue dry thoroughly. Refer to Figure E.
When the glue from the first step is sufficiently dry, place a small dot of glue on the upper side of each rail to adhere two more fenceposts, at the points indicated on Figure E. When the glue is tacky, affix the remaining two fenceposts, aligning their bottom edges with the first two fence posts using a scrap piece of sheet plastic. Again, let the glue dry thoroughly before attempting to move the fence module, or you will destroy your good work before the soldiers can get to it.
When the module is thoroughly dry, the masking tape used to hold it steady may be removed carefully. The module may then be affixed, with dots of white glue on the bottom of each fence post, to a sheet with dots of white glue on the bottom of each fence post, to a sheet plastic base measuring 1/2 inch (1.2 cm) wide by 2 inches (5 cm) long. When the glue has dried, the base can be painted green to blend with your battlefield, and even textured with "grass" if you are so inclined. When finished, you may wish to coat the entire unit with a clear flat (matte) spray, which will protect the module and help hold it together.
Don't worry a bit if your fence modules are uneven, rickety, or even "lean" a little bit one way or the other. First, you will get better after you have constructed a few modules. Second, the rail fences of the Civil War era were rickety and leaned quite a bit also, and your fence modules will look surprisingly realistic once they are on the table.
With care in handling, and proper storage (in a separate container among your wargaming materials), these fence units should provide long service. I have been using my oldest fence modules for over five years, and believe it or not, not one has broken yet. They provide a pleasing and realistic look to a miniatures battlefield, and the wargamer can enjoy the pride that comes from having constructed an accessory "from scratch." Good luck, and keep your powder dry.
Wayne R. Terry, an attorney in Los Angeles, is a charter member of the ACW society, and a previous contributor to The Zouave.


Back to The Zouave Vol VI No. 3 Table of Contents
Back to The Zouave List of Issues
Back to Master Magazine List
© Copyright 1992 The American Civil War Society
This article appears in MagWeb (Magazine Web) on the Internet World Wide Web.
Other military history articles and gaming articles are available at http://www.magweb.com