Good wargaming terrain always seems to be a show stopper at wargaming conventions. But I am amazed at the number of games I see which have very poor terrain, consisting of a couple of buildings and a few woods. As gamers, we spend a lot of effort on painting our figures, but many of us forget to put as much effort into our terrain. I am a strong believer that good terrain can overcome a bad gaming experience, and leave one feeling fulfilled.
I am indebted to the likes of John Hill (JR III), and Chris Hughs (Triangle Simulation
Society) for continually challenging me to create even more lifelike terrain.
I will begin this adventure by discussing stonewalls and stone and rail fences. Future articles will include other fences, hills, buildings, steams/rivers, woods/trees, battlefield clutter and debris, rock outcroppings and the use of scenic flocking. Feel free to submit ideas or questions to me through the ZOUAVE or email me at DKline1863@aol.com.
In many areas of the country, people had been farming for 60 to 100 years prior to the war.
Farmers piled the rocks plowed from the fields as borders around their fields. Some walls were built in an orderly fashion, while others were only piles of rock. Stone walls were great borders for fields since they helped to keep livestock and animals out of the crops.
A variation to the stone wall was the stone and rail fence. This wall/fence combination
helped to keep both the large and small animals out of or in a field. This kind of fence was also known as an "Over and Under" fence.
There are quite a number of commercially produced stone walls and even stone and rail fences on the market. Some of the manufacturers who make walls include Gallia, TCS, and Musket Miniatures. Musket Miniatures also has a good looking stone and rail fence available for purchase. For those of you with a little less cash than time, these walls can be modeled rather easily in bulk. Another advantage of scratch built walls is the random piled look
that can be achieved.
Doug Kline, 32 years young, has been wargaming formally since '78. A one-time ACW Reenactor since '88, he's an amateur ACW Historian, married with child on the way, and living in Roanoke Virginia. A member of HMGS East & a founding member of Blue Ridge Historical Miniatures
Association (BRHMA). Designing wargame terrain for years, he is the owner of Battlefield Terrain Concepts: a vendor of custom quality wargaming terrain. He also helped playtest ACW
wargame rules and has been a designer of scenarios for a number of years.
His email address is DK1ine1863@aol.com
1. Begin by cutting the Basswood (strong and easy to work with, but you can substitute), and cut it in 7/16" strips. These strips can then be cut to 1/2", is in 1", 2", 4" and 6" lengths (your choice). I like to use a straight edge to make these cuts. Then line the pieces (bases) on paper and spray them with the green ail Fences spray paint; be careful to get all edges. For best results, I keep the can 8-10" from the pieces so they do not move around from the spray.
2. Next, take the dry bases and cover them with white glue, and sprinkle the Woodland Scenics Turf on the bases. When dry (allow 24 hours), shake off the excess and proceed to the next step. A few tricks for this process include the use of an old pickle jar with numerous holes punched in the lid, as a sifter. This will allow for more uniform coverage for the Turf material. I also like to line the bases on small pieces of 2"x4"'s, standing on edge, over paper. I then use a spray bottle with slightly watered down white glue. The use of a sprayer will speed up the process, specially when making a large batch.
3. Now the bases are done, and you are ready to actually build the walls. Take Woodland Scenics Talus and place it in a small box. Talus is a Kitty Litter type of material sold in most Model Railroad shops. It comes in fine, medium, coarse and extra coarse sizes and in buff,
brown, gray and natural colors. Each bag holds 12 oz. and costs around $2.49. I prefer natural and buff colors in the medium grade. The other grades can be used with larger and smaller
scale troops.
4. Run a bead of white glue along the center of each base, and spread it out with your brush. You may choose to use a little extra glue at this stage, since this is the base or widest part of the wall. Next place the piece on the tray or cardboard, and cover with the Talus. I prefer to prepare several sections, and cover with the Talus, by using an old film canister to pour the Talus. Allow to dry for 24 hours, and uncover. Next, take your fingers, and rub them along the edges and top of the bases, and break off any rocks that seem out of place. (This can be rough on tender fingers, sometimes the Talus can be a little sharp and irritates the fingers).
6. To do this, build a three layer wall (rather than the 4 layer described above). Obtain materials to be cut into fence rails. I really like to use scale lumber easily purchased at good model railroad shops. (This can be ordered from a Walthers Catalog if you can not find it in stock). I like N scale 3"x3" strips which can be bought in bulk. These really save work. Just cut the rails to length, and you are ready to go to the next step. You will need to cut
both rails and cross supports (X-Braces). See Fig, 2 & 3 for examples. Once you have cut the rails, you can stain them. I like to use a heavily watered down dark gray or black paint to stain the rails and give them an authentic weathered look. Just drop the rails in the cup of paint, and fish them out with tweezers. Lay the rails out to dry on paper towels.
I have given you an idea of how I build some very good looking walls and fences. Feel free to experiment and develop methods that work better for you. I think that you will find that with a little patience, you can build a good supply of walls in a week or so. The moreyou build at
any one time, the better the results and use of materials (remember the assembly line). I look forward to sharing more terrain ideas and projects with you in future.
This article appears in MagWeb (Magazine Web) on the Internet World Wide Web.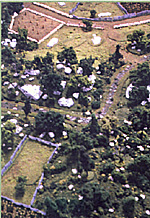 With this submission, I will create a series of articles on terrain in wargaming. Initially, I will draw on my own knowledge and skills on this topic, and later may provide information from some of wargaming's "greats". Over the past several years, I have continually sought ways to make my wargaming table an "experience". After much trial and error, I have developed some good ways of building quality wargaming terrain, and have also begun selling some of these items at conventions.
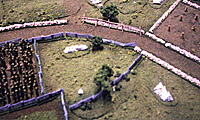 You will find very few Civil War battles that were not cluttered with terrain features. Farms in 19th Century America were in fact criss-crossed with fences and stone walls.
One can hardly read a memoir without noting references to positions held along walls and fence.
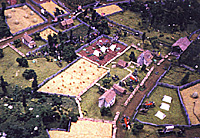 The materials needed to build your own stone walls include 1/16" Basswood, Woodland Scenics Green Blended Turf and Talus, a can of cheap flat green spray paint (I like Walmart for this), White Glue, and Zap-a-Gap CA+ (An Instant Glue made by Pacer). You will also need some space to work (and leave the materials for several days), and a tray or large piece of cardboard. A small paint brush will also help. All of my descriptions are for 15mm terrain, but conversions can easily be made for 25mm and 10mm games.
Terrain Work
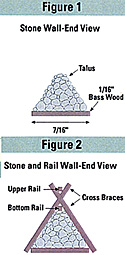 5. Repeat the above process three times, spreading a little less glue each time. This will result in a finished 15mm wall in three more days. (6 days total). See Fig. 1. You will find that these walls will look very good on your table, and actually are easy and quick to build in bulk. You can take this process to the next step, and create stone and rail fences.
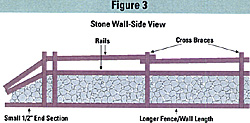 7. Once dry, you can begin adding the rails. First, glue the bottom rail onto the top of the fence; let dry ( I use Zap-A-Gap CA+, but any thick quick dry glue will do). Second, add cross members on one side of the fence; let dry. Next add the cross members on the other side and allow to dry. Last, glue the top rail onto the cross members. When dry, you will have a finished stone and rail fence.
Back to The Zouave Vol XII No. 1 Table of Contents
Back to The Zouave List of Issues
Back to Master Magazine List
© Copyright 1998 The American Civil War Society
Other military history articles and gaming articles are available at http://www.magweb.com