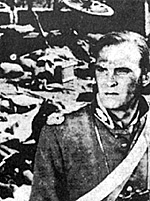
Battle Report of the Month
 The following set of rules is not meant for
the Colonial Period, nor even the Zulu War. Rather,
these rules are especially suited for the fierce
hand-to-hand fighting at Rorke's Drift. I am rateful
to Gary Gygax for his help with the fire chart, and
to Paul Hand for his ideas on the mechanics of
crossing barricades.
The following set of rules is not meant for
the Colonial Period, nor even the Zulu War. Rather,
these rules are especially suited for the fierce
hand-to-hand fighting at Rorke's Drift. I am rateful
to Gary Gygax for his help with the fire chart, and
to Paul Hand for his ideas on the mechanics of
crossing barricades.
Fire: The d efenders are allowed to fire two volleys prior to initial melee con- tact. Roll two dice per man and hit with a 4-12. Zulu riflemen were effective when firing in mass, so allow a two-dice roll per each group of three Zulus (armed with rifles) and score on a 10-12.
Melee
Each soldier/Zulu rolls two dice and consults the chart:
| Behind or in: | Killed on roll of: | |
|---|---|---|
| Zulu | English | |
| OPEN | 7-12 | 8-12 |
| MEALIE BAG WALL | 10-12 | 11-12 |
| KRAAL WALL | 9-12 | 10-12 |
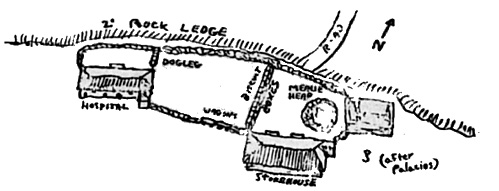
The north wall of mealies (see map) was built at the top of a 2' ledge. Subtract 1 from attacking score and add 1 to defender's score.
Odds of 2-1 will add 1 to attacker's score.
Zulu special:
If a Zulu casts one number less than required for a kill, he is allowed to breakthrough and bypass the defender. Also, victorious Zulus that kill a defender may occupy the position.
Movement
Defenders have free movement from anywhere within the perimeter. Penalties for crossing barricades are
- 1st turn: move to base of barricade.
2nd turn: cross over with base of figure touching barricade base.
3rd turn: proceed.
Mechanics
Move-Countermove system. As long as the English are defending at perimeter decide this by zones), they receive first move in that zone. For the sake of zoning the perimeter, let the north wall from the hospital to the dogleg be one zone; from the dogleg to the biscuit box line; and the "final perimeter" - from the biscuit box line to the kraal. The kraal itself shall be considered a zone.
If English are forced to fall back from the perimeter, the highest die roll will determine who moves first.
To those who feel that the move-countermove system is not as realistic as the pre-written order or the map-marking, they must realize that we are dealing with an "individual" type of wargame where each man is his own unit, so to speak. That would be far too many "units" to keep track of on paper or map (in my case, several hundred).
Additionals
The two officers -- Chard and Bromhead -- are allowed two shots per turn with their pistols (4-12 to hit) for three consecutive turns and take one turn to reload. All defenders allowed to fire during additional melee rounds (if not engaged on previous turn), taking one uninterrupted turn to reload.
Zulu numbers are inexhaustible for this type of game, therefore the Zulu player can "resurrect" his dead for the next assault. Depending on the size of your forces and the desired length of time for play, set a maximum number of resurrections.
To add to the aethetics of the scene, I have an amount of dead figures which I have finally found a useful purpose for .... Replace the dead for the living on a one dead-equals-three-living ratio. The revived Zulus are allowed to join in the same assault wave. Example: A Zulu wave of 35 lose 10 to volley fire. If they beat the morale cast and press ahead, the Zulu player has the option of bringing 9 of those dead back to life and Placing 3 dead figures on the field. Once used, the dead figures cannot be used again for the entire game. Same rules apply to the English defenders, but the resurrected English will start from hospital or storehouse.
Morale
Defenders are immune to any sort of morale throw. For the Zulus: each wave (at least 20 per wave) that rushes the perimeter must check their morale on 25% casualties. Roll two dice:
- 1-5 retire.
6-8 fight for one round of melee, then retire.
9-12 fight on until destroyed or voluntary retreat.
Zulu groups that retire or fall back must wait until the next "resurrection" before attacking again.
I have intentionally left out any rules for the "final redoubt" of heaped mealie bags - as this ploy was not developed until later in the battle. Those who insist on Using the redoubt can easily alter the melee table to allow for the defence of same. I have also skipped any formal attempt to re-create the room-to-room fighting in the hospital. I tried, though. The notes I compiled began to resemble a book, and "playability" was beginning to vanish. In my own case, I can lift off the roof of hospital and actually "fight" the battle - since I have taken the time to partition all the rooms (with swinging doors yet!) as per the fine diagram in "Washing of the Spears". Again, a simple alteration of the melee table and a simple provision for knocking holes through the walls (for the defenders to escape), and maybe even the possibility of the roof catching fire are all that one would need to add.
 Notes: The English can really cut down a lot of Zulus on the volleys - and almost always
the Zulu waves must check at 25%. Even if the waves of Zulus get through, the fighting at the
perimeter will usually claim a few more. But when the Zulus begin to break through and melee on an even basis, they begin to have things their own way. Initial experiments proved that they had things TOO MUCH their own way, which is why the delay in crossing the barricades was written in. In one assault, sixty Zulus kept pouring over the mealie wall in front of the hospital and were being cut down by a rolling fire from alternate ranks (it worked in the movie, too). The few that got through this inferno managed to cut up several defenders - but the price was high.
Notes: The English can really cut down a lot of Zulus on the volleys - and almost always
the Zulu waves must check at 25%. Even if the waves of Zulus get through, the fighting at the
perimeter will usually claim a few more. But when the Zulus begin to break through and melee on an even basis, they begin to have things their own way. Initial experiments proved that they had things TOO MUCH their own way, which is why the delay in crossing the barricades was written in. In one assault, sixty Zulus kept pouring over the mealie wall in front of the hospital and were being cut down by a rolling fire from alternate ranks (it worked in the movie, too). The few that got through this inferno managed to cut up several defenders - but the price was high.
Chard and Bromhead are excellent at plugging gaps with their "rapid fire", and could be considered the "secret weapons" of the game. I have my own ideas and theories on tactics for this game, and nine times out of ten, the methods used historically (and in the movie ZULU) seem to work the best.
About my own set: I used the Stadden and Suren 30mm figures, and have 50-odd defenders and 160-odd Zulus. These numbers will ze swelled to 400 Zulus and the entire garrison on a man-to-man ratio. The mealie bags are the Britains Farm Sacks (sold in packets of 12) and the biscuit boxes are cut from balsa. The hospital is scratchbuilt from balsa and cardboard (with hemp fibre for the roof thatching), and the storehouse was custom-built by Bill Holmes of Deltorama Limited. The entire garrison covers 2' x 5' in area.
Back to Table of Contents -- Wargamer's Newsletter # 99
To Wargamer's Newsletter List of Issues
To MagWeb Master Magazine List
© Copyright 1970 by Donald Featherstone.
This article appears in MagWeb.com (Magazine Web) on the Internet World Wide Web.
Other articles from military history and related magazines are available at http://www.magweb.com