Introduction
This was an attempt to combine as muck wargaming as was possible over three days with an overall purpose so that each battle was important in itself and also for the influence the result might have on the other two. In short, a campaign was envisaged but not one that would involve such a lot of map moving that the figures never got onto the table.
The answer was to equate game movement on the table-top with map moves over the imaginary area covered in Fig.1. The lack of actual relationship between one and the other is irrelevent, six table-top game moles may represent 6 hours fighting and the distance between two battle areas may be 39 miles or 2 days march, but for campaign purposes the distance is represented as so many game-moves and time bought -- or lost on the table-top will determine how well your army fares in subsequent battles.
As can be seen from a look at the three maps control of road exits becomes important if you are to get to your next battlefield at a time somewhere near your choosing.
The fog of war and the paucity of intelligence is catered for in two ways. Firstly, you do not know which battle will Ile fought first and secondly you do not know what importance your opponent will attach to it or any other. You are committed to using 25% of your forces in each area -- at least initially, but you have considerable discretion re the actual composition of each army.
A draw is possible but under any circumstances at least two battles must be fought. In the event all three areas were contested and with suitable variations in accordance with individual rules I am sure this idea could be improved upon and prove a popular way to fighting a simulated campaign.
 RULES
RULES
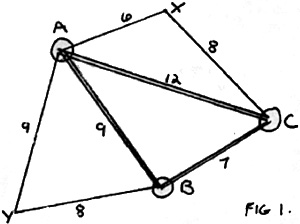
A, B and C are 3 areas where a battles is imminent. X and Y are locations not directly concerned -- as yet. The Figures represent the distance in GAME MOVES between each point.
1. Actions WILL be fought at A, B and C; each side must allocate at least 25% of its total force to each action.
2. Each side will consist of 24 Infantry Regiments, 8 Cavalry Regiments and 8 Artillery Batteries which totals 720 points when 15 points = 1 Infantry Regiment: 20 points = 1 Cavalry Regiment and 25 points = 1 Artillery Battery.
3. The forces allocated to each area must include at least one unit of each arm and total at least 180 points.
4. Players will dice for each map before game begins to determine which side of the field their respective forces will enter from.
5. The players will then allocate their forces as in (3).
6. The players will then dice to decide the order in which the battles will be fought. The second action will commence 10 game moves + 1 die throw after the first and the third action 10 game moves + 1 die throw after the second.
7. When battle begins any troops in excess of the 25% MAY be sent down any accessible road and begin marching the required number of game moves to whatever location the road leads to, the distance they make being noted and their arrival at another area or at X or Y having the necessary relevance appropriate to their numbers and point of entry.
8. Red numbers indicate points to be gained on each field.
9. Once action begins further movement of troops may take place after completion or 5 game moves but counting time/distance will not begin until such troops are completely off the table on a unit basis. Troops Jay not leave under circumstances that would violate normal play procedure.
10. If troops are sent to X or Y then if they are there first they will cause any of opponents forces (however strong) to retire to their starting area. A regiment of infantry or cavalry is sufficient to effect such a retirement. Of course troops may travel from area to area via X or Y in large numbers -- if the way is clear.
11. A decision must be reached at each table (the same one of course!) before the next action can begin.
12. Players may agree, as in areas A and B to settle for what they have won but the
overall winner will be the one with most points from 3 games.
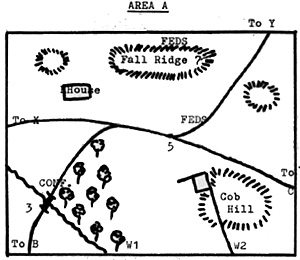 Area A
HILL Normal Speed -- does not cover Ground behind Fall Ridge or woods
RIDGE Halt at base -- one move to ascend (or descend) controls area.
RIVER 1 or 2 you cross, 3 or 4 no move, 5 or 6 lose 1/3 force or gun.
WOODS Infantry only -17 speed.
ENTRY South between W1 and W2: North from Y
to NW corner.
 Area B
HILL -Normal speed -- dominates the area,
DITCH Lose 3" to cross -- trench value for infantry.
WOOD -- Infantry only -- half speed.
HEDGE -- Artillery and Infantry. 1 move to make gap. Cavalry lose 3"
ROCKS -- Infantry only, in open order.
ENTRY -- From N or S edge.
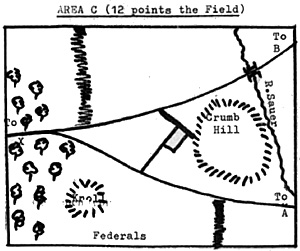 Area C
HILL -- 1/2 speed infantry: 9" cavalry and artillery.
RIVER -- Artillery -- Bridge only, Cavalry 1 move to cross. Infantry 1 move less 2 x die throw.
WOODS -- Infantry only, 1/2 speed
HEDGES -Artillery, Infantry, 1 move to make gap. Cavalry lose 3".
ENTRY -- From N or S edge.
THE TRIANGIE CAMPAIGN REPORT
Primarily the campaign was between Bill Mell who drew the Confederates and John Ellis the Federals; Stan Aspinall served in both armies and Dallas Cliff in his one appearance was a Reb.
The maps show how the two armies were to enter each battle area and with this information the planning began.
Bill decided that if he could win 'C' then 7 points from the other two would suffice for victory so he allocated 330 Points to that area. It seemed to him a defensive battle at A from the commanding heights of Fall Ridge should offer a good chance of these 7 points, and that the minimum of 25% of his force may well do just that. His main objective it seemed in area B should be to deny the Federals the use of the exit road to C where his main force would be, the remaining 210 points were allocated to that end.
John too placed most of his eggs in one basket by allocating no less than 345 points to 'A' and hoping it would be fought as the third battle. To 'B' he sent 185 points and those left for 'C' were a mere 2 batteries of artillery, 4 regiments of infantry and 4 of cavalry -- 190 points.
Alphabetical order had its way and a toss of the dice turned up for A, B and C to be fought in that order. This suited Bill but not John who after completion of the obligatory 5 game moves, detached 5 regiments of infantry and 2 of cavalry and sent them down the road to ICI which was now scheduled to explode into action on the 28th game move.
Now follows a brief report on each battle in the order they were fought.
'A'
Although equal in infantry and cavalry having 6 and 2 regiments respectively of each, the battle became a killing ground for the 4 Federal batteries which took up position in the centre and achieved early and spectacular succeas by reducing the Confederates batteries to near impotence.
As Federal infantry worked their tedious way through the woods, Bill sent his cavalry and supporting infantry to take the bridge and also to avoid the enemy guns. Adroitly using his cavalry as a 'threat in being' John twice forced Bill into precipitate moves from out of cover of the ridge and each time the Federal artillery practically destroyed an infantry regiment.
The Rebs did much better at the bridge where a see-saw melee saw them in final control about the same time as their commander had to relinquish his position on the Ridge -- so much for the original defensive plan. A final blood bath around the house was possible but pointless. Neither side was strong enough il infantry to take and hold anything else so Bill began to move what he had left down the road to X en route for 'C.' Two half batteries of artillery may yet prove useful. It was agreed to end the fighting then with 12 points in the bag for John and 3 to 'Bill. Although he had lost one gun during the action John was well pleased, and with 3 good batteries and a shorter route the prospects at 'C' looked much brighter. Apart from what may be gained at 'B' he now fancied his chances of finishing with 24 points.
CONTINUED NEXT MONTH.
Back to Table of Contents -- Wargamer's Newsletter # 95
To Wargamer's Newsletter List of Issues
To MagWeb Master Magazine List
© Copyright 1970 by Donald Featherstone.
This article appears in MagWeb (Magazine Web) on the Internet World Wide Web.
Other military history articles and gaming articles are available at http://www.magweb.com