Situation
General Musnier was lost - and so were the three thousand men in his brigade. All he knew was that he was in North Italy and that somewhere to the south of him was the rest of the French army. A cautious, painstaking man, he had spent too long breaking camp the day before and had become separated. Now he could hear the murmur of gunfire to the south and was harrying his men along in a most uncharacteristic fashion.
Up ahead, on the crest of another of the endless hills, there was a commotion. His leading battalion, the 1/42nd, had halted, and the second battalion of the same regiment was piling up behind. Fuming, he rode forward - and stopped at the top. There, about two kilometres away, dust rose from two columns of marching men. His telescope showed him the white coats of Austria in the distance. He counted - at least six separate units, and guns - more guns than his single battery.
As he watched, the dust began to settle, and a group of horsemen rode to the front. Obviously, he had been seen, and his hopes of creeping back unobserved were lost. Only one thing for it stand and fight.
Casting a quick glance over the terrain, he rode back, bawling for his colonels and the major of the artillery.
General Haller was surprised.
Moving to reinforce the main army with a scratch division of reserve battalions, a couple of field batteries and a battalion of border troops, he had not expected to see another force for at least six miles. The sudden appearance of the blue-coated troops on the hill in front took him aback, and he halted the columns. As he watched, the battalion was joined by another, and both spread out into line on the forward slope. They were joined by a battery of artillery, who unlimbered to a flank.
If the French were going on to the defensive, they probably had a smaller force - and they were in the way. Calling his staff around him, he gave his orders - left flank, direct assault by one battalion with two battalions and one battery giving supporting fire, right flank to attack in column through the village supported by one battery, one battalion to advance in the centre in line and lend fire support in either direction as required. His officers left him, and a few minutes later the battalions began to move into position.
As soon as the leading units were ready, he waved his arm, and the whole Austrian force began to move forward.
The Troops
France
1/12 de Ligne (24)
2/12 de Ligne (24)
1/42 de Ligne (24)
2/42 de Ligne (24)
Bty Field Artillery (5 + 1 gun)
Austria
Third battalions of:
4th Regiment (24)
13th Regiment (24)
28th Regiment (24)
40th Regiment (24)
61st(Hungarian) Rgt (24)
80th Regiment (24)
6th (St.George Borderers (20)
2 Btys Field Artillery (each 5 + 1 gun)
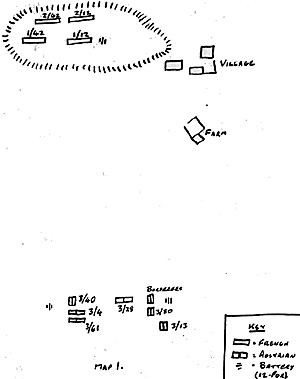
Opening dispositions are shown on Map 1. Throughout, to avoid confusion, French battalions will be referred to as, e.g. 1/12th, Austrians, e.g. 13th.
The Battle
Move No. 1-3
The Austrians advanced, 40th in column soon out-stripping its two companions. As they came within range, the French battery opened fire, causing no casualties initially, but finally getting the range to 40th.
4:
As the Austrians closed to within half a mile, General Musnier realised the threat to his left flank, and sent the two second battalions around behind the hill, still fn line, to counter it, and at the same time ordered the battery to engage targets to that flank. The left flank Austrian battery unlimbered and began to fire on 1/42nd.
5:
At this, 1/42nd opened fire, but the range was too great to be effective on the scattered gunners.
 6:
6:
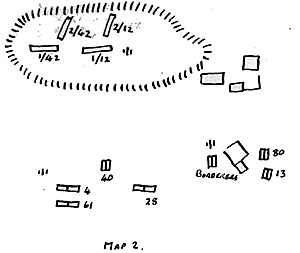
By now, the right flanking attack had gone wrong. The battery, to avoid getting too close to the French, passed close to the farm, forcing the Greny battalion to fall in behind. To save waiting, 80th and 13th had marched to the right of the farm, and were now effectively lagging. (Dispositions at this point shown on map 2. The French battery was now firing on the Borderers, to good effect, which caused some disquiet, as they had seen their support disappear behind the farm.
At this point, the right flank battery unlimbered and began to engage heavy casualties. Meanwhile, on the other flank, 40th had left its supports far behind and had almost reached the bottom of the hill, still in column. 1/12th opened fire, and 40th, after a few crippling volleys at this short range, virtually ceased to exist. The survivors scattered back towards the oncoming lines, who were now receiving some casualties from 1/42nd at long range.
7:
On the right flank, the Borderers were still losing men fast from the fire of the French battery, themselves under fire from the Austrian guns. Now the 28th took a hand; halting, they opened fire on the battery's flank.
8:
The combined effect of musketry and cannon fire drove the gunners from their guns, with heavy casualties. The Borderers, now free from their firing, took heart and began to climb the slopes.
9:
Both Austrian batteries now moved forward, to get into close range, and the 4th and 61st, now marching side by side, came within close range of the French infantry and halted to open fire.Supported by the fire of the 28th, the 61st inflicted massive losses on the 1/12th, and the survivors retreated over the hill. The 4th, on the left, and no longer supported by the now moving battery, lost their firefight with 1/42nd and began to retire.
On the right flank, the 'Borderers were plodding steadily up the hill when, to their amazement, a line of French infantry suddenly appeared above them. The 2/12th had completed their stumbling march along the reverse slopes, and were now revealed to the surprised Austrians. The French commander reacted first and attacked.
 10:
10:
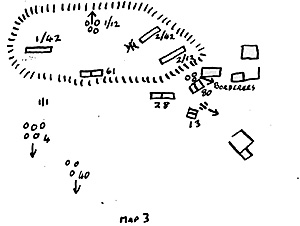
This was just too much for the Borderers, who promptly broke and fled into the village, some of their companies crashing through the ranks of the 80th, now halted at the unexpected appearance of the French, who now began to advance down the hill. The Austrian battery, confronted at close range by the French line, turned about and hurried off. (The situation at this point is shown on Map 3).
11:
Halting, the 2/12th opened fire on the 80th, who made sporadic reply before they, too, scattered into the village. The French, however, preoccupied by the troops to their front, had not noticed the advance of the 28th on their flank. The right flank companies of the French battalion disintegrated under the Austrian volleys, and the 2/12th retreated into dead ground.
12:
On the Austrian left, the battery once again unlimbered and opened fire on the 1/42nd, who made little reply. Standing by his deserted guns, General Musnier took stock. His centre was shattered, his right flank was holding but could make no headway against the Austrian battery, and was in danger of being cut off by the battalion advancing through his centre. His left was retiring, with two Austrian battalions following up. It was time to cut his losses. He sent aides to the flank battalions ordering them to withdraw, and rode down to the 2/42nd, still advancing towards the crest. Quickly he gave his orders - deploy in line on the reverse slope, left flank behind the now silent battery, fight enough of a rearguard action to allow the remainder to get clear, then.break off the action and follow - and good luck! Musnier rode off to drive 2/12th into some sort of order as they streamed past.
13:
Meanwhile, the Austrian advance continued, the 61st and 28th leading in line, with the 13th following in column. Haller rode to*the village and chased the Borderers out and into some 13 order, and told the right flank battery, still nervously hanging back, to follow his infantry. The left flank battery, still in action, received no orders, and remained where they were for the rest of the action.
It was now a race against time. If the 2/42nd, of whose presence Haller was not aware, did not get into position before the Austrians reached the crest, they would probably be caught in 14 the flank and destroyed. Struggling and slipping along the slope, they made it, swinging into line and waited.
14:
As the Austrians reached the crest, the French fired, and fired again. The 61st, already weakened by their firefight with 1/12th,broke and ran. The 28th swayed, steadied and began to return fire. Then the 13th, fresh and uninjured, swung around the flank of the 28th and poured over the crest.
15:
That was the final blow to the French, who turned and retired by companies.
Haller reached the crest and looked around. He had almost 1,500 men dead or seriously wounded - only the 13th were untouched - his guns were too far away to be effective, and there were some hundreds of French wounded and stragglers to be guarded. He had won his battle - the only Austrian success that day - and was content. He called off the pursuit and began the slow business of bringing some kind of order to his command.
Game Notes
1: General. The battle was fought solo, and took 21 hours. Rules used were South London Warlords 19th Century, using mainly the A.C.W. sections with 2 bits from the F.P.W. Sections and some minor changes (e.g. lower morale for Borderers, subtractions for range changed to -1, -2, -4, -5), giving a ground scale of 1mm = 1 yard and a figure scale of 1 figure = 30 men.
2. Models. Models were all Airfix conversions, the French from Foreign Legion, the Austrian line infantry from British Waterloo infantry (with a lot of plasticene), the Borderers from Highlanders and the Austrian artillery from A.C.W. artillery. Guns were unconverted A.C.W. artillery due to lack f references to what was actually in use.
3. Control. The initial deployments and plans of attack and defence were decided by dice throws e.g. do the French occupy the village? 1, 2, 3 yes; 4, 5, 6 no). Each time a decision was required, his too was decided by a suitably weighted dice throw (e.g. the Austrian flanking move becomes apparant - 1, 2 do nothing; 3, 4, 5 move troops to threatened flank; 6 retire whole force). It was quite simple to decide on alternative actions and suitable ratios.
4. Casualties. As these rules lead to whole units being destroyed, I have produced a table for final accounting, and for use in campaigns. All losses are divided into four parts - 25% are dead, 25% seriously wounded, 25% walking wounded and 25% have decided (temporarily, of course) to take no further part in the action. This led to a casualty rate of 850 dead and seriously wounded for the rench, and 1,390 for the Austrians - over a quarter of each force.
Note: The ideas in "Control" and "Casualties" are taken or adapted from ideas in Donald Feathertone's "Advanced Wargames" and "Solo Wargames".
Comments
1. Although the rules are sometimes puzzlingly incomplete, they give a good fast game. The system of "full move - don't fire; half move - fire once; no move - fire twice" seems right for this period, and gave what I consider to be a likely result to the battle.
2. "General Haller" was unable to extend full control over his front, which led to several difficulties, e.g. loss of 40th, battery left behind at end, borderers out-stripping supports. However, he on in the end, mainly because of more effective artillery, the 28th acting as a central reserve of firepower, and the 2/12th's unaccountable failure (dice, actually) to press home the counterattack, and the 2/12th's unaccountable failure (dice, actually) to press home the counterattack.
Back to Table of Contents -- Wargamer's Newsletter # 174
To Wargamer's Newsletter List of Issues
To MagWeb Master Magazine List
© Copyright 1976 by Donald Featherstone.
This article appears in MagWeb.com (Magazine Web) on the Internet World Wide Web.
Other articles from military history and related magazines are available at http://www.magweb.com