This was an imaginary battle set in around 1813. The table was 4' x 4', the rules my own, partly based on Donald Featherstone's rules in "Wargames". It was, as always, fought solo with Airfix figures.
BRITISH
- 1st regiment 20 figures
2nd regiment 20 figures
3rd regiment 20 figures
Highland regiment 20 figures
3 guns with 12 crew figures
cavalry 13 figures
5 skirmishers from each regiment formed to make a light regiment.
FRENCH
- 1st regiment 25 figures
2nd regiment 25 figures
3rd regiment 25 figures
4th regiment 25 figures
3 guns with 12 crew figures
13 cavalry
5 of each regiment are skirmishers
The fact that these forces are exactly equal will, no doubt, arouse cries of derision, but I believe this makes one have to rely on tactics more than sheer brute force. The regiments are number for ease of narrative.
The 4th French regiment went to the farmhouse and the 1st to the ridge. The rest advanced dire forward.
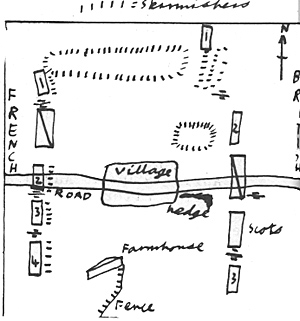 The British advanced directly forward. Their 3rd caught the French 4th, and in a fierce fight them flying. Meanwhile the British 1st began to out-flank the French by morning round the north of ridge. The Scots were by now heavily engaged with the French 3rd and at one time were almost routed
The French 2nd was now moving through the narrow streets of Montamne village. They had not gone far when a British gun was moved to the top of the village and opened up on them. The French rushed it, but could not shift the gunners who continued to spray the French with grape.
The 2nd British now attacked a French gun just to the north of the village, killed the crew, spiked the gun and moved round to the west of the village, trapping the French, who surrendered. Moving up the field, the British cavalry trotted onto the hill and charged their French counterpart. The latter stood firm, however, and slashed the British to bits. Losing all control they pursued, sending them from the field and capturing a gun.
On the ridge the French skirmishers had been wiped out by the British light regiment, but they have other things to worry about. The 1st British now, having out-flanked them, gave them a devastating volley and charged. The French gallantly countercharged them and a fierce melee raged with advantage to neither side until the British light troops came up on the French rear, and their survivors made the hills.
The French commander is now doomed with both flanks gone and the centre surrounded. He orders withdrawal, the exhausted cavalry abandoning the gun they captured and the 3rd losing 9 out of 10 men on the way. I lost because he paid no attention to the out-flanking fore till too late (he could have destroyed it with cavalry at one point) and because he allowed his 2nd to be held up b; the gun, so the British 2nd could move round unopposed to destroy them.
Also by forming the light troops separately the Brit: had 5 regiments to 4 French so they could hold down all tl French regiments as well as leaving enough for an outflanking force.
Back to Table of Contents -- Wargamer's Newsletter # 167
To Wargamer's Newsletter List of Issues
To MagWeb Master Magazine List
© Copyright 1976 by Donald Featherstone.
This article appears in MagWeb (Magazine Web) on the Internet World Wide Web.
Other articles from military history and related magazines are available at http://www.magweb.com