 Lieutenant Hopkins split his men into three sections of ten. He commanded
A section, a colour-sergeant commanded B section and a sergeant
commanded C section. With the mealie bags he built an outer perimeter wall
waist height, as shown on the map and constructed an inner redoubt which was
breast high. Sections A and B took the south perimeter wall and C section took
the north and east, including three men in positions on the roof. Each section
included one or two novices and two or three veterans, the rest were
averages.
Lieutenant Hopkins split his men into three sections of ten. He commanded
A section, a colour-sergeant commanded B section and a sergeant
commanded C section. With the mealie bags he built an outer perimeter wall
waist height, as shown on the map and constructed an inner redoubt which was
breast high. Sections A and B took the south perimeter wall and C section took
the north and east, including three men in positions on the roof. Each section
included one or two novices and two or three veterans, the rest were
averages.
In all, there were one hundred Zulus divided (rather unhistorically) into groups of ten. Groups 1 and 2 were all novices, groups 3 to 6 were averages and groups 7 to 10 were veterans. The Zulu player deployed his men and issued orders after the British player had completed his dispositions. The Zulu positions are shown on the map. Groups 1 and 2 were to lead the assault backed up by 3 and 4. Groups 5 and 6 would assault at the same time but groups 7 and 8 would hide in the drift until signalled by the commander who led groups 9 and 10. Groups 1 and 2 set off at a rush.
Lieutenant Hopkins now had to issue rapid orders. He could see the Zulu groups 1,2,3,4,5,6 and 9 and 10. He did not know what more there were. He took a risk and ordered C section over to the southern perimeter wall. All sections were ordered to retire back on the central redoubt when the order was given.
 Groups 5 and 6 went over the hedge into the field. Groups 1, 2, 3 and 4 disappeared into the drift only to re-emerge soon after. Group 1 took the brunt of the first British volley. It's group leader was hit and the umpire (me) deemed it should react. Group 2 surged through and moved on while the British frantically reloaded. it takes three phases and in that time the Zulus moved fifteen yards (cms) closer. They were almost at the wall when the second volley was fired. It was group 2's turn to react; the remnants of group 1 came on. Group 3 and 4 continued undamaged and group 5 and 6 came on through the field. The four men at the gate to the field fired and downed two Zulus, but the two groups were undaunted.
The leader gave group 7 and 8 the signal to advance and they decided to move around the west of the field. Groups 9 and 10 advanced down the hill. Group 1 reached the wall and group 5 assaulted the gate. Lieutenant Hopkins ordered the retirement and most of sections A and B fell back, reloading as they went. Some of C section fought a bloody action at the gate and managed to hold back the Zulu tide.
A section stood to face this tide as B section got over the breastworks. The remnants of groups 1 and 2 were shot away in a final volley but the Zulus were undeterred. After all their Average groups had reached the walls unscathed and the Novices, their worst fighters, had taken the brunt of the firing.
As A section scrambled over the breast work, groups 3 and 4 came over the outer wall and lost a few casualties to B section's ragged firing. At the gate the British lost their first casualty, as Sergeant Evans received an assegai in his stomach. Two men continued to hold off superior numbers at the gate while one man dragged the sergeant back. Unfortunately the two men at the gate decided to fall back as did the man dragging the sergeant. He was left on the wrong side of the breastwork!
By now all three sections were crowded in the redoubt and the Zulu groups 3,4,5 and 6 were meleeing over the breastwork emplacements. Groups 7 and 8 were moving over the outer wall and groups 9 and 10 had moved up to the side of the building. Here a shield ladder was formed and the Zulus proceeded to climb up on the roof. (This is an instance of an exercise not covered in the rules but for which an umpire can devise rules quite easily within the framework of the ground and timescale.)
With the melee over the breastworks, British casualties began to increase although the British also dealt with a number of Zulus. The normal Zulu supremacy in melee was lost because the breastwork prevented the use of the shield aggressively. (This isn't in the rules either but is logical if you think about it.)
 Lieutenant Hopkins commanded an inner group of veterans from the three sections who were ordered to shoot or attack any Zulu who reached the top of the breastwork. This tactic proved very successful and the Zulus found it almost impossible to get into the position from ground level. On the other hand, there were a small number of Zulus now on the roof and these were launching themselves into the redoubt.
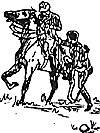
At this point when Lieutenant Hopkins was beginning to despair, a bugle call sang out and a small troop of 17th Lancers who had been attracted by the shooting, crossed the ford, formed line and began a charge. By the time they jumped the southern perimeter these ten lancers (commanded by the umpire) were going at a gallop. They smashed into the Zulu veteran groups 7 and 8 and rode through them leaving a train of devastation and then rode out of the perimeter over the north wall. (The speed of the horses allowed no other course) They reformed and prepared for a fresh assault. However, the Zulus had had enough and retired. In all, over half the Zulus had been wounded by firing and in melee. The British had only ten casualties
In the next Skirmish Line, I shall be airing some thoughts for adapting the Colonial Rules for larger games, such as Johnson's Crossing.

Part 3: Adapting Rules for Larger Games
Back to Table of Contents -- Wargamer's Newsletter # 152
To Wargamer's Newsletter List of Issues
To MagWeb Master Magazine List
© Copyright 1974 by Donald Featherstone.
This article appears in MagWeb (Magazine Web) on the Internet World Wide Web.
Other military history articles and gaming articles are available at http://www.magweb.com