This was a recent lively Boer War action we fought with four British commanders against three Boer commandants.
Forces 25mm Scruby, Mini-Fig and Airfix
1 figure = 20 men.
British
21st Lancers - 15 figures
17th Lancers - 15 figures
Gordon Highlanders - 30 figures
Scots Guards - 30 figures
Naval Brigade Battalion- 30 figures
24th South Wales Bn. - 30 figures
2 Pom-poms
2 15-pdrs.
1 Maxim
2 Units of Mounted infantry - 30 figures.
Boers
Pretoria Kommando - 25 figures
Winburg Kommando - 25 figures
Vryfrierd Kommando - 25 figures
Leen Kommando - 25 figures
Stoats Artillerie:
- 2 Krupp medium guns
1 Pom-pom
1 Maxim
Situation
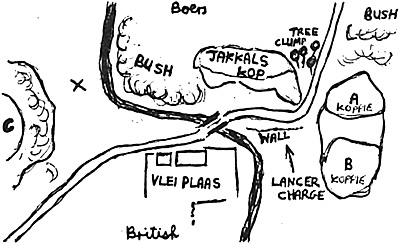
Moving up hastily through a dense morning mist, it was the object of both sides to seize Jakkals Kop with its valuable commanding position.
How it turned out. The British pushed forward as quickly as possible all along their side of the table seizing Vlei Plaas, "C" hill and B Koppie. They could not see a single Boer at this stage, and even began to think they might reach Jakkals Kop before the firing started; then all they would have to do would be to dig in and hold it with their bayonets - the day would be theirs.
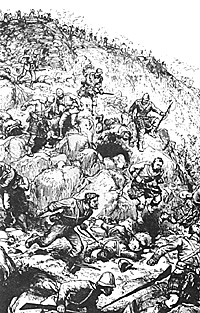
The 3rd round came, and still not a shot. I was commanding the two units of Lancers just to our right of the stream. I decided to rush straight round the right of Jakkals Kop to see if I could catch the Boers who were no doubt messed on the far side. I drove my dusty troopers forward at full speed. The
 Boers were just too quick for us. We were only about 150 yards away when they topped the rise
in strength and opened up with a terrible fire which was to last through the whole action. Horses
reared end troopers dropped. We fell back and dismounted behind a stone wall completely pinned.
Boers were just too quick for us. We were only about 150 yards away when they topped the rise
in strength and opened up with a terrible fire which was to last through the whole action. Horses
reared end troopers dropped. We fell back and dismounted behind a stone wall completely pinned.
If the infantry did not support the lancers at once, they would soon be wiped out. The South Wales with a maxim and pom-pom had occupied Vlei Pleas (the farm) and were ordered to concentrate all fire on the Kop. The moment of crisis seemed to pass. Boers on the Kop switched their fire from the lancers to the Pleas and on our far right the sailors and Scots guards, backed up by the medium guns, seemed to be making good progress against the Boers on A Koppie. In fact a few lucky hits from the guns temporarily threw the Boers back from A Koppie, but our infantry were too slow to be able to take advantage.
As things seemed to be progressing reasonably well, we decided to see if we could put more pressure on Jakkals Kop by moving the Gordons up along the route the lancers had followed to support them, where they lay still firing feebly away with their carbines from behind the stone wall. At the same time the South Wales were to work their way from the form towards the central bridge, keeping under cover, but slowly massing for an eventual bayonet rush in concert with the Gordons, when the latter reached the stone wall. Finally, the enthusiastic junior member in charge of the mounted infantry, which had done nothing so far except seize "C" against no opposition (since all the Boers were on the other side of the stream) ... was ordered to cover the dense riverbank bush to our left of Jakkals Kop, but warned not to advance into the open (area X). It seemed like a good plan, but we forgot we were opposed by slimy skilful opponents who had co-operative tactics down to a fine art!
Fun Began
The fun began when the Gordons tried to reach the wall. We now found to our cost that the Boers had only revealed about a quarter of their strength BO far. At least a full commando had been concealed in ambush positions about the tree clump. As the Cordons tried to cross the open, they were met by a sudden unexpected blast from this mob, and with fiendish precision all the Boers on Jakkals Kop swung their fire from the Pleas to the GordonB as well. For a round or two my brave Highlanders staggered forward trying to volley fire, then broke and fell back in disorder, followed shortly by a few shredded remnants of lancers. The only bright spark was when a lyddite shell from one of the medium guns burst exactly in the centre of a large pair of trees from which about 25 Boers had been firing down on us, "causing heavy execution" as they say. This could not hide our utter defeat in the centre.
Disaster soon followed on our wings. The commander of our right chose this moment to show the rest of the club that he did not have a very good head for wine! Getting confused with our Revolutionary War rules, he ordered all his infantry into some sort of column or something. I cannot bear to describe the results! In our concern about the centre and right, we forgot about the enthusiastic junior on our left ....
With fiendish timimg he chose his moment. He had bad no excitement so far, and was determined to show us bumbling clots with our disordered regulars, how to fix the Boers. Leaving their horses, all the mounted infantry ran across the open at X hoping to take Jakkals Kop from the flank. Needless to say the last Commando had been waiting the whole game concealed in the bush just across the stream. There was a single terrible blast which hit the M.I. at 50 yards. Once again I cannot bear to describe the results. To put it briefly - we'd had it!
CONCLUSION
The British were defeated by superior fire power and more particularly, superior generalship. The Boer commanders never once got in each other's way and kept us off balance and confused from the start. I have probably been biased in emphasising the foolishness of our wing commanders while playing down my own blunders with phrases like "my brave Highlanders". My cavalry rush was a reckless gamble which deserved the fate it got. In fact the only British commander who did a reasonable job was my friend Hamish Paterson who covered our somewhat over enthusiastic retreat from the farm. I wonder how those wily Boers would cope with an armoured train?
Back to Table of Contents -- Wargamer's Newsletter #146
To Wargamer's Newsletter List of Issues
To MagWeb Master Magazine List
© Copyright 1974 by Donald Featherstone.
This article appears in MagWeb (Magazine Web) on the Internet World Wide Web.
Other military history articles and gaming articles are available at http://www.magweb.com