 Sept. 1944: 4th Battalion the King's Own Shropshire Light Infantry
of the 11th Armoured Divison has been ordered to capture the key railway bridge
carrying the line from Antwerp to Amsterdam over the Albert Canal. At dusk that
day (1oth move), it'll be blown by German Engineers. For this on its 1944 establishment the
Bttn has 4 Rifle Companies (each 8 riflemen, 1SMG, 1 Bren (LMG) and 1 PIAT team [12 men in
all] and a support company with a mortar platoon (two 3" mortars and one 2" mortar), a
carrier platoon (3 Bren gun carriers), and an Assault Pioneer p1atoon (1 mine detector, a
flame thrower, and a demolition specialist). Battalion HQ contains a CO, radio operator and
a stretcher party. Total 81 men worth 114 1/2 (my weapon system points). An AT platoon with
two carriers towed 6lber guns.
Sept. 1944: 4th Battalion the King's Own Shropshire Light Infantry
of the 11th Armoured Divison has been ordered to capture the key railway bridge
carrying the line from Antwerp to Amsterdam over the Albert Canal. At dusk that
day (1oth move), it'll be blown by German Engineers. For this on its 1944 establishment the
Bttn has 4 Rifle Companies (each 8 riflemen, 1SMG, 1 Bren (LMG) and 1 PIAT team [12 men in
all] and a support company with a mortar platoon (two 3" mortars and one 2" mortar), a
carrier platoon (3 Bren gun carriers), and an Assault Pioneer p1atoon (1 mine detector, a
flame thrower, and a demolition specialist). Battalion HQ contains a CO, radio operator and
a stretcher party. Total 81 men worth 114 1/2 (my weapon system points). An AT platoon with
two carriers towed 6lber guns.
The German forces of the 1st Battalion of the 929th infantry Regiment from the 711th Static Division with 3 rifle coys., organised like the British with Panzerfausts instead of PIATs, and a support company (3 tripod mounted HMGs, 1 80mm moryar and 1 50mm mortar) with identical bttn HQ. Total 54 men worth 72 points.
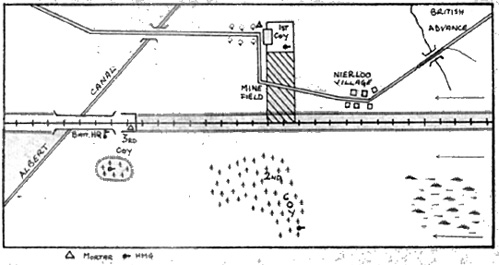
Terrain See Map. Hornby girder bridge and rails. Merit fir and poplar trees. Minibrick houses. Cloth strip stream and canal. Book hills and embankment. Model RR greening 6'6" x 6'3" table.
Deployment See map.
The Germans were outnumbered by over 60% with their advantages are the 3 NGs (the Brits have none), the minefield and the rule that their MG42 Spandaus could fire a second burst per move subject to dice throw and jamming to allow for their higher rate of fire compared to the Brens. However, 1/929 Bttn was badly positioned with 1st Co. in the Big House (45 defense points) and hedge enclosure covered on its right flank by the minefield while 2nd Coy only had cover of woods (1 saving through) on the other side of the RR embankment. 3rd Coy with 1 vital HMG and the 50mm mortar from the suppport company was too far back holding a tete a pont at the south end of the bridge and the hill to the west.
Note: The Assault Pioneer Platoon and Battalion H.Q. both had 1 Jeep as transport.
RULES
In the Lionel Tarr spirit except for morale where at 25%, 50% and 75% casualties each sub- unit throws separately. Rifle range was 15" (600 yards). Moves were alternate but firing was considered to be simultaneous. No vehicles were allowed on the embankment.
1st MOVE
The British moved first with A Coy in jeeps (3) and B Coy partly in Bren gun carriers (2) with a 3" mortar and flame thrower in support on their left skirting the impassable marsh on both sides -- my ingenious cousin had utilised his vehicles to motorise 18 men L.R.D.G. style! Mortar fire dealt with the German LMG and Brens from the vehicles eliminated the HMG crew thus depriving 2nd Coy of much of its firepower at the cost of only 2 riflemen.
On the right the other Rifle Coys with the 6pdrs, 2 mortars, Battalion H.Q and the Assault Pioneer Platoon advanced slowly due to lack of vehicles (2 Bran gun carriers towing 6 pdrs) and failure to use the road.
The German reaction, on foot as it twere, was limited to 1st Coy moving its 2 MGs to cover Nierloo and a belated effort by part of 3rd Coy to move to 2nd Coy's support.
2nd MOVE
The Germans moved first, let Coy's MGs taking Nierloo Village, destroyed a PIAT team, 4 AT gunners and a mortarman, but on their right 2nd Coy killed only one rifleman. Inevitably British rifle and Bren fire dealt with the Germans left flank MGs while the 6pdrs levelled the front of the hedge enclosure without firing at the house which, with its 45 defence points, would need four or five direct hits to demolish. On the British left flank 2nd Coy was virtually destroyed (1 man being captured) by the 4 Brens and the flamethrower of the motorised force.
The Germans now threw for 25% losses with the result that 3rd Coy retreated down the bridge eventually rallying while the remaining HMGs and mortars retreated 6".
Third Move
The British moved first, on their right a Bren carrier, having unlimber its 6pdr, in Nierloo, now probed the hitherto undisclosed minefield without being blown up. Bren and rifle fire accounted for 7 men of 1st Coy, now helpless without MG support and deprived of frontal cover, at the cost of a mortar crew which left the 2" mortar unmanned with a 6pdr in Nierloo. On the British left 2nd Coy's 2 survivors were mown down by the motorised column now moving beyond the wood. 1st Coy's Panzerfaust moving desperately outside the house was unable to get within the required 4" range of the Bren carrier in the minefield.
4th Move
At this point the annihilation of the German forces became inevitable since the British won the throw to move first, the mortars continued to retreat and 3rd Coy, immobile after rallying, was unable to re-occupy the tete au point. The British motorised force now fanned out on each side of the hill and utilising a captured MG, began to mercilessly shoot down half of 3rd Coy now scattered in little groups around the hill. On the right flank C Coy began eliminating the last pockets of resistance that 1st Coy could offer while the demolition specialist cleared a 3" x 1" lane through the minefield for D Coy, and the leading Bran carrier continued down the road through the poplar tree avenue to destroy the still fleeing 80mm mortar team.
5th MOVE
My cousin once more had the luck of the devil and in moving first proceeded to totally eliminate the more than 50% reduced 1/929th Battalion, whose 3rd Coy had only just rallied from a second retreat to the north side of the bridge. The motorised column now disembussed 1 PIAT team who destroyed the Battalion command carrier below the bridge at point-blank range killing the radio operator, while to the west the flamethrower despatched the last MG team on the verge of the Canal. the remnants of 3rd Coy were cut down on the north side of the bridge while the German CO remained defiantly on top of the bridge, where he had been since the beginning, with binoculars clapped to his eyes. The last spasm of resistance proved to be the most destructive German riposte because the last Spandau destroyed 1 1/2 PIAT teams and a rifle volley (4 men) riddled as SMG and Bran gunner. The last 4 German survivors, including also the CO now surrendered as a result of an adverse throw (the last of many:) under the 75% casualties rule. Only the 50mm Mortar team escaped. On the other flank mopping up was finished and the minefield lane lengthened.
CASUALTIES
British Losses 18 men (18 points) (5 PIAT crew, 4 AT gunners, 3 Mortar crew, 1 Bren gunner, 1 SMG and 4 Riflemen) 7 casualties from LMG fire, 6 from HMG.
German Losses 52 men (6 prisoners while 22 casualties were the result of Bren fire). (68 1/2 points).
My points system, by the way, values each weapon, in this game the range varied from 1 point (rifle) to 6 (AT gun).
CONCLUSION
Victory went to the British (it would have taken them till the 7th move to actually get to both ends of the bridge), since they drove for the weak German right flank and utilised all their resources which the Germans did not, an error worsened by unlucky dice scores. Time was about 3 hours.
Back to Table of Contents -- Wargamer's Newsletter #141
To Wargamer's Newsletter List of Issues
To MagWeb Master Magazine List
© Copyright 1973 by Donald Featherstone.
This article appears in MagWeb (Magazine Web) on the Internet World Wide Web.
Other military history articles and gaming articles are available at http://www.magweb.com