 Wargame Replay
Rules used were Philip Barker's plus
some modifications of my own which could allow
certain events that actually happened to occur;
e.g. William being unhorsed, high altitude fire
of Norman archers, Harold being hit by an
arrow, etc.
The battle opened at 10 a.m. with the advance of the three divisions of William's army, the archers leading followed by the foot soldiers and then the mounted knights bringing up the rear. Closing on the Saxon shield wall to about 100 yards the archers opened fire but were ineffective. William then sent his infantry forward up Senlac hill to engage the Saxons at close quarter.
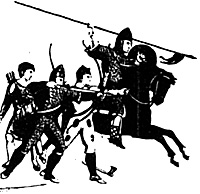
Harold's famous Huscarls formed the front ranks of the shield wall and wielding their double-handed battle axes they created havoc amongst the front ranks of William's central division. (The Norman King made the mistake of putting his less armoured troops in the front ranks). The right wing commanded by Eustace of Boulogne. He faired only a little better and at about 11 a.m. the front ranks of the centre and right wing divisions panicked and fled, disorganising the ranks of the troops to their rear. In the confusion William was unhorsed while attempting to rally his fleeing front ranks (as happened in the actual battle) and the cry went up from his wavering troops that the Duke had fallen.
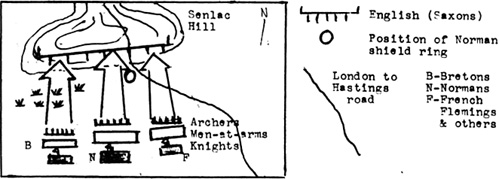 The less experienced troops of William's central division continued their flight taking others with them. The more disciplined Norman infantry armed with spear or sword and kite shaped shields refused to retreat and seeing themselves exposed (the French, Flemish, and other mercenaries had retreated when seeing the panic flight of the troops on their left) formed a shield ring.
The Bretons on William's left had had to traverse the marshy ground along the line of the Sandlake Stream and had only recently engaged with the enemy. With his right wing in the air Count Alan Fergant, the Breton commander, began to withdraw his division in good order back towards the stream. At this stage in the proceedings the Norman army had sustained about 1,100 casualties against 400 Saxons.
In 1066 William's initial attack was pushed back somewhat similarly as our reconstruction (albeit not so drastically) and with Wil1iam unhorsed and his men wavering, an organised and determined counter-attack by Harold may well have been successful. However, whilst in reality a general assault was not launched, the Saxon King in our wargame chanced his arm and at about 11:15 the Saxons poured down the slopes of Senlac hill and charged his dis-organised foe.
Any hopes of a crushing quick victory were soon dispelled when the Saxons in the centre crashed into the solid ranks of the Norman shield ring. For an hour the grim and determined Normans threw off attack after attack of Saxon Huscarls, thegns and fyrd. The fighting was fierce and bloody. Here a group of axe-wielding Huscarls cut a way through the enemy ranks only to be overwhelmed by a swarm of lightly clad swordsmen left in the centre of the ring for just such a purpose.
There some patriotic fyrd with the smell of victory in their nostrils flung themselves at the Norman shields and are cut down by thrusting spears and slashing swords. In that hour were sustained 1,300 casualties and 900 were Saxon, including nearly 200 Huscarls.
Some of the Norman knights had counter-attacked on the left of the shield ring and were lending good support with Duke William himself in the thick of the fighting, his mace crushing not a few Saxon skulls!
On the left, however, things were not going so well for the Norman cause. Attacked whilst retreating across marshy ground many Bretons met their maker including their commander Count Alan and on his death the Bretons turned and fled, being hotly pursued by their enemy.
Shortly after noon Eustace of Boulougne was killed leading the French, Flemish and other mercenaries on William's right flank. The death of Eustace precipitated the flight of his troops excepting a hotch-potch collection of infantry, archers and knights that held their ground under an attack led by King Harold himself with his personal banner 'The Fighting Man' raised at his side.
Between 12.30 and 1 p.m. the hard core of Normans forming the shield wall began a fighting withdrawal covered by William's knights. The Saxons opposing the Normans in the centre had sustained many casualties and broke off the action being only too pleased to allow the remaining Normans to escape towards Hastings, after all it could be only a temporary escape with the Saxon ships controlling the seas off the coast.
As the battle drew to a close and the survivors of William's army fled southeast Harold was wounded in an action against the few troops on the Duke's right wing that stayed to fight it out. However, the wound was a slight one and he was rescued by his personal bodyguard. After 3.5 hours fighting the Saxons had won the day and history had been reversed. Two days later from a beleaguered Hastings Villiam was forced to hand over important hostages and to renounce all claim to the English throne. He was then permitted to sail for home.
Casualties: 1,760 Saxons and 3,040 Normans.
Back to Table of Contents -- Wargamer's Newsletter # 122
To Wargamer's Newsletter List of Issues
To MagWeb Master Magazine List
© Copyright 1972 by Donald Featherstone.
This article appears in MagWeb.com (Magazine Web) on the Internet World Wide Web.
Other articles from military history and related magazines are available at http://www.magweb.com