I have been reading with interest the articles on battle reporting in the News; letter and I have been thinking about the merits of reports similar to reports on games of chess. I have come up with an idea that might be of interest.
The principle of my idea is the use of abbreviations for units or pieces and the map reference for positions. To illustrate the idea I have reported on a modern game I played not so long ago.
The first requirement is to give each piece numbers or abbreviations and I have used the Radio call sign method. The game was between a German and British force each organised into two battle groups. NOTE: CS = Call Sign.
British Force
Force H.Q. = CS 0 (Zero)
Air Support = cs 4A
Reme Support = CS 3
1st Battle Gp
CS 1 - Comd
CS VA - Churchill
CS 1/B - Churchill
CS VC - Grant
CS 1/D - Amrd Inf.
CS 1/E - 25pdr.
CS 11F - FOO (Forward Observation Office).
2nd Battle Gp
CS 2 - Comd
CS 2/A - Sherman
CS 2/B - Sherman
CS 2/C - Shermanf
CS 2/D - Amrd Inf.
CS 2/E - 25 pdr.
CS 21F - FOO
German Force.
Force H.Q. = CS 0 (Oscar)
Air Support = CS D1
Eme Support = CS C
Battle Gp A
CS A - Comd
CS A/1 - Tiger
CS A/2 - Panther
CS A/3 - Aslt.Gun
CS A/4 - PzKw4
CS A/5 - A.A.Cannon (Mobile)
CS A/6 - Amrd Inf. + Med. Mortar.
Battle Gp B
CS B - Comd
CS B/1 - Huy Amd.Car
CS B/2 - Amd. Car
CS B/3 - Amd. Car
cs B/4 - 88mm Gun
CS C/5 - Amrd Inf + Med Mortar.
NOTE: Vehicles without the call sign carried adds a Zulu prefix.
This is most important, especially with the British i-tracks as they mount medium machine- guns on the Co-drivers turret. For example CS Z 1/D = halftrack without the infantry mounted.
The second requirement is to produce a map and superimpose a grid system on it. See map attached. I use nick-names for important points on the map as this cuts down space when reporting and can be quite amusing thinking up names. The map is marked at the end of the first game-move, British moved first. I hope you can understand the map but in black and white it is difficult to show the differences. The snake-like line nick-named 'Meat Balls' is a railway line.
Now to the battle report itself. This all depends upon the accurate map reference. As you know to give a map reference one gives the bottom reference first followed by the side reference. Thus CS1 is at reference A7. To be more accurate each square e.g. A7, is subdivided into 10 vertical lines and ten horizontal lines, giving several smaller squares to each large one. By this method CS1s' position would read A577. I hope this is quite clear.
The second game-move would thus be shown:
BRITISH
1st Battle Gp.
CS 1/A to C575
CS 1/B to B777
CS VC to A871
CS 1/D Area Soup Ladle
CS Zl/D to F957
CS 1/E Destroyed 1st fire
CS 11F. with CS 1/D
2nd Battle Grp.
All remain
GERMAN
Battle Gp A
CS A/1 to E743
CS A/2 to E158
CS A/3 to D558
CS A/4 to C968
CS A/5 to
Remain
CS A/6 to c568
Battle Gp B
CS B/1 to C256
CS B/2 to C563
CS B/3 to C464
CS B/4
Remains
CS B/5
Remains
I hope this is not too confusing and that one is able to mark the second move on the map. As one can see the German commander has continued to advance on the JAM TART feature with Battle Gp. A while Battle Gp. B is pushing past PLUM PIE down the railway and are gathered to the west of BUTTERED CRUMPET. The British have held No. 2 Battle group in position while swinging the armour of No.1 Battle Group over to the East to support No.2 Battle Group.
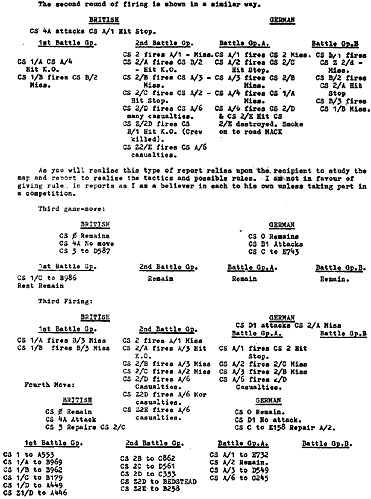
Fourth Round of Firing:
BRITISH
CS 4A Attacks A/1 Hit K.O.
1st Battle Gp.
CS VA fires ZA/6 Miss.
CS I/D fires CS B/5 some
casualties
2nd Battle Gp.
CS L fires CS A/2 Hit
K.O.
CS 2/A fires CS A/3 Hit
K.O.
GERMAN
Battle Gp.A.
CS A/1 fires 2/C Miss.
CS A/2 fires 2/B Miss.
CS A/3 fires 2/B Miss.
Battle Gp.B
CS B/4 fires 1/D Miss.
At this point the German commander conceded defeat.
This was a very quick game that lends itself to this chess-type reporting but I don't know if a more lengthy game of some twelve moves or so would not become rather boring without a little bit of explanatory reporting with some realism thrown in. The battle about PLUM PIE was very exciting and would lend itself to a realistic report. For example the German infantry commander took his fire group through the house while pushing his anti-tank weapon to the right and his flame throwers to the left. The party to the East of the house were met by a blast of fire from the 25 pdr (CS 2/E) but for some reason they all had saving throws. The Germans replied with flame and fried the gun. The British infantry escaping from some very nasty grenades thrown from the house gave the Germans some very heavy casualties. They were greatly helped by the medium machine-gun from CS Z2/E who polished off the anti-tank gunners fairly rapidly. The British throws throughout the game were fantastic and fives and sixes came very fast on one another.
Well there it is for what it is worth. This method does give a chess report appearance although a long game would take pages to write. I enjoy the battle reports in the Newsletter very much and study the moves made, carefully drawing in the new position of units so that I can understand the tactics involved. A long and involved report pleases me rather than a short one full of gallant deeds by favourite units. I find other peoples rules rather boring as I don't usually agree with them anyway so always miss those parts out. However, I expect those wiser than myself in wargaming, and there must be dozens of those, will probably find this idea just as boring.
Back to Table of Contents -- Wargamer's Newsletter # 101
To Wargamer's Newsletter List of Issues
To MagWeb Master Magazine List
© Copyright 1970 by Donald Featherstone.
This article appears in MagWeb.com (Magazine Web) on the Internet World Wide Web.
Other articles from military history and related magazines are available at http://www.magweb.com