 Product Review: Wonder Cutter
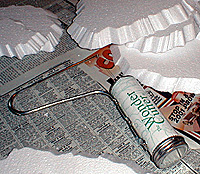
I found the "Wonder Cutter" selling for $7.00 in the garden and flower section of my local craft store. It's a simple device designed for cutting foam. The entire apparatus consists of a cardboard tube for holding two D cell batteries, a metal arm, and two pieces of thin wire (nichrome?). The arm is used to hold the wire taut. When the switch is turned on resistance in the wire causes it to heat up.
Based on its modest price and flimsy looking construction I didn't expect much from the "Wonder Cutter," but it performed like a champion. I found that it cuts cleanly and easily through Styrofoam. The wire cools and heats quickly.
When in operation a very small amount of smoke was generated, but not enough to be a problem. Occasionally a small wisp of foam would stick to the wire, but I found that it could be easily cleared by blowing on it. The main drawback is the length of the wire, about 4", which limits the thickness of foam that can be easily cut. The "Wonder Cutter" is a very useful tool for the hobbyist.
Making Mountains
Terrain Building - sculpted plateau hills out of foam
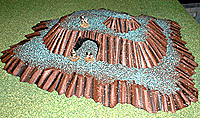
My goal was to make a set of hills in a variety of sizes and shapes so they could be mixed, matched, and stacked to form whatever shape was needed for a game. I planned to make them with flat tops to make it easier to put figures on them. I decided to make two sets of hills - green and sandy.
At the hardware store I found some insulating foam - 6 pieces ¾" X 48" X 24" for $15. The store also had blue and pink insulation that cost less but had to be purchased in very large quantities, and wasn't as thick.
I used a "Wonder Cutter" to cut the foam into different sized pieces. You want to cut a wide variety of sizes and shapes. Start by cutting out the larger ones and use the scraps for the small hills. I cut the sides at about 45 degrees with lots of ins and outs to enhance their appearance. After cutting, I painted the pieces with a watered down Elmer's glue solution (about 50/50 glue and water) to stiffen the foam.
At the hardware store I bought the cheapest little containers of latex paint I could find in the right colors. These turned out to be Rustoleum Almond and Leather Brown. I also purchased American Accents textured paint in Green and Brown Stone. The green hills were painted top and sides with the Leather Brown. It takes quite a long time for the paint to dry completely. The tops then got a spraying of Green Stone.
 The Green Stone is not entirely satisfactory because it has a blue tint and too much white for my tastes, but I think it's quicker, easier, and cleaner than using flocking. The sandy hills were painted top and sides with Almond, and then sprayed on top with Brown Stone. These look very nice. I finished the hills by painting the sides - a darker color for the "ins" and a lighter color for the parts that stick out.
This was done with Folk Art Acrylic paints - Ivory White and Honeycomb for the sandy hills, Black and Acorn Brown for the green hills. Just for fun I also glued some of my left over pieces of foam together to make a few double thick pieces. These were used to make steep mesas and to carve out caves. Overall the project was much easier than I had expected, and much cheaper than buying finished hills. Give it a try.
Back to SJCW The Volunteer Fall 2001 Table of Contents
Back to SJCW The Volunteer List of Issues
Back to Master Magazine List
© Copyright 2001 by SJCW
This article appears in MagWeb (Magazine Web) on the Internet World Wide Web.
Other military history articles and gaming articles are available at http://www.magweb.com