I receive quite a few letters and phone calls in the course of a month asking me to help decipher the WRG 7th Ancient rules. I am not an authority on these rules, though I have played and umpired my share of tournaments and correspond with the author, Phil Barker, on a regular basis. I can certainly sympathise with those gamers who get bogged down in the sheer complexities and wordiness of a rules book which is 48 pages long, but with a bit of an overview of the WRG system, and how it works, I feel that any wargamer interested in the period from 3000 B.C. to 1450 A.D. can understand and master the rules.
I will go on record as saying that the WRG 7th rules are the most accurate and playable simulation yet to appear. They have been belittled, bad-mouthed and ignored by many gamers who give up on them after nothing more than a cursory glance or hearing .. so and so says they're too hard to decipher so I can't learn them". This is nonsense. These same gamers are often the guys who have mastered and played Empire IV, a system I can't seem to get a handle on.
So, for those of you who would like a little help, I have put together the following simulation, giving a running commentary on aspects of the rules. This fictional battle pits a Sicilian Norman army against a 'mainland' Norman army around the time of the first Crusade - contrary to popular opinion, the Crusading fervor did not entice the majority of Western European warriors to pack up and leave home. Each army was made up from established army lists, Normans #102 and Sicilo- Normans, #135 (NASAMW). Settle back and enjoy.
Unlike most rules, WRG 7th does not utilize pre-set battle situations. Each game starts with a plain, green 6'x4' wargame table. The two or more players decide on which armies they are going to use (and there are over 180 of them to choose from), "buying" up to the stated number of points worth of troops, usually 1500 for competition play.
Each army list has a number of required troops which you must buy, and the rest are chosen from the options given you. After having chosen your troops, they are organized into units of warbands of similar type, morale, etc., with some variations allowed.
The units are mounted on stands (called elements in WRG) which are then divided into the units; a minimum of two stands to a maximum of twelve per unit. Once your stands are divided into units, you combine them into commands, each command under a general - how many is up to you and the number of generals bought.
An important aspect of any ancients/medieval campaign was to bring the enemy to battle on ground favorable to your own army. This is simulated in WRG by allowing each side to pick several terrain pieces, usually four each. Placement is dependent to some extent an a die roll, but with judicious forethought. a good terrain selection can dictate the direction and movement of both armies. Obviously, some armies do much better in rough terrain, i.e. Welsh, Irish, 'Celts, while others want as much clear as possible; Mongols, Huns, and knight armies.
When facing an opponent who has, or could have plenty of cavalry, I always like to fight with one flank anchored on a large body of water, hence my proclivity to use Soots, Normans, Vikings, etc., all at 'home by the sea'. One of my terrain picks for this game was therefore a major water feature which I rolled for and placed on my right (as the die roll indicated).
My opponent, Ardo the Terrible, picked four gullies for his terrain, wishing to channel my mounted attacks. He managed to place three of them, effectively isolating the center of the battlefield from the flanks.. I desired an area of brush and a section of woods, hopefully to place some light troops in, enabling them to ambush out if any of Ardo's troops walked in there. The brush I rolled successfully for, but the hill had to be discarded -- just because you pick a terrain piece doesn't mean you get it.
Once a battlefield was established, we rolled for character of generals. As stated before, each army has to be divided into a number of commands or medieval 'Battles' each under a general, who you bought with your army points (out of the 1500 allowed). The loyalty, character or veracity of a subordinate commander was never a sure thing and this is reflected in the character die roll. A roll of 3 4 or 5 and the subordinate is 'BOLD' or a good, reliable commander who will follow orders. You get to pick what your own CO's character is -- after all, it's you!). A die roll of 6 indicates a Rash general who has a 50-50 chance of over-reacting to your orders and going berserk! A roll of 2 is a Cautious general who has a fair chance of under- reacting to your orders. The worst possible subordinate appears with a roll of 1. This means an unreliable general, who might just sit back and watch the battle before joining in -- possibly on the other side!
Next is scouting, dependent on scouting points derived from the number of Light Cavalry (3 pts), Cavalry (1), and Light Infantry (1/2) you have. If one has 3x the other side's pts, the lower side deploys first.
Usu.ally, or by mutual choice, a battle to be fought is 'fair and open', which means that you get to play a normal head to head game. You can dice for other variables: weather, ambush, and time of day.
Battle Up
Since neither Ardo nor I had a vast number of scouting points, we deployed normally. We assigned a deployment zone on table: within 6" of your baseline is no problem, but if you set up beyond that (up to 1" from the centerline of the table), these are force marching and count for 2 extra fatigue points.
If you have woods on table, you can set up troops inside in AMBUSH--I elected to do so with LMI (2 fatigue pts).
Combat results are recorded as a loss of fatigue points. After 15 pts, a unit's exhausted and removed from the table.
Ardo, having nowhere to put any ambushers, didn't have to bother with this. At this point in the game, you may also elect whether or not to attempt an out-flanking maneuver. This is done off table and you can use a single unit or an entire command or 'battle' to try this with. These troops are not placed upon the table initially (like ambushers). Each turn, you roll for their attempted arrival with a d8. A roll of 5or 8, they show up, anything else, no luck: they got lost, found other employ, ate. Although you can keep trying to get them until the end of the game, after turn five, they become fatigued from their ordeal of trying to find the battlefield. Neither Ardo nor I attempted this.
Okay, we'd figured out our deployments, rolled for our generals (all BOLD) and now we rolled to see who placed the first unit. I had high die, so I placed my CiC as per my ordered deployment. In turn, each of us placed units until all except ambushers and those hidden behind others or woods, hills, etc. were deployed on the table. This was what our respective generals, scouts and forward observers could see. From this information, we had to write our orders.
Orders are simple and straight forward. Each order, ATTACK, PROBE, HOLD, WAIT and DELAY has its advantages and disadvantages. First time players do well to just go to ATTACK and not try to outfinesse their opponent as other types of orders restrict certain actions a unit can perform. Once you've played a few games, you can become more adept at utilizing other types of orders. Ardo seemed to always use ATTACK orders ... hmmm...
I gave my CiC orders to WAIT until he signalled them to ATTACK (this is the only conditional order allowed in WRG 7th), while my 21C had ATTACK orders.
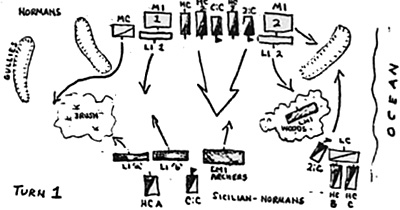 My plan was simple. Hold in the center and left, while
swinging my right into Ardo's weak flank units (see map
1). Hopefully. Ardo would overreact to my flankers and
leave his center or right open to exploitation. We would
soon see! I planned to screen my center with LI,
hopefully pinning Ardo's center before he got into
position to smash my own weaker middle units. I needed
time to get my flankers into position and my LI would
have to buy me that time.
My plan was simple. Hold in the center and left, while
swinging my right into Ardo's weak flank units (see map
1). Hopefully. Ardo would overreact to my flankers and
leave his center or right open to exploitation. We would
soon see! I planned to screen my center with LI,
hopefully pinning Ardo's center before he got into
position to smash my own weaker middle units. I needed
time to get my flankers into position and my LI would
have to buy me that time.
I realized Ardo's main thrust would be right down the pike, thus my LMI in ambush... they'd slow his a bit, but not before he'd committed himself past the center line of the table. I needed his units congested and hard- pressed to handle my flankers once they'd ridden past his left.
Once our orders were written, we placed the rest of our troops on the table (except those in AMBUSH), Ardo surprised at my four units behind the woods and me surprised at all of his foot on his flanks! He was committing all of his HC to the center. If he got to my HC before my flank attack developed ... it might be a short afternoon.
We began the game. The first segment in a turn involves rolling for off-board troop arrivals (those You flank marched) and changing orders. Since it was the first turn, this part was skipped.
After that comes the 'Approach Phase' which allows you to make Tactical (normal) moves with any units within 12" of visible enemy. Neither of us were this close, so we skipped this phase as well. Next comes 'March Moves' or strategic movement. Units outside of 6" from enemy units may elect to March. Each type of unit has a specific number of March Segments of 8" each, from LC with five segments allowed to HI with just two.
You start by allowing any units with five Segments (LC) to move 8". Then you go to those with four Segments (HC and LI), moving the LC again as well. You continue this process until every unit has had a chance to March. LC conceivably may move 30" in all (it's rare), while HI night move a maximum of 12" during a single turns March Move. They must halt upon coming to 6" from a visible enemy and are then considered pinned and ineligible for any further Marches that turn or until again over 6" away from nearest enemy.
This allowance gets units into action immediately on the first turn, usually, without a lot of wasted time. If during a March Segment you come to exactly 8" of a visible enemy (not in woods, ambush, etc.), you must halt, even though you may have a number of March Sagments left to you. Your unit in pinned. This simulates your coming to within long range archer fire and tactical movement range of your opponent.
Units which used March (strategic) movement are not allowed to shoot that turn. Obviously, rapid deployment left no time to set up in a position, string bows, and begin to fire. As the next phase of the turn was Preparatory Fire, we skipped this as well along with the Charge Declaration and Combat phases (no one was within charge range yet, and everyone who could shoot had march moved this turn and thus were not allowed to fire). Finally, Staff Moves were made.
If your Generals and their bodyguards (only one extra stand [element] besides their own, (i.e. sixty figures if HC) did not move during Marches, Approaches, Counters or Retirements (expalined later), they may now make a Staff Move. This is a Tactical move (4" for HC)., I chose to move my Cic forward 1" to count as advancing - an important morale- builder in ancient/medieval warfare. As long as your troops are within 8" of the General's Army Standard and can see it moving towards the enemy, they are more likely to pass their morale (Waver) tests. Always make sure to keep the Standard moving ahead.
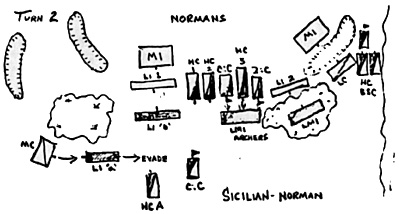
The first turn was over, moves as on Map 1. Our plans had immediately begun to take shape an the two armies moved towards each other. It was now the start of turn 2. The first order of business was for Ardo and I to roll to see who got to move first in the Approach phase (remember, we skipped this the first turn as in order to move tactically, you have to be within 12" of the enemy, and neither of us was the first turn). This any sound like a divergence from standard simultaneous movement (used during march moves), but it is clean, clear and concise. You move, then I move ... no ambiguity there.
Ardo won the roll and moved his foot units which were within 12" of me ... at least he moved those he wished to ... remember, an long an you're outside of 6" from the enemy, you can continue to use strategic March Moves, but if you wish to do a formation or facing change, you have to use tactical moves to do it, not March Moves. Ardo elected to put his LI units into Skirmish order, making then harder to hit, but also rendering them useless in *also. I elected to not use any Approaches with my foot, except to put my LI 'b' unit into Skirmish order, as I desired to continue Marching as many units as possible (I was not pinned by Ardo's troops yet). Ardo then moved his cavalry, putting his Norman knights into wedge. My cavalry elected not to Approach - they'd continue Marching or waiting ...
After Approaches, we came to the Counter/Retirement phase. Any unit not moved during Approaches, and still within 12" of an enemy, can try a Counter ( a defensive response to either got out of Charge reach or to face a threatened flank). A Counter is risky. It's not a given, you must roll a d8 - a 4,5 or 6 for 'C' class Irregulars, a 3,4,5 or 8 for 'B' class Irregulars or 'C' Regulars allows you to make your Counter. I rolled to Counter with LI 'a', so that they could face the advancing Norman MC retainers to their flank. They rolled a 5, so were successful, turning to face the MC.
Retirements are different than Counters in that you actually turn and move away from the enemy. This costs each general time to do, i.e. giving orders, signalling, etc. Each turn a jerwal is assumed to have 15 minutes to change orders , rally units, signal neighbors or prompt &-Charge or a Retirement. Each seperate action costs him part of his 15 inutes. He rolls a d5, adds that number to modifiers (how ar away the signalled unit is, if it's in night or not, if it's Irregular, @to.). Usually, it costs form 5 to 8 minutes to 'Prompt' an action. Neither Ardo nor I wished to waste any of our valuable Prompt points (minutes), so we passed on this.
We had arrived at the March phase again. I marched my LC to the gully lip (see map) where I had to halt as Ardo's MI had me pinned at 6" from his troops. My HC continued marching pat my LC, they'd attempt to swing around the gully and hit Ardo's rear.
At this end of the March phase, the only units not pinned were my three HC flankers, my CiC and HC 'a'. Ardo had just one MI unit which could still March.
Units which did not march can now fire their missiles (Prep Fire). Fire is simultaneous. Close range for archers is 2", long range is 6". You don't have to fire unlesss you are in skirmish order. Each time you fire, it costs a Shooting Fatigue (different from regular Fatigue). When you get a combined 5 fatigue points, the unit is "tired," adversely affecting your firing. It's a good idea to hold fire for good targets.
Ardo, in skirmish order, had to fire his LI unit 1 at my LI 'b" unit--and I fired back. It's hard to get a hit on skirmishers, so firing was a hit on skirmishers, so firing was largely ineffective. At the end of turn two, both units had 2 Shooting Fatigue Points and 1 Regular Fatigue Point. They were down to 2/5 of effective firepower.
My LI "a" fired at Ardo's Medium Cavalry, scoring two hits (fatigue points) and forcing it to either test morale (waver test) or charge. Ardo would charge. The LMI archers fired at the three HC units bearing down on them (see map).
They had to split their fire, only three figures each shooting at HC *3' and the 21C, and six at the CiC. When firing at a cavalry target, it's hard to miss and, with the random roll, a simple +1 on the die caused a whopping four hits (fatigue points) on the CiC's unit. The 9 figure HC '3' took only one hit and the CiC took two. Ardo again elected to charge instead of taking a morale (waver) test with both the CiC and his 2iC. Note that a single fatigue point on a unit in a phase not require a morale (waver) test, but two or more does. This concluded our turn two preparatory fire phase.
Now we were at the Charge Declaration Phase. When you desire to charge a unit, the unit must be in range and an eligible target: LI and LC cannot rrontally declare a charge on closer order troops unless from behind a flank or if the enemy is disordered, railed waver (morale), or broken. Since Ardo's charges were-all self-prompted as a result of morale (remember he decided to charge instead of having his cavalry take a waver test), he did not have to write them down, the usual procedure, as I already knew about them. He only had to decide whether they would be impetuous or not.
An impetuous charge is an all-out wild attack which can't be halted even after the enemy has broken. It hits with a big +2 above and beyond the normal +1 attack bonus cavalry receive. Regular infantry can never be impetuous, but Irregulars and Regular cavalry with accompanying generals can. Ardo elected to be impetuous. Oh, yes, impetuous units tire faster than others, taking an additional fatigue point for each impetuous attack.
I had no charges and Ardo had four. His MC charged my LI 'a'. I elected to evade (run away). Since the MC was 4" away, I easily outran his charge (this was not a given, however an cavalry get to roll a dG if Irregulars, d5 if Regular, with a 5 or 8 getting you a +2" on your charge, while my LI rolled as well, with a 1 reducing my move by 1"). As I had been charged by cavalry in the open, I had to take a waver test and passed with a roll of 5.
Ardo's three HC units which had taken fire from my LMI archers all elected tO impetuously charge then (he had written one charge after all, sneaky!). Ardo rolled for his charge length and all rolled normally. With that, he moved his cavalry into contact with my poor archers who could do nothing but hold and take it (foot cannot countercharge cavalry, nor can LMI evade, unless in skirmish order, which they were not). I could, however, shoot at him as the Norman horse moved into contact.
Unfortunately, my archers first had to take a waver test for being charged in the open by mounted. I rolled's four, so they passed - being of average morale, Irr. C, they had to got a 3 or better on a d6. I now fired the LMI archers, again splitting my fire among the three eligible targets. This time, however, my archers had to count a -2, for firing at troops who ended in contact.
My archers managed to inflict only one hit on the 9-man HC unit. but got two on both the CiC's and 2iC's troops.
This meant that Ardo had to take a -1, -2 and -2 on his three units tactical factors respectively, reflecting the fact that the deadly archer fire had emptied many a saddle and slowed the attack. Even so, Ardo hit the archers with three wedges of Norman HC, a total of 15 figures fighting only 9 of mine, with factors of five, four and four against my factor of only two.
 To add insult to injury, Ardo rolled his random
(simulating the chance factor) and got evens for his 9-man unit and 2iC, but rolling +2 for his CiC!
To add insult to injury, Ardo rolled his random
(simulating the chance factor) and got evens for his 9-man unit and 2iC, but rolling +2 for his CiC!
Being Irregular A fanatics, they received another +2 from this - a benefit of rolling a plus in melee with these unpredictable troops. Ardo had five figures at a tactical factor of 8, five at a five and five at a four, giving his a total (from the casualty chart) of 72 hits. My archers rolled a -1! I inflicted only 12 hits total, split among all three units a big nothing as far a casualties per figure went. I didn't hurt the cavalry.
Ardo had inflicted twice an many as he received and had caused me three casualties per figure (CPF) causing my archers to immediately break and rout.
Seeing the archers rout to their immediate right did not go down well with the LI archers 'b'. Being within 3", they had to take an immediate waver test which they promptly failed, causing then to waver in the face of the advancing enemy. My CiC also was in the vicinity of the rout ... he took a test as well, failing with a grand throw of "1," and that did it for me. One quick, sharp attack and my army began to fall apart. We normally would have continued playing (and actually did) with my 2iC still able to cut behind the main enemy force, but for demo purposes, this is long enough!
I hope this short piece will give some of you the impetous to try WRG 7th. If you have any questions, comments or suggestions, please write. Until next time...
Back to Saga v4n5 Table of Contents
Back to Saga List of Issues
Back to MagWeb Master Magazine List
© Copyright 1990 by Terry Gore
This article appears in MagWeb.com (Magazine Web) on the Internet World Wide Web. Other military history articles and gaming articles are available at http://www.magweb.com