 This article is about running a playtest for a new set of Rules. There are currently being written to adapt
Medieval Warfare (MW) written by Terry Gore to be used in a Siege Scenario. I found it very different from playing a regular game or even doing a demo game. The playtest opens your work to criticism of other players.
This article is about running a playtest for a new set of Rules. There are currently being written to adapt
Medieval Warfare (MW) written by Terry Gore to be used in a Siege Scenario. I found it very different from playing a regular game or even doing a demo game. The playtest opens your work to criticism of other players.
Intro to the rules
The Siege Warfare rules describe how to "build" and use fortresses or a castle for a Siege Scenario. They include how units move and fight in a fortress, use of siege equipment and siege operations. These rules cover the actual assaults on fortresses. In real life, sieges took many months even several years, and during that period one or more assaults might be made on the fortress. The long siege operation is ignored, and the months of building and preparation for the assault are presumed already finished.
The defender has twice as many points to spend but 3/4 must be used on the castle itself. This allows the attackers to out number the defenders by 2 to 1 in points for troops.
The Scenario
First we had to decide on a scenario. We had the Anglo-Irish defending a castle guarding an important river crossing of a critical road.
The Vikings want to take the castle for the plunder. What else do Vikings do? But to test the rules we added some organ guns and catapults to the scenario. Where they both got organ guns is anybody's guess (hey its a playtest!)
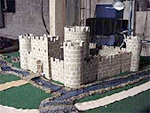
The Castle was make from poster board. The rules call for the besieged to design a castle and to determine terrain placement. Generals are rolled for using the normal MW Rules.
These pictures are from the first playtest of the Siege Warfare Rules. The playtesters enjoyed the game so much that we stopped the game after about 4 hours of playing, arguing about the rules and rewriting the rules on the fly. We decided to continue on a different day.
The Game
The enemy arrived in mass. Figuring exactly where the siege equipment starts was a big question. Too far away and it takes forever to get to the walls. Too close and the defenders do not have enough time to deal with it.
We started this game with the Siege Equipment far from the castle. Since Siege Towers and Battering Rams move as artillery the first few turns were very boring. Starting closer possibly at engagement range might speed things up.
The Anglo-Irish stood ready. There were archers in each tower firing three deep (close order) but how many should be allowed on the walls? We went back and forth on this for a while and decided on only 2 deep on the walls (close or loose).
The hard part was trying to maneuver the stands on the walls and within the castle itself. Keeping formations within the castle was difficult at best. Allowing the units to more in a much looser “group” within the walls and keeping regular formations outside the walls seemed to address the problem.
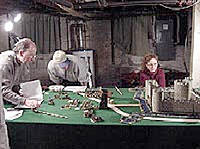 Pictured are the Playtesters looking over the battlefield. They include Karen Jarosz, John Steinhilber and Jim Payne. Not pictured is Mike Burke. All are experienced MW players.
Siege towers and bowmen
Moving the siege tower was much slower then I thought originally and the bowmen reigned supreme! The Irish artillery also took a bite out of the Viking formations. The artillery and Bowmen in the towers were treated as being on a hill in regular MW. This gave them some defensive help and allowed the artillery to fire over units.
The Anglo-Irish Knights sally out.
Sallying out of the smaller sally port acted as delaying terrain. This slowed down and caused the knights to become disordered. The Vikings liked this part but the Irish did not. As per regular MW rules they were given a recover order, next turn, and regained “good order”.
The Vikings were busy putting fascines into the river to make the crossing easier. Each fascine converted 1 stand width of stream to clear terrain 1 each deep. This was done using a deploy order. A two-inch stream took two turns and 2 fascines. That group also carried a log ram to assault the wall. This allowed the Siege Tower to get close enough to drop its ramp.
“Bring it on....” Karen’s words not mine.
Still the siege engines had not contacted the walls. Still looking into changing the speed of the siege engines or their placement.
The assault on the wall with the Siege Tower bogged down and the movement rules within and on the tower had to be looked at again. The normal Medieval Warfare rules worked well for the sally. Movement within the towers did prove interesting, as did the lack of room even for the order markers.
How many stands defending the wall came up several times. This will need to be looked at again later. The supply and command rules made sense if the castle is unbreeched. This will be tested once the walls are taken.
The attack across the ramp of the siege tower raised a few questions. The discussion on this was very interesting. What modifiers from the regular MW close combat table would be used was brought up. Bonuses for depth, being wider and even the charge bonus were analyzed and “discussed” (quite loudly) back and forth.
The sally got bogged down once the Vikings realized it was a stream not a river in front of them. Crossing the stream in mass caused the battle to heat up beneath the front right tower. The Irish moved archers from a non-threatened tower into the battle. Again, the movement issues inside the towers came up. Movement within the castle and even the towers need to be more abstract. Formations and facings were becoming more difficult to maintain.
The Viking’s Huscarls destroyed one unit of knights and attacked a second gaining the upper hand. Outside the Castle all battles used the regular MW rules and worked out quite well.
The Vikings were unable to take the walls. Both sides agreed that neither side had a runaway victory. The Vikings that attacked with the lightly armored Bondi could not take the wall. It was a very close battle.
The Viking commander opted at this point to withdraw the Bondi and send in the heavier armored axe wielding close order Huscarls. This did the trick and the wall was taken.
Finally the Battering Ram did its job and a tower fell killing the unit on the roof. This forced units on the walls of either side and in the courtyard to take morale checks. The units in the gatehouse did not have to. With a collapsed tower, Hurcarls on the wall and with all the Anglo-Irish Knights lost in the sally, the defenders sued for peace. Game Over
Conclusion
I started out to design a supplement that could be used with the existing MW rule set and not change the game into a skirmish rule set. This presented some interesting situations and “discussions”. Most notable the movement within the castle and towers and placement/speed of the siege equipment.
Supply and Command did not seem to be an Anglo-Irish issue. That is until the walls were breached. Turning each tower into a separate fort with the supply based in the central keep allowed the guns in the gatehouse to fire only until they went out with no chance to re-supply.
To sum it all up it was a great game and a good learning experience for me. It allowed a number of players to try and see the rules through my eyes and for me to see it though theirs. Some rewriting is in order. But that’s the purpose of a playtest!
To see the additional pictures of this playtest you can go to http://www.saga-publishing.com and click on After Action Reports.
Back to Saga # 91 Table of Contents
Back to Saga List of Issues
Back to MagWeb Master Magazine List
© Copyright 2003 by Terry Gore
This article appears in MagWeb.com (Magazine Web) on the Internet World Wide Web.
Other articles from military history and related magazines are available at http://www.magweb.com