Many Medieval battles took place on terrain that strongly favored one side over the other. The Scots victories at Stirling Bridge and Bannockburn were won on fields where the English were fools to ever fight at all, while the Byzantines suffered more than one disaster while traversing mountain passes without securing the hills on either side. But they won at Balathista in 1014 after trapping the Bulgars in a valley. Others were won by the proper use of existing terrain like when Henry I used concealed units of cavalry to hit the Normans after they were engaged at Tinchenbrai in 1106.
Battles such as these can be duplicated using the Medieval Warfare, Rules for Wargaming Tactical Level Combat, by Terry L. Gore (www.SAGA-publishing.com). Please refer to these rules for any specifics mentioned in this article.
First we will discuss the types of terrain and their effects within the rules of Medieval Warfare. All measurement presented assume the use of 25 mm figures.
Types of Terrain
Clear Terrain Terrain void of any other type.
Light Delaying Terrain Scrub, marshland, sand dunes, brush, rocky ground, steep hills.
Dense Terrain Woods/Forest (good place for ambushers), swamps, bogs, steep hills covered with Light Terrain.
Obstacles Streams, walls, fences, hedges, gullies, ravines, caltrops, stakes, and potholes. They count the same as Light Terrain for movement delay and disorder.
Non-Delaying Terrain Light woods, orchards, palm groves and low hills.
Low Hills Offer no movement penalty but troops defending the tops are in superior position for combat and morale purposes; artillery placed on it may fire over one unit of friendly troops.
Streams These represent minor water features 2" wide. They are treated as obstacles.
Rivers These are wider and more difficult to cross than streams. They are 3" wide. They may only be crossed at bridges or fords.
Water Features These represent ponds, lakes, major rivers, or seas. Ponds are a maximum of 12" in diameter. A lake, sea or major river runs the entire length of one of the table's two flank edges (select randomly) and can be up to 12" wide. Only one per player may be placed.
Terrain Effects
Light terrain: Skirmish Infantry is not slowed when moving through Light Terrain. All others deduct one die roll from their movement allowance. Close Order Infantry, Elephants, Artillery, and War Wagons are disordered when entering light terrain.
Any mounted troops are disordered when entering light terrain. The only exceptions, Skirmishers, Camels in Sand Dunes, Elephants in scrub or crossing hedges/streams. Troops in light terrain may still Charge or Countercharge.
Dense Terrain: Skirmish Infantry deduct 1" + one half of a die roll, Other infantry deduct 2" + a die roll, Cavalry and Elephants move 1 1/2", Artillery and war Wagons are not allowed. Units deduct the dense terrain penalty from their move distance once any stand in a unit touches the terrain. They may not have enough move distance left to actually enter the terrain.
Close Order Infantry is disordered in dense terrain. However, infantry in dense terrain may still Charge or Countercharge. Cavalry and Elephants move very slowly through dense terrain. They are disordered and cannot Charge or Countercharge. Artillery and War Wagons cannot enter dense terrain.
Obstacles and terrain effect all types of movement distances including Advances, Charges, Pursuits, Retreats, Routs and so on. As long as any part of any stand in a unit is within the delaying terrain, the entire unit is effected.
Delaying Terrain Any terrain that causes a particular troop type to be slowed down. Chargers crossing any obstacles or in delaying terrain, do not receive the charge die roll bonus.
Terrain Generation for Competition Games
Use the Terrain Tables (see MW Rules) to determine what terrain is present on the table. There is initially a 20 percent chance that a specified piece of terrain will be discarded (not used during the battle). A 30 percent chance that you will place the terrain on the enemy’s half of the table and a 50 percent chance of placing it on you half. The exact placement is a combination of actual die roll and modifier based on the your Commander-in-Chief’s (CinC’s) ability.
The players announce how many rolls they intend to make and alternate making rolls. Randomly determine which player rolls first. Roll one d10 for each piece of terrain, adding +1 or deducting -1 to each roll if your CinC is Brave or Charismatic. Each player may roll for up to 5 pieces of terrain.
Scouting
Before selecting terrain, each player figures out his number of Scouting Points based on troop type and quantity (See MW Rules for details). Both sides add up their total of Scouting points and compare them. If having at least 10 scouting points more than the enemy, the higher total may do one of several things including placing one of your terrain picks anywhere you wish on your own side of the table without having to roll for placement. If having at least 20 more and twice as many scouting points as your opponent you may do two items. These items also include extra set-on allowance, favorable Flank March Arrival and Ambush Attrition die roll modifiers.
This simulates having your forces scouting the land and picking a favorable position from which to give battle. Finally, the scouting army will strive to find a battlefield with 'good ground'. The more intelligent leaders would find some point of reference on the field of battle from which to form their battle lines. Even if only a single low hill!
Example of “How to” use Terrain

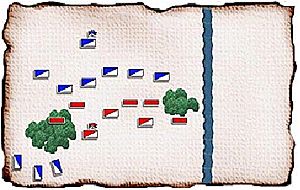
Setting a Trap Terrain can be a blessing or a bane for a commander. In tournament play one gets a chance to place terrain (if the dice and general skill are with you) unlike historical scenarios where the terrain is set. In one tournament game my opponent decided to place no terrain! I populated the enemy center with 2 forests and 2 wall sections that stretched between them. My fifth roll resulted in a discarded lake. A very defendable position which he capitalized on and placed the bulk of his forces there along with some loose order infantry in the woods to help secure his flanks.
Grinning, my opponent smiled at me and said “Come and get me”. So I just sat there until my skirmish cavalry made it around one of the forests and were poised to attack his units in the rear. Seeing the trap I set he advanced out of the cover of the wall to attack me frontally but it was over as the skirmishers did their job and disordered his troops allowing the others to mop them up.
Examples of “How not to” use Terrain
Hemming Yourself In In a friendly game between the Mongols and a mixed force of Hungarians and Poles we rolled for a "River" on our right flank. Basically, this removed one third from the field of battle. Our other rolls were for forests aimed for his half of the table. The plan was to cut down on the Mongol maneuvering advantage. But lady luck was not with us, as they needed to be placed on our half. The Mongolian player rolled for and placed all "Clears" in the center.
Advancing our foot slowly to “box in” the Mongols we commented on the massive number of Mongol stands. Counting the stands; however, we found out that a large number were missing. We realized a little to late that he was Flank Marching a large force on our left flank. (Should have paid closer attention to the number of enemy units.) The “Forests” in our rear and flank, via the bad die rolls, made it difficult to deal with the threat of the Flank March. We were hemmed in like the Turks by the terrain at Antioch in 1098. The game was pretty much over at that point.
Loose Order Foot Can Out Run Skirmish Cavalry. No Really! At the last tournament, Cold Wars 2002, I had the chance to try my Late Medieval Poles against the Swiss. He rolled first and placed a “Hill” in his center rear so his artillery could take advantage of it. Next I rolled and placed a “Heavy Woods” in front of the hill eliminating the artillery threat, or so I thought. The Swiss rolled for another hill and placed it next to that one. I tried again to place “Heavy Woods” in front of it but the die dictated that I place it on my left (I placed it as close to the centerline as possible) hence still providing cover from the ridge forming on his baseline. He ended his terrain placement with a “Heavy Forest” placed off to the left of the first hill.
Effectively this gave the Swiss a ridge where he placed his artillery to cover the approaches funneled by the “Heavy Woods”. Additionally he placed Pike and Crossbowmen to block those approaches. Supported by the artillery on the ridge he had a very secure position.
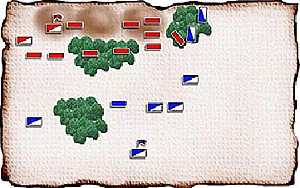
Looking at the movement chart and noticing that my Lithuanians, Skirmish Cavalry (SC), doubled armed with Bow and Spear, could move through the woods slowly but disordered. This might do the job of hitting one of his Pike blocks in the flank and disordering them allowing my wedge of Polish Knights in Full Plate Armor (FPC) to charge in and do some damage. Hidden ambushers, however, put a stop to those plans; the disordered SC retreated and was caught by the loose order ambushers. So I tried it with a second SC unit and it happened again! All I could do was play into the “funnels” he created… Game Over.
After Thoughts
When looking over the army lists as to what army you want to put together give some thought as to the type of terrain it is best suited for. Huns and Mongols favor open terrain, as do the later Poles. Saxons and Swiss with their close order foot are no use in rough terrain unless supported by loose order foot. While the early Irish, with theirs hordes of loose order warbands, and the Slavs are true rough terrain armies. In all, the use of terrain adds another dimension to the wargaming experience.Further Reading:
Medieval Warfare, Rules For Wargaming Tactical Level Combat, by Terry L. Gore
Neglected Heroes, Leadership and War in the Early Medieval Period, by Terry L. Gore, Praeger Publishers, 1995 Warfare Lore Section of the SAGA Publishing Website (http://www.saga-publishing.com/) articles on Tactics, Fanatics and Ambushes.
Back to Saga # 86 Table of Contents
Back to Saga List of Issues
Back to MagWeb Master Magazine List
© Copyright 2002 by Terry Gore
This article appears in MagWeb (Magazine Web) on the Internet World Wide Web. Other military history articles and gaming articles are available at http://www.magweb.com