When two units end up in contact with each other, their respective stands must be aligned in order for the close combat to be adjudicated. Normally, the player who moved first that turn has the option of how to align stands in dubious circumstances, but sometimes, even these need clarification. The following will illustrate how to do this.
 Contact to the Front
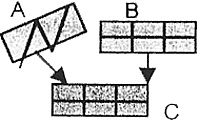
Unit A and B are in contact with Unit C. The player controlling Unit C moved first this turn, so gets to align the stands that are in questionable contact.
Unit C has to fight both units. However, Units A & B only have three stands that can be in contact with Unit C, as Unit C is only three stands wide and there are no flanks involved. Unit C could opt to have two stands of Unit B in contact and only one of the cavalry unit A.
If the player controlling Units A & B had moved first, he could elect to have two stands of cavalry Unit A and one stand of Unit B in contact as it would then be him who decided how to align the dubious stand(s).
 Contact to Flank
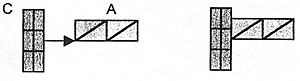
Unit A is being charged in the flank by Unit C. Unit C moved first this turn.
Even though Unit C can hit Unit A with two stands, once they are aligned to fit base to base, only one will be in contact. Unit C moved first, so could have the stands aligned as in the second figure.
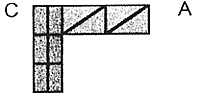 If Unit A had moved first, he would probably opt to have the stands line up as below. This would keep Unit C from having six stands count as in contact next turn as you only count one overlap per flank in subsequent rounds.
Back to Saga # 86 Table of Contents
Back to Saga List of Issues
Back to MagWeb Master Magazine List
© Copyright 2002 by Terry Gore
This article appears in MagWeb (Magazine Web) on the Internet World Wide Web. Other military history articles and gaming articles are available at http://www.magweb.com