In working on the new MW Wars and Warfare scenario booklet for SAGA Publications, I thought I'd include one of the battles here to spark some interest in fighting historical battles.
This particular scenario was gleaned from an article by Guy Halsall that appeared in the December, 1986 issue of Miniature Warfare. It is an interesting battle in that involved not only the son of Harold Godwinson, but also the grandson of Harald Hardrada and a son of one of William the Conqueror's followers as well. Thirty-two years after the battles of Stamford Bridge and Hastings, the descendents of the antagonists in these battles would meet in battle.
The Menai Straits lie between the island of Anglesey and North Wales. As the Anglo-Normans were not averse to attempting to bring Wales under their control, invasions were not unusual. In 1097, William Rufus marched into Wales, but failed to accomplish anything substantial. The year after, an Anglo-Norman army under the marcher lords, the Earl of Shrewsbury (Hugh the Proud) and the Earl of Chester (Hugh the Stout) led a fairly large 2,500 man expedition into North Wales along the coastal isle of Anglesey. The Welsh fled rather than offer battle to the mounted knights and better-armored foot of the English as they advanced.
The Norse lord, Magnus III (Barefoot), grandson of Hardrada, happened to be at the Isle of Man, using it as a base of raiding operations that year. With him sailed the son of Harold Godwinson. Magnus set sail on one of the large raiding expeditions of the year (over 1,500 men) and just happened pick the exact place that the Anglo-Norman army occupied to land! The ensuing battle was bloody and the sources are split on the outcome, but by most accounts, the Norse defeated the Anglo-Normans and killed Hugh the Proud when he charged through the surf at them (supposedly by an arrow in the eye). Guy Halsall notes that it is interesting to speculate that Harold Godwinson's son may have been the archer!
The Armies
The Anglo-Normans have two leaders, Hugh the Proud, as Commander-in-Chief and Hugh the Stout as General.
| 1 x CinC | FMC | Veteran | Lance & Shield | 3@ 54 Points |
| 1 x General | FMC | Veteran | Lance & Shield | 3@ 39 Points |
| 4 x Knights | HC | Veteran | Lance & Shield | 3@ 48 Points |
| 12 x English Foot | LAI | Warriors | Spear & Shield | 4@ 60 Points |
| 4 x Mercenaries | HI | Warriors | Spear & Shield | 4@ 24 Points |
| 8 x Welsh Archers | UI | Warriors | Bows | 3@ 16 Points |
| 4 x Welsh Foot | UI | Warriors | Long Spear/Sh | 3@ 12 Points |
| 4 x Welsh Cavalry | SC | Warriors | Javelins/Sh | 2@ 16 Points |
| 1 x Priest, 1 x Supply Unit @ 40 Points | ||||
| Totals: 309 Points | ||||
The Norse will also have two commanders, Magnus as CinC and Godwinson as General.
| 1 x CinC | HI | Veteran | Axe & Shield | 3@ 47 Points |
| 1 x General | HI | Veteran | Axe & Shield | 3@ 32 Points |
| 6 x Huscarls | HI | Veteran | Axe & Shield | 3@ 36 Points |
| 4 x Vikings | HI | Warriors | Various/Sh | 3@ 20 Points |
| 8 x Vikings | LAI | Wb(F) | Various/Sh | 3@ 32 Points |
| 8 x Viking Archers | LAI | Warriors | Var/Bow/Sh | 3@ 40 Points |
| 4 x Bondir | UI | Warriors | Var/Sh | 3@ 12 Points |
| 1 x Priest, 1 x Supply Unit (on board ship) @ 40 Points | ||||
| 8 x Ships @ 24 Points | ||||
| Totals: 283 Points | ||||
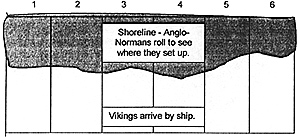 The Map
The battle is fought along the shoreline. As such, there are no terrain features per se. The table is divided into six areas as noted below. At the beginning of the battle, the Anglo-Norman is randomly scattered along the shoreline. The Anglo-Norman CinC starts in either area 3 or 4, along with up to two units of HC and the SC unit. All other Anglo-Norman units (and the General, Hugh the Stout) must roll a d6 to see in which area they are situated.
The Norse are likewise going to arrive at various points as they sail into land. Each ship (use cardboard cutouts to represent these) may normally carry up to four stands of figures. In this battle, there was a very large flag-ship, carrying Magnus. This one ship may carry up to six stands of figures.
Three Viking long ships, one carrying the Magnus, may enter either into area 3 or area 4 on the first turn. . Magnus must land in area 3 or 4. All other ships arrive in succeeding turns. On turn two, three more ships arrive, the same for turn three and the last two arrive on turn four. Roll a d6 to see which area they enter into. Each other arriving ship is limited in where it may beach, only in an adjacent area to the one in which it entered.
Special Rules:
Any Norse unit may disembark and form up in shieldwall adjacent to their ship without being disordered if they make no further movement that turn.
Any Norse archers firing from their ships count as being shielded and in cover.
If attacked while still on board their beached ships, the Norse will count as defending an obstacle.
The Anglo-Norman lance-armed cavalry must charge any Viking unit that is on land within the normal movement range of the cavalry unless they are restrained by two Recover orders.
If the Vikings remain aboard their ships, the Anglo-Norman foot may attempt to cut holes in the ships as per the MW rules, destroying war wagons.
Victory
The player that forces his opponent to lose 1/3 of his units forces the enemy to leave the field of battle and is the winner. If either CinC is killed, the resulting morale tests will probably cause this to occur.
Back to Saga # 85 Table of Contents
Back to Saga List of Issues
Back to MagWeb Master Magazine List
© Copyright 2002 by Terry Gore
This article appears in MagWeb (Magazine Web) on the Internet World Wide Web. Other military history articles and gaming articles are available at http://www.magweb.com