This article has been prompted due to some confusion about the different types of artillery found in Medieval Warfare. There are two types of artillery in Medieval Warfare. The first are the mechanical types such as mangonels and trebuchets as well as bolt and stone throwers. These are also found in Ancient Warfare.
The second are gunpowder weapons, such as bombards and organ guns, used on in Medieval Warfare by later armies from the Armies of the Age of Chivalry and the Later Middle Ages army list booklet. Both types are powerful weapons and each has advantages and disadvantages. The following will explain these differences and give you some ideas on how to effectively use artillery in battle.
Mechanical artillery and gunpowder artillery both have quite long ranges in respect to other missile weapons. For large stands (25mm figures), they can fire up to 45". They can easily out-range any other missile weapons, allowing your artillery to inflict casualties on enemy units with virtual impunity. As long as your artillery remain out of enemy missile and charge range, they are safe from harm. How do you effectively use artillery and protect them at the same time?
With their long ranges, you will want to get the artillery units into action as soon as possible to maximize enemy casualties.
Since all artillery units are considered to be in close order, they cannot move through light terrain very easily. If they can move through it at all, i.e. if you can manage to roll a 1, 2 or 3 for their terrain delay in inches, (otherwise they are pretty much stuck), it will be in a disordered state. In fact, they are so slow to move at all (only 3" Tactical Movement, 4" Strategic Movement). During setup, be sure to have your artillery in the exact area they will be firing from. If this is not possible, get them up on low hills as soon as possible. A wise use of your terrain is to have low hills within 12" of your army baseline, that way your artillery can either start the battle already in position to fire or quickly move into position within 1 turn.
Why have your artillery on hills?
Because in the open flat, they are masked by any of your own units in front of them.
If you have a friendly unit in front of an artillery unit that is in the open flat, you cannot fire through the friendly unit to hit an enemy unit in the open flat (although if the enemy unit was uphill, you could shoot over your friendly unit to hit the enemy unit).
If you have your artillery on a hill, it can fire over any intervening friendly units to hit an enemy unit. This is the advantage of having the artillery uphill.
This does not mean you get to pick any enemy target you like and shoot at it! You are still required to fire at the nearest enemy unit unless you give your artillery Double Defend Orders (if using this optional rule).
Artillery count as a close order unit.
This means that each artillery stand takes four hits (casualties) before it is removed. We normally have the number of crew figures determine whether the artillery unit is able to fire or not. If the entire crew is killed, the artillery may no longer fire for the remainder of the game. Artillery stands are therefore not removed from the game until they have taken four casualties or been beaten in a close combatt. If they have a crew of 2 or 3, the crew may be killed, but the artillery stand may still be around…and the unit does not count for army break point or losses until it is removed!
Artillery are considered to be Lightly Armored Infantry (LAI) in respect to armor classification.
Artillery also count as a shielded missile target, thanks the dispersed nature of the crew and to the protection afforded them by the artillery pieces themselves.
So how do you get rid of pesky artillery?
Keep putting hits on it, even though the crew may be all killed, until you have gotten 4 casualties on the stand. Then it is removed. Of course, you can always engage the artillery in close combat. If you push the artillery back, it is considered destroyed.
The same goes for causing the artillery to take a morale test. If the artillery is forced to Retreat, it is considered destroyed (artillery are not allowed to retreat, the crew would run away, attempting to drag their pieces with them, but they fail). This is considered to be the same as a close combat pushback for losing the artillery stand/unit.
General Artillery Fire
Both mechanical and gunpowder artillery have some basic firing factors that are the same to both.
Both types of artillery have the same ranges for close, effective and long range fire. Artillery that moves that turn may not fire that turn.
Both types of artillery ignore the armor types of their targets as well as shields (artillery would pretty much flatten anything it hits).
You may not 'automatically' resupply an artillery stand/unit at the end of the Recover Phase of the current turn if using the two supply units in the optional Supply Rule as you can other missile units.
Mechanical Artillery Fire
Mechanical artillery fires differently from gunpowder artillery in the following respects.
In the first place, they get a single d10 die for each firing stand, just like any other missile unit.
They count the Missile Fire factors for having a "Strength of four" (-1) or "Strength of two" (+1).
They get to fire each turn without penalty unless they move or are Out of Missiles.
Gunpowder Artillery Fire
Gunpowder artillery fires differently from mechanical artillery in the following respects.
Gunpowder artillery get a d10 for each crew figure remaining on the artillery stand.
Gunpowder artillery go Low on Missiles after each shot due to their very slow reloading. You can opt to fire again next turn (counting 1/2 of the crew as you are now Low) but you will then pick up another Low and then be Out of Missiles.
Example of Play - Artillery
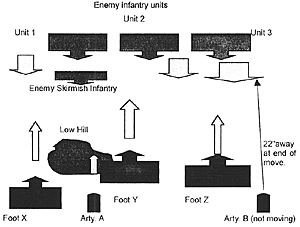 The following example will show how artillery operates. In the example, we will assume that the artillery units are each a single stand bombard with a crew of 4.
On the first turn of the game, the army with the artillery units moved artillery unit A 4" up onto the hill during Strategic Movement, it's maximum movement and left unit B where it was, planning on firing during the Fire Phase.
Artillery unit B fires from 22" away when all movement is finished. It barely has an eligible target as its own foot unit has moved ahead of it, almost but not quite masking the fire. Enemy unit 3 is the target. Artillery unit A moved this turn, so may not fire.
Artillery unit B is at Effective Range (12-30") so has a base factor of 8 to hit. We now go through the modifiers, if any. Since the artillery are bombards, they ignore the Strength of 4 modifier. They get a d10 for each of their crewmen. Artillery ignore armor and shields, so there are no modifiers to its fire (the enemy foot are not in mass or cover and are not skirmishers). It has a crew of four, so it rolls 4 d10, needing an 8 or better to hit. The die rolls are 6, 5, 3, 8 for one casualty on enemy unit 3. The bombard automatically picks up a Low on Missiles marker.
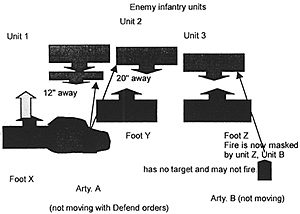 The next turn, the enemy units continue to close in while the friendly foot also march on towards them. Artillery unit A may fire this turn as it did not move. Artillery unit B finds that it is now unable to shoot as its own foot are in the way!
At this point, Artillery unit A can only fire on the enemy skirmishers. They are the closest enemy target and since the general has not bothered to place Double Defend orders on artillery unit A, it has to fire at the closest target…the skirmishers.
Artillery unit A is firing at Close Range (12") so starts with a factor of 6. The only modifiers are that the target is skirmisher infantry (+2) and that the artillery has Defend orders (-1), so the final factor is 7.
The artillery unit gets four d10 and must roll a 7 or better to hit the skirmishers. It rolls a 2, 10, 7 and 4, so gets two hits, forcing the skirmishers to lose a stand and take a morale test.
The artillery is now Out of Missiles, however! As gunpowder artillery, it automatically goes Low each time it fires. It also rolled a '10' as one of its d10 rolls, which also results in a Low on Missiles. Two Lows equals an Out.
Artillery unit A must Recover in order to fire again. Recovery will take one complete turn, so the unit will not be able to fire next turn.
Let's say that the general did give artillery unit A Double Defend orders that turn. What would have been different? It could have opted to ignore the skirmishers and fire at another eligible enemy target, in this case, unit 3. Being on the hill, the artillery could fire over the friendly unit Y to hit the enemy unit 3. It could not fire through the enemy skirmisher unit.
You cannot fire over enemy units, but you can fire over friendly units if you or the target is on higher ground and visible.
As you can see, artillery can be powerful, but they require some forethought on how and where they can do you the most good. Placement is essential to their success. When well placed, artillery can destroy portions of the enemy army while he is helpless to respond. They are expensive, but can be well worth the cost when used to effect.
Back to Saga # 85 Table of Contents
Back to Saga List of Issues
Back to MagWeb Master Magazine List
© Copyright 2002 by Terry Gore
This article appears in MagWeb (Magazine Web) on the Internet World Wide Web. Other military history articles and gaming articles are available at http://www.magweb.com