Army Composition
I reenacted the Battle of the Standard (1138 AD) using a double Scots Common army (#140) vs. a double Anglo-Norman (#134). However, it seems that the English were lesser in number, since the English king was busy repressing a baronial revolt in the south of the kingdom and was not present with his full army. Perhaps a 18-element strong Anglo Norman army vs. a 24-element strong Scots Common would be more accurate.
In any case, this is the composition of the armies I used:
- Scots Common: 16x4Pk, 2x3Kn 2x3Bw, 4x3Wb
Anglo Norman: 8x4Bd (dism. knights), 2x3Kn, 8x4Sp, 6x2Ps
Deployment Notes
The English deploy first on and around the hill, then the Scots deploy anywhere opposite them. The English C-in-C represent the Standard, and should be an element of Blades positioned in the back, perhaps 2nd or 3rd rank. King David, the Scottish C-in-C, is an element of pikes, part of the reserve behind the warbands.
The Gaming Map
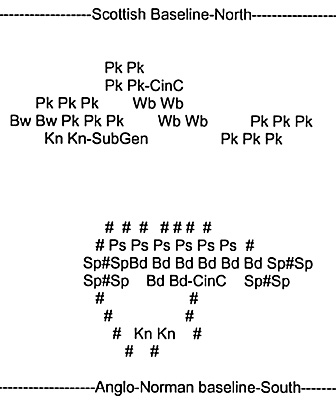
Terrain Notes
There is no bad goings anywhere. Actually the only terrain features are a road with two opposing hills on the right. The hills are both good going and offer a +1 advantage to the uphill defender. In the game map above, I have omitted the Scottish hill and the road since they didn't play any role in the historical battle. The ### on the Anglo side represents the hill, which is good going all round with a +1 advantage to the uphill defender.
Special Rules
The English CinC rolls 1D6+3 for PIPS (i.e. 3 additional PIPs per turn) or 1 PIP for every 4 elements more than the original 12. The extra PIPs were allocated since there are no sub-commands. Command radius, however, remaind the same, i.e. 12 inches. The English deploy in one command and they lose if the CinC is killed or if 8 elements are destroyed. The dismounted English knights are NOT impetuous, i.e. they do not follow up after having made their opponent recoil. It is clear to me that the English army deployed defensively and it was probably made clear to the men that none should break ranks. Indeed, the Normans did not even attempt to pursuit after they had won.
The Scots deploy in two commands: Prince Henry, the Knight SubGeneral, is in charge of the 10 elements that comprise the Scottish right wing. Their demoralization level is 3. If they demoralize, they fight with a -1 and will move towards the board edge unless PIPS are spent on them. It takes two PIPs to bring a demoralized element in contact with the enemy, 1 for all other movement. The Scottish king is the CinC in charge of the rest of the army; demoralization level is 5. For the Scots to lose the battle, both commands have to be demoralized.
The Scottish army should include the Wb option. Warbands are impetuous and will move straight ahead their full movement allowance towards the English line unless halted at the expense of 2 PIPs. The warbands' forward movement can be slowed to less than their full allowance by expenditure of 1 PIP.
The battle was otherwise conducted according to David Kujit's Big Battle DBA Rules.
Victory Conditions
For the English, normal. The Scots win if they kill 1/3 of the English elements or if the CnC/Standard is taken.
The Battle Report
In the first three bounds both armies shuffled for positions. The Scots kept moving forward with no PIPs spent on halting the Wb. On the right, the two Kn moved in between the Bw and the Pk forming one straight line. I was the Scottish commander and my plan was simple: I had to deploy according to the historical battle, but did not have to move like they did, i.e., my 2 elements of Kn were not going to charge forward with no support. Instead, I would try to outflank the shorter English line and use missile fire from the Bw and knightly pressure in order to make the English left buckle and roll them uphill. This would be the spearhead of my attack; everything else would just have to move along and support them. I was aware of the tactical inflexibility of the monolithic English formation and I knew that one little break in it would give me the day (or that's what I thought).
The Norman General (my roommate) stood and watched as I shuffled. With cool resolve and confidence in the discipline of his troops, he sent the two elements of knights to the extreme left of his formation, in order to extend his line. At this point I was approaching the hill in 4 different groups, pretty much the way I had deployed, except that my right was now in a linear formation. Unfortunately, I hadn't halted the Wb this whole time and not only that but the Pk behind them were still a base apart (see no support). The Wb crashed into the two Ps elements in the center before my right got into position. The Ps recoiled through the Bd, the Wb followed up and were now being overlapped by the other Ps on their sides.
With my Pk farther than 40mm behind them, nothing could stop the Ps from closing around them not only providing a +1 for the Bd but also prohibiting my Wb from recoiling. With a +6 vs. a +3 all four Warband elements were destroyed in a single round of combat bringing the whole command awfully close to demoralization. This was the first tactical mistake that I committed that afternoon.
On my right, the two lines were now facing each other with the two elements of Bows overlapping on the extreme left of the English formation. Not wanting to risk another uphill engagement (the previous had proven disastrous), I moved the bows forward within range and fired on the Norman knights. Amazingly, I doubled my opponent and killed an element. This is it, I thought. Not quite.
My roommate extended his line of Spears and separated my bows from my knights on a wide circling motion in order to get behind the English line. When the two lines clashed, the single English spear, outflanked, doubled my Kn General!!!! How could have I foreseen this?
Now the day was lost for the Scottish. Both commands were one element away from demoralization (the subgeneral counting as two elements lost) and the Normans had only lost a single element.
An encircling attempt by the formation of Pikes on the left was thrown back by an extended line of Sp (plus the +1 for uphill), in the center my CiC (now in single file to prevent the Ps from repeating their feat) managed to kill an element of Bd but the gap in the line was immediately filled by the Bd behind. Finally, another Pk was gone on the left while the same accursed element of Sp killed one of my Bows on the right. The battle was over with the English line having hardly moved at all. I lost 7 elements vs. 2 on my opponent's side.
Lessons Learned
Two critical mistakes cost me the day. I should have supported the Wb somehow and even after they got killed I shouldn't have separated the Bw from the Kn but used the overlap instead of going for the flank.
Attacking heavy infantry uphill is tough. Perhaps my only chance would be to force my roommate to give up his strong defensive position, but how? With his Bd not being impetuous (a rule we both agreed to) all he had to do was sit back and wait. Lots and lots of Bw or Art could be helpful but no such options for the Scots. My question is, with an army like the Scots Common why would anyone ever attack the Anglo-Normans?
Conclusion
This is one of the few medieval battles that is relatively easy to recreate, although there is no evidence about the extra strength of the English army or who was at its head. My primary source was "Warfare in England,1066-1189" by John Beeler, which offers extensive references and a couple of maps about the battle.
Gamer Feedback
Roy Beers: One of my interests is Scottish medieval warfare, and while the standard DBA lists are fine for "generic" games they need to be radically rethought for individual campaigns. Obvious example is the battle of Northallerton, or Battle of the Standard, 12th century. The English army is more or less ok as it is but the Scots army is really a hybrid of the Pre-Feudal and Scots Common armies, with far more warband than a typical late 13th/early 14th c army. So, the Northallerton campaign Scots army should be, I tentatively suggest: 4 x 4Pk, 4 x 3Wb (Highlanders and Galwegians) , 2 x 2Ps, 2 x 3Ax (Caterans/sma' folk); 1 x 3Kn (Norman Knights); 1 x 3Bd (Islesmen) or 2Ps or 2LH.
For the sake of argument say two Wb elements are Galwegian: they will not group move with any other troop type and should default advance to contact unless a pip is spent to stop them.
Battle of the Standard: Historical Account
Back to Saga #80 Table of Contents
Back to Saga List of Issues
Back to MagWeb Master Magazine List
© Copyright 2001 by Terry Gore
This article appears in MagWeb (Magazine Web) on the Internet World Wide Web. Other military history articles and gaming articles are available at http://www.magweb.com